Caping out a turkey and preparing it for display is simple to do and takes very little time. It makes a great display and there’s virtually no cost or kits to order, no plaques to make and no taxidermist bill to pay.
Once you’ve done one it takes no more than 10 minutes to cape a turkey out in the field and prepare it for transport. It takes about the same amount of time to prepare, stretch, and tack it down on a board, and borax the bird once the season is over and you pull it out of the freezer.
This “How to Cape a Turkey” write up along with the video that GSN has provided will make it easier for those who want to cape their birds.
Taxidermy is the art of preserving an animal’s body via mounting or stuffing for the purpose of display or study For many hunters, taxidermy is a way to memorialize a special hunt or bird When it comes to turkeys, proper skinning and preparation is key for a quality taxidermy mount. In this article, I’ll walk you through the full process of skinning a turkey and prepping it for the taxidermist.
Planning Ahead
The first step is planning ahead and lining up your taxidermist. Not all taxidermists work on turkeys so make sure to find one that specializes in turkey mounts. Reach out to them before your hunt to coordinate logistics for getting your harvested bird to them quickly. This is especially important if your taxidermist is located out of state.
Discuss the process for skinning and prepping the carcass. Some taxidermists prefer to receive the whole bird intact, while others will work off just the skin, feathers, and fan. Having these details sorted ahead of time ensures a smooth process after the hunt.
Field Care
Once you’ve harvested your gobbler, the goal is to preserve the bird in its original condition with minimal damage to feathers. Avoid flopping the bird around or carrying it solely by the tail. Support the weight of the bird carefully.
Before skinning, use scissors to clip off the wings to make the process easier. Hang the bird upside down by the head and neck if possible. This frees up your hands for skinning.
Place paper towels or toilet paper in the mouth and wrap the head to absorb fluids. Seal the head with a plastic bag secured with tape. This prevents blood and other fluids from contaminating the feathers.
Put the bird headfirst into a large plastic bag for transport. Keep it cold until you can get it to the taxidermist. If freezing is necessary, do so immediately. Thaw completely before skinning.
Skinning the Bird
Start by making an incision at the back of the neck, separating the feathers from the skin. Follow the natural feather pattern and part line down the side of the bird. Cut slowly and grip the skin to avoid pulling out feathers. Make incisions down to the legs on both sides.
Gently work your hands between the skin and meat to separate, trimming connective tissue with the knife. Pull the skin outward and downward, clearing the back and wing areas. Be extremely careful around the thin skin of the mid-back.
Continue separating skin around the fan region, then make final cuts at the leg joints to remove the skin in one piece with the fan attached. Avoid vertical cuts into the breast area.
Cape Prep
To prepare the skin for the taxidermist:
- Cut away excess skin and feather sections for shaping.
- Trim remaining meat or tissue from the inside of the cape.
- Remove meat from the base of the fan and clip the protruding bone.
- Lay the cape feather-side down on a board. Stretch and tack it open using small nails.
- Spread the fan and align with the cape. Tack fan in place while spread fully open.
- Generously cover all skin surfaces with borax powder.
- Store mounted on board in dry, safe area for several weeks to cure.
Caping your turkey in the field
- Handle the bird carefully once you’ve harvested him. Be careful not to damage feathers or the fan when carrying him back to camp. The better shape he’s in – the better cape you’ll have.
- For easier caping clip the wings off.
- Hang the bird by his head and neck. This can be done from limbs or even the side rail of your truck. (Note: This entire process is easier if there’s someone to hold the bird still while you cape. I’ve done numerous ones alone but not trying to cape a pinwheel helps.)
- You will notice a distinguishable parting of feathers starting at the neck and extending down the side of the bird all the way to his fan. It’s similar to a human hair / part line. The key is to follow this line when cutting the cape off the bird. This is narrow on the neck and gets progressively wider as you get closer to the wing.Make your first cut on the back of the bird’s neck where the feathers meet the hairless skin near the head and begin to follow the part line down the bird. Cut a few inches on each side to get started. Be careful to not pull feathers loose and as soon as the skin is exposed grip this instead to the outer part of the cape. This avoids pulling feathers loose that could affect the look of the finished cape. Once you get away from the head, slip your fingers tips in behind the skin and pull while you cut and follow the line. If in doubt where the line is go wider towards the clipped wing bone area. I usually make this cut all the way down to the bird’s leg and then do the same on the opposite side.
- After the side cuts are complete, grip the cape from the inside and begin to pull and trim the cape away from the bird. Often the skin will separate similar to skinning a deer but be careful to not over do it. As you approach the mid back region the skin is very thin and you have to be careful not to cut thru the skin. You’ll understand this better once you’ve done one. Don’t worry if you have a couple “cut throughs” as it will likely not show up from the outside of the cape. After clearing the mid back the cape will pull loose for a couple inches and then you’ll have to trim again.
- Once you trim the cape down to the fan area, finish the cuts on each side near the legs so that the entire cape is below the section at the fan. You’ll be able to grip the same place that you would normally just cut the fan loose and cut it free. The fan and cape should be in one piece and the caping is now complete.
- To prepare for transport simply place a paper towel or toilet paper along the area against the exposed skin and fold it over. Place it in a bag and its ready for the freezer. If traveling its good to have an oversized “carry on” bag that you can pack the cape in. I have packed as many as 6 capes in a piece of luggage. If you’re on a travel hunt and a freezer isn’t available, spread the cape and borax it until its time to pack up and travel. (A word of advice here is that if you do borax the bird, try and finish the caping process sooner rather than later once you are home. I have had birds began to cure out while still in the freezer making it difficult to prepare and stretch compared to a bird that was not boraxed.)
The field aspect is now completed and once back home simply place it in the freezer until the season is over and you have time to finish the process.
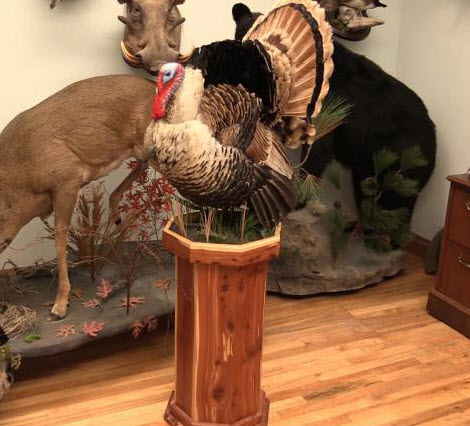
Turkey capes can be made into arrangements to maximize space
HOW TO SKIN A TURKEY | taxidermy
FAQ
How to preserve turkey skin for taxidermy?
You can preserve the turkey head and neck skin by using a few methods to prevent shriveling. First, it’s important to inject a preservation solution (like a mixture of glycerin and water or a commercial tanning solution) into the skin of the bald areas.
How do you prepare a turkey for taxidermy?
Do not gut or cut the bird in any way. You want to make sure that the feathers stay as clean as possible. Push a wadded paper towel into the mouth of the bird to prevent blood from getting on the feathers. Then wrap the head in a paper towel or a rag and secure with rubber bands.
How to skin a turkey by hand?
- Hang the turkey by both feet at chest level. …
- If you want to save the beard, remove it now. …
- Remove the fan by cutting the skin away from the tail.
- Cut off the wings at the elbow or second joint.
- Grasp the skin at the tail and begin pulling it down. …
- Cut off the neck and the skin.
How do you remove the skin from a turkey?
For a quick-cleaning method, many hunters simply choose to breast the bird out. Simply cut the beard free as mentioned above and cut the skin along the breastbone. You can then peel the skin away, exposing the breast, the major source of meat on the turkey, and cut them away from the breastbone as described above also.
What happens if I don’t get my Turkey to my taxidermist?
If you get a turkey and can’t get it to your taxidermist fast enough, you can still save the meat and the mount! This is part 1 of a 2 video series that will show how to safely skin the turkey for eating while not harming your trophy for the taxidermist! Who says you can’t have your turkey Show more
Where can I get a taxidermy mount of a Turkey?
At Birds Only Taxidermy in Dickson, Tennessee, I offer full-service taxidermy for Wild Turkeys. Contact me to order an in-season mount or to get onto our special fall season mount list. I specialize in Wild Turkey Taxidermy and instruction, with both in-person seminars and online live instruction available.
What are some easy DIY Turkey taxidermy projects?
Five cool DIY turkey taxidermy projects that are easy to make … and even easier on the wallet. Painted turkey fan. Painted turkey fan. I’m going a bit crazy — turkeys on the brain!
How do you skin a deer for taxidermy?
Skinning is the separation of the animal’s skin from the rest of the animal body’s flesh and is a step essential to taxidermy. If you are to skin a deer for taxidermy, the ideal skinning method should always start from behind the deer specimen’s front legs while it is hanging in an upside-down position. Check out this video:
Where can I buy taxidermy skins?
Arctic Raw Fur Company stocks a large supply of taxidermy quality skins. We handle thousands of skins every year and can satisfy most fur needs. You can find several pictures on our site to assist you in choosing each species.