How Long to Bake Chicken Breast with Bone for Juicy Flavorful Results
As a home cook and food blogger I’m often asked how long to bake chicken breast with the bone in for the best results. Bone-in chicken breast can be more flavorful and juicy compared to boneless, but it does require some technique to bake it properly. Under or overcooking can lead to dry tough meat or unsafe consumption.
In this comprehensive guide, I’ll share my tips and tricks for baking bone-in chicken breast so it turns out moist and delicious every time. Whether you are baking for a family dinner or meal prepping for the week, mastering this easy protein is a must. Let’s get cooking!
Factors that Influence Baking Time
When determining how long to bake bone-in chicken breast, you first need to consider several factors that impact total cooking time:
- Weight/thickness of the breast
- Oven temperature
- Bone vs boneless
- Brining or marinating
The main factors are the size and thickness of the breast itself. A thicker or heavier breast will require more time compared to a thinner, smaller cut. Plan for approximately 15-20 minutes per pound at 350°F.
Higher oven temperatures will reduce baking time but can lead to dryness. I find 350-375°F hits the sweet spot between cooking quickly and retaining moisture.
Bone-in breasts need 10-15 more minutes than boneless since the bone acts as an insulator. Marinating also speeds cooking by tenderizing the meat.
Step-By-Step Guide
Follow these simple steps for baked chicken breast perfection:
- Prep the chicken
- Pat bone-in chicken dry and coat with oil or dry rub
- Allow to sit at room temp 15-30 mins
- Preheat oven
- Preheat oven to 350°F-375°F
- Bake
- Arrange chicken on a baking sheet or pan
- Bake for 30-40 mins based on size
- Flip halfway through
- Check for doneness
- Temperature should reach 165°F
- Juices run clear
- Meat near bone is white
- Allow to rest
- Let chicken rest 5-10 mins before serving
- This helps lock in juices
Pro Tips
- Pound thicker breasts to flatten for more even cooking
- Brine chicken in saltwater solution 1-2 hrs before baking
- Add compound butter under the skin for extra moisture and flavor
Now let’s get into more detail on each step so you can master baking juicy, delicious bone-in chicken breast.
Prep the Chicken
Properly preparing the chicken before baking is one of the most important steps. You want to remove any excess moisture from the surface of the skin and coat it with oil or dry seasoning.
Pat the chicken breasts dry with paper towels. Getting rid of excess moisture helps the skin crisp up in the oven rather than steaming. Make sure to pat both sides of the breast.
Next, brush or rub the chicken with olive oil or melted butter. You can also use a dry seasoning rub. The small amount of fat separates the chicken from the pan for better browning and promotes even cooking.
Let the chicken sit at room temperature for 15-30 minutes before baking. This helps it cook more quickly and evenly since the meat will be closer to the target internal temperature when it goes in the oven.
Preheat Oven
While the chicken rests, preheat your oven to the optimal baking temperature. As I mentioned above, I recommend anywhere from 350°F to 375°F for bone-in chicken breast. This gives you wiggly room to account for differences in thickness and size.
If you are baking multiple chicken breasts, be sure not to overcrowd the pan. Leaving space between them prevents steaming.
Bake the Chicken
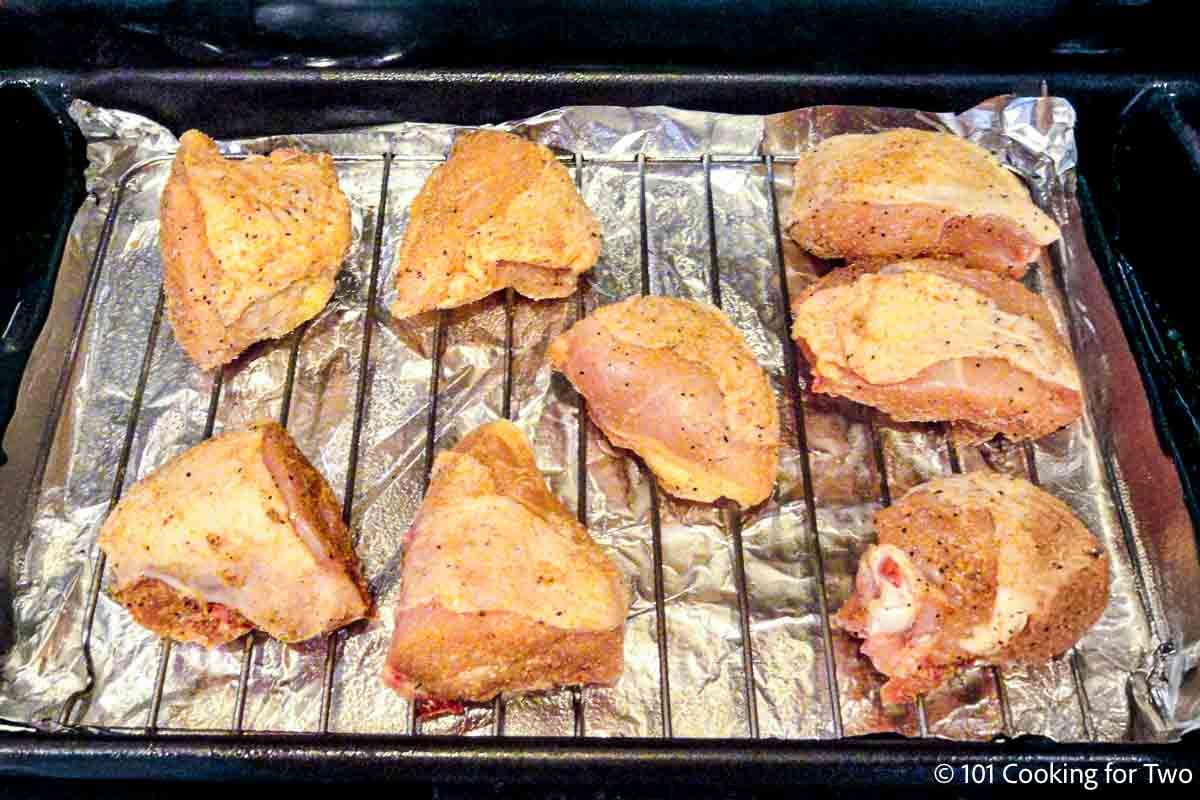
Once your oven reaches the target temp, it’s time to bake the chicken! Place the prepared bone-in breasts on a baking sheet or pan lined with parchment paper or foil for easy cleanup.
Baking time can range from 30-50 minutes depending on the factors I outlined earlier. A good rule of thumb is approximately 15-20 minutes per pound at 350°F.
Set your timer and bake for the minimum recommended time based on size. Rotate the pan and flip the chicken halfway through for even cooking.
If baking larger, thicker breasts, tenting the pan with foil after 30 minutes prevents over-browning.
Check for Doneness
This is the most critical step to avoid undercooked chicken. The best way to ensure safety and proper doneness is to use an instant-read thermometer.
Insert the probe into the thickest part of the breast, taking care not to hit the bone. The temperature should read 165°F when done.
If you don’t have a thermometer, look for these other signs:
- Juices run clear when pierced with a knife
- Meat near the bone is opaque and white
- Texture is firm to the touch
Allow to Rest
I can’t emphasize enough how important resting is for juicy, tender chicken breast. As soon as the chicken reaches the target internal temp, remove it from the oven. The temperature will continue rising as it sits.
Let it rest on the pan or a cutting board for 5-10 minutes before slicing and serving. This allows the juices that have been driven to the center during baking to redistribute back into the meat.
Skipping this step can result in dry breast meat as the juices run out when you cut into it. Patiently allowing the chicken to rest helps lock in moisture.
Serve and Enjoy!
Now you can beautifully carve the chicken breast and serve it alongside your favorite sauces, grains or veggies. Proper baking results in a juicy, savory product.
I like to drizzle extra virgin olive oil and fresh lemon juice over the chicken before serving. You can also top it with a creamy sauce, pesto or fresh herbs. The possibilities are endless.
Troubleshooting Common Issues
Even when you follow all the steps correctly, you may occasionally run into an issue with your baked chicken breast. Here are some common problems and how to prevent them:
Chicken breast is dry – Brine before baking, cook at lower temp, and always rest before slicing
Skin is mushy – Pat chicken dry before baking, cook at higher temp
Burnt exterior – Use lower temp, tent with foil
Undercooked meat – Allow to rest to final safe temp, use thermometer
As you get more comfortable baking bone-in chicken breasts, you’ll learn how to adjust time and technique to achieve your perfect results every time. Don’t be afraid to experiment with flavors and preparation until you find your favorite way to serve this versatile ingredient.
Get Creative with Recipes
While basic baked chicken breast is delicious, I encourage you to try creative recipes that take this staple to the next level:
-
Chicken Cordon Bleu – Stuffed with ham and Swiss cheese
-
Chicken Parmesan – Breaded and baked with marinara and mozzarella
-
Chicken Kabobs – Skewer with veggies for grilling
-
Chicken Bacon Ranch – Topped with bacon, cheese and ranch dressing
-
Buffalo Chicken – Coated in hot sauce and served with blue cheese
-
Chicken Enchiladas – Shredded and rolled into tortillas with enchilada sauce
The options are endless for incorporating baked chicken breast into entrees, sandwiches, salads and more. Use your favorite unique ingredients and global flavors to spice up basic baked chicken.

Prepare for Oven
Line a baking tray with foil and place a rack on top if you have one. For crispier skin, let the chicken rest for 30 minutes before baking to let the baking powder do its thing.
Why You’ll Love This Recipe
- Delicious and budget-friendly: Bone-in split chicken breasts are affordable and full of flavor.
- Juicy and extra crispy: Great texture, with the option for even crispier skin using baking powder.
- Bold seasoning: Garlic, onion, and spices bring big flavor, with just a touch of heat if you want it.
- Simple and reliable: Beginner-friendly with no flipping, and works in either a convection or regular oven.
- Better with trimming: Cutting into smaller portions helps them cook evenly and season well.
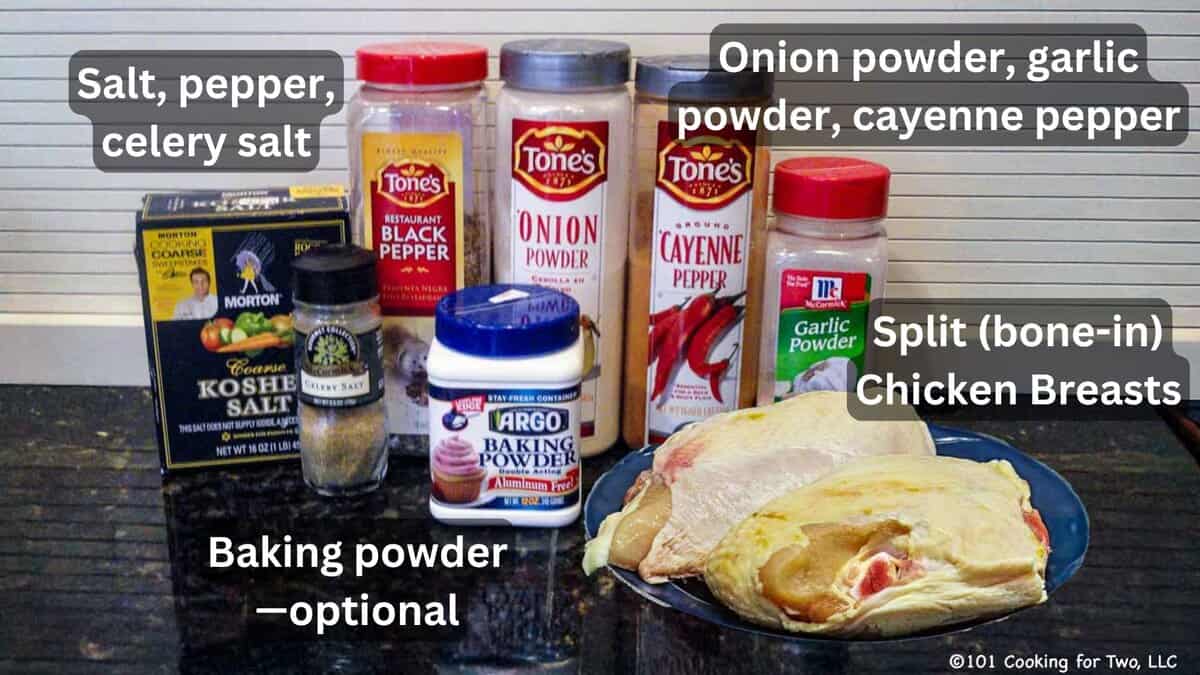
- Split chicken breasts: Also called bone-in or skin-on bone-in chicken breasts. Big, flavorful, and budget-friendly.
- Seasonings: Garlic powder, onion powder, kosher salt, and black pepper—for simple, classic flavor.
- Cayenne pepper (optional): Adds a little kick if you like some heat.
- Celery salt (optional): Brings a subtle, savory bite—grassy and peppery.
- Baking powder (optional): Helps dry the skin for extra crispiness.
✅Pro Tip: Use aluminum-free baking powder. Some people can taste a bitter, metallic flavor in versions that contain aluminum.
PERFECTLY BAKED BONE IN CHICKEN BREAST
FAQ
Is it better to bake bone-in chicken at 350 or 400?
The ideal temperature to roast bone-in chicken breasts is 400oF. However, you can bake chicken in an oven that’s anywhere from 350oF to 425oF. Obviously, cooking time is affected. You’ll have to add time if you’re roasting it at 350oF and subtract time at 425oF. Again, an instant read thermometer is your friend.
How long do bone-in chicken breasts take in the oven?
Large boneless, skinless chicken breasts: 20 to 30 minutes in a 375 degrees F oven. Large bone-in, skin-on chicken breasts: 35 to 40 minutes in a 375 degrees F oven.
How long for bone-in chicken breast at 375?
Bake the marinated chicken at 375 degrees F for about 45 minutes, or until it reaches an internal temp of 165 degrees F.Jan 14, 2025
How long does it take to bake boneless chicken breast at 350 degrees?
To bake a chicken breast at 350 degrees Fahrenheit, it typically takes about 25 to 30 minutes for boneless, skinless chicken breasts. If the chicken breasts are bone-in or thicker, it may take closer to 30 to 40 minutes. Always ensure the internal temperature reaches 165 degrees Fahrenheit for safe consumption.