This Paper Plate Turkey Craft is a fun and cute Thanksgiving craft to make with kids. My kids had so much fun creating their paper plate turkeys and adding their own twist to their turkeys.
One of my favorite things to do with my kids during the holidays are arts and crafts. Getting creative together is a great way to slow down and spend quality time together during what can be a very chaotic time.
When doing a craft with the kids, I usually start with an idea, but then allow the kids to take it in whatever direction they want with the supplies we have on hand. You can see a good example of this with our Thankful Turkey Craft.
Making a paper plate turkey is a classic Thanksgiving craft that is fun and easy for kids of all ages. With just a few simple materials like paper plates, construction paper, googly eyes, glue, and feathers, you can create a colorful turkey centerpiece or decoration
Supplies Needed
To make a paper plate turkey craft, you will need:
- Paper plates – 1 for each child
- Construction paper or cardstock – brown, red, orange, yellow
- Googly eyes
- Glue (white glue or hot glue for faster drying)
- Feathers
- Scissors
- Marker or crayons (optional)
Step-by-Step Instructions
Follow these simple steps to make a paper plate turkey with your kids
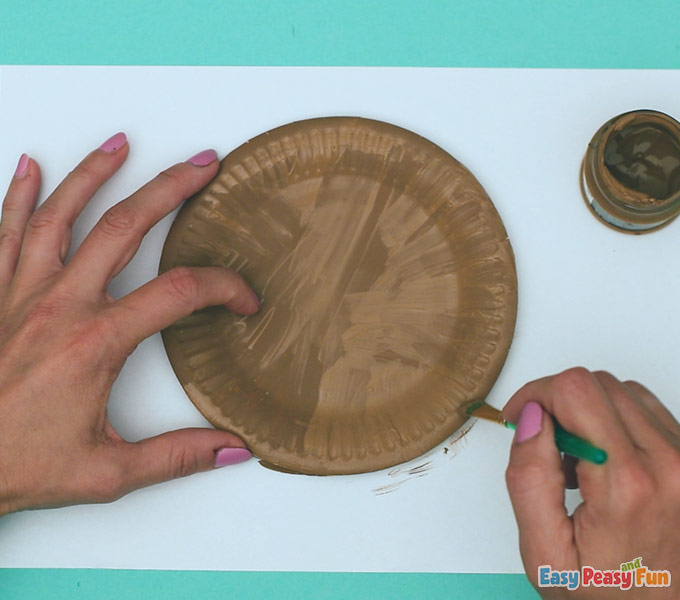
1. Paint or color the paper plate
Have kids paint their paper plates brown using acrylic paint, tempera paint, or markers/crayons. Make sure to cover the entire surface area of the plate. Set aside to let the paint fully dry.
2. Cut out the turkey’s body parts
Use brown construction paper to cut out the turkey’s head and feet. For the feet, fold the paper in half and cut out two feet at once.
Cut out a triangle shape from orange paper for the beak. For the red wattle, cut out a teardrop or oval shape from red paper.
3. Attach the facial features
Glue on the googly eyes near the top of the paper plate. Below the eyes, glue on the orange beak and red wattle.
Next, glue on the brown turkey feet on the bottom edge of the paper plate.
4. Add the feathers
Cut feathers out of construction paper or use ready-made feathers. Let kids glue on feathers in whatever colors/patterns they choose. Encourage them to overlap feathers and use different angles.
Glue larger feathers near the center for the tail and smaller feathers around the edges for the wings.
5. Draw on legs and other details
Use crayons or markers to draw on turkey legs, feet details, and lines for wings. Get creative and let kids add any extra doodles and designs.
6. Display your turkey crafts
Once complete, you can proudly display the paper plate turkeys by propping them up on a table or hanging them on the wall. Have a Thanksgiving parade by taping them to cardboard tubes and marching them around!
Turkey Craft Variations
There are many ways to customize this paper plate turkey craft:
- Use cotton balls dipped in paint for the feathers
- Stick on craft foam or fabric for the head and feet
- Add wiggle eyes instead of googly eyes for a fun effect
- Use magazine clippings for a collage style turkey
- Make it 3D by gluing a cardboard tube in the back to prop it up
Switch up the materials or add creative details to make each turkey unique. Encourage kids to get creative and let their imaginations run wild!
Benefits of Making Turkey Crafts
Crafting turkeys together provides many benefits for kids:
- Develops fine motor skills through cutting, gluing, and drawing
- Practices creativity and self-expression through design choices
- Teaches about turkeys and Thanksgiving traditions
- Creates a fun holiday decoration for the home
- Provides a keepsake craft to be proud of
The sense of achievement kids gain from making their own turkey is invaluable. Display these treasured handmade turkeys every Thanksgiving to look back on.
Fun Turkey Crafts for Preschoolers
Younger kids will love making these simple turkey crafts:
Handprint Turkeys
- Trace child’s handprint, cut out, and decorate
- Glue on googly eyes, construction paper feathers and legs
Clothespin Turkeys
- Decorate clothespins with paint and glue on facial features
- Fan out feathers from the bottom
Coffee Filter Turkeys
- Fold a coffee filter in half and cut out a half circle
- Decorate with paints or markers and add facial features
Chain Paper Plate Turkeys
- Cut paper plates into strips and link together into a chain
- Attach a head shape at the front and fan out the back for a tail
The key is using kid-friendly materials that are easy to manipulate. Have fun crafting adorable turkeys together for Thanksgiving!
Share Your Turkey Creations
Once the turkeys are complete, have a craft show to present the turkeys to each other. Display them proudly at home and take photos to share with family and friends.
Let kids use their imaginations and get creative with making paper plate turkeys! This Thanksgiving activity is a memorable way to celebrate the holiday while making something special with your own two hands. Gobble gobble!
Paper Plate Turkey Craft Supplies
This post contains affiliate links. See the Disclosure Policy for details.
- Paper plate
- Paint & paintbrushes
- Scissors
- Craft knife (optional)
- Googly eyes
- Orange paper
- Red balloon (We used a water balloon.)
- Glue
- Turkey body template
Paper Plate Turkey Craft Directions
1. Draw a turkey body onto your paper plate or print out our template (linked above in the supplies) and trace onto your paper plate.
2. Using scissors and/or craft knife (adult only), cut around your turkey’s body leaving the outside rim of the paper plate intact.
3. Paint your turkey’s body brown and allow to dry.
4. Chose paint colors for your turkey’s feathers. The kids chose red, orange, yellow, and brown. We used the same colors to make our Paper Plate Turkey Wreath.
5. Paint the outside rim of the paper plate alternating colors to create feathers for your turkey. We all painted our feathers slightly different. Allow to dry. This idea of painting the feathers on the rim of the paper plate was inspired by an adorable turkey craft from I Heart Crafty Things.
6. Glue googly eyes to the turkey’s body.
7. Cut a beak from orange paper. We used a small water balloon for the gobbler. You could also cut a gobbler from red paper. Glue the gobbler to the back of the beak and glue both to the turkey’s body.
How to Make Paper Plate Turkeys
FAQ
How do you make a paper plate step by step?
- Step 1: Prep the Plate Mold and Paper Mache. After gathering your supplies, begin by making the paper mache paste. …
- Step 2: Apply the Paper Mache. Rip the magazine or newspaper pages into strips that are 2 – 3 inches wide. …
- Step 3: Trim the Plates to Shape. …
- Step 4: Remove the Plates From the Mold.
How to make a turkey out of a paper sack?
- Stuff your turkey as you normally would.
- Open one brown paper bag inside another one.
- Butter the inside of the inside bag real well.
- Put the turkey (in bag) into the roasting rack (rack being inside of roasting pan).
- Bake at 325 F.
- THAT IS IT!
How do you make a turkey head with a paper plate?
Attach and glue the beak onto the head, just below the eyes. Glue the completed turkey head onto the paper plate. Position the feathers along the back side of the paper plate and glue them in place. Finish off by placing the feet at the bottom of the paper plate and glue. Did you make this craft?
How do you make a turkey head?
Grab a paper plate and paint it brown. Draw a circle for the head on brown paper, and cut it out. Draw two large wings. On white paper, draw a small and large circle for the eyes, then cut them out. Draw a beak on orange paper, and cut it out. Draw a hanging skin under the beak on red paper, and cut it out. Glue the eyes on the head of the turkey.
How do you make a Turkey snood on a paper plate?
Paint the paper plate brown and let dry completely. Glue the turkey wing in the center of the paper plate. Assemble the turkey head by gluing the eyes towards the top of the head. Glue the snood onto the beak, then use scissors to trim the excess off. Glue the beak onto the head, just below the eyes.
How do you make a tail with a paper plate?
Make Tail Cut feather shapes from construction paper. Glue or tape feathers onto the back of the paper plate to make a tail. 5. Embellish Use crayons, markers or stickers to add fun details like feathers, dots, stripes or glitter.
How do you make a turkey head with a snood?
Glue the turkey wing in the center of the paper plate. Assemble the turkey head by gluing the eyes towards the top of the head. Glue the snood onto the beak, then use scissors to trim the excess off. Glue the beak onto the head, just below the eyes. Glue the completed turkey head onto the paper plate.
How do you make a Turkey eyeshadow with a wattle?
Draw a hanging skin under the beak on red paper, and cut it out. Glue the eyes on the head of the turkey. Go ahead and glue the beak on the turkey. Next, you’ll want to glue the wattle to the beak. Make sure the beak and the wattle are secure. Draw black dots into the white eyes. Take a Q-tip and put red blush on the turkey with eyeshadow.