Year after year, people sit down to the same old (albeit usually delicious) baked or fried turkey at Thanksgiving. For a more outdoorsy option, here’s how to cook a turkey in an earthen oven.
Cooking a turkey in a deep pit is an age-old technique that results in incredibly moist, tender and flavorful meat While it requires more time and effort than roasting in an oven, the payoff of juicy, smoke-infused meat is well worth it Here is a step-by-step guide to deep pitting a turkey for your next special occasion.
What You’ll Need
To deep pit a turkey. you’ll need
- Shovel
- Bricks or stones
- Firewood (hardwood like oak works best)
- Large metal lid or sheet metal
- Heavy duty aluminum foil
- Burlap sacks
- Poultry wire
- Charcoal (about 6-7 lbs per 10 lbs of turkey)
- Wire for lowering turkey
- Probe thermometer
Choosing and Preparing the Turkey
- Select a 10-20 lb turkey. Larger birds can be difficult to maneuver.
- Thaw frozen turkey 2-3 days in fridge if using frozen.
- Remove giblets and neck from cavities.
- Rinse turkey inside and out and pat dry.
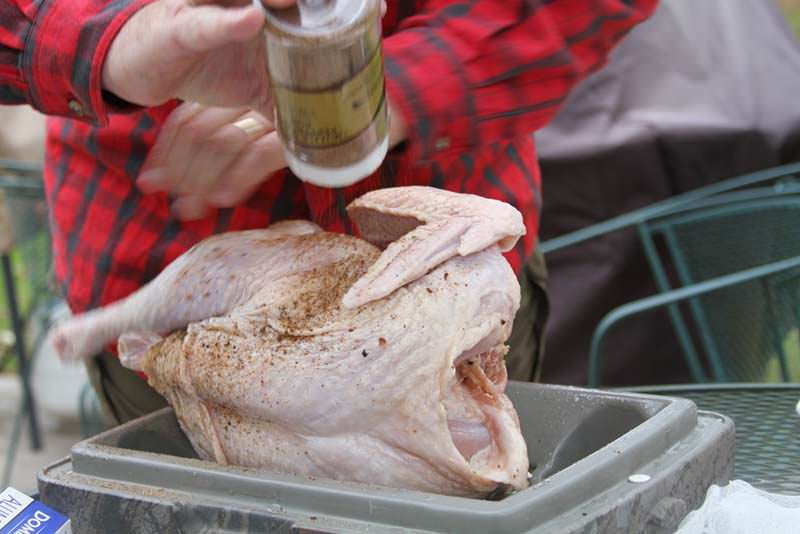
- Prepare turkey as desired with rubs, herbs, butter, etc.
- Truss turkey and tie legs together to make lowering easier.
Digging the Pit
- Select a safe location away from buildings and trees.
- Dig a pit 2 feet larger in diameter than the turkey and 3-4 feet deep.
- Line the bottom and sides with bricks to retain heat and prevent collapse.
Building the Fire
- Place 6-7 lbs charcoal per 10 lbs turkey in bottom of pit.
- Cover coals with 4-5 inches of dirt to prevent flames.
- Light kindling on top of coals to start fire.
- Keep adding hardwood, allowing previous layers to burn to coals.
- Maintain fire until you have 2-3 foot deep bed of red hot coals.
Preparing the Turkey Bundle
- Place turkey in disposable roasting pan and add aromatics.
- Wrap turkey tightly in 3-4 layers of heavy duty foil.
- Cover foil with wet burlap and secure with wire.
- Attach wires for lowering turkey into pit.
Lowering and Cooking the Turkey
- Once coals are ready, lower wrapped turkey into center of pit.
- Cover pit with metal lid and seal edges with dirt.
- Cook for approximately 30 minutes per pound.
- Check doneness with probe thermometer (165°F thigh).
Removing and Serving
- Carefully remove turkey from pit using wire handles.
- Let rest 15-30 minutes before unwrapping.
- Slice turkey and serve immediately for incredibly juicy meat.
Cooking a turkey in a pit roast results in the most flavorful, aromatic holiday bird you’ll ever taste! While it takes serious time and effort, the incredibly moist meat and concentrated smoky flavors make it all worthwhile. If you’re up for the challenge, grab a shovel and give deep pit turkey a try this holiday season. Your family will thank you for the incredibly delicious meal.
Tips for Deep Pit Turkey Success
- Use hard fruit or nut wood for mild, sweet smoke flavor. Avoid resinous woods.
- Seal foil tightly so no ash or dirt contacts turkey.
- Monitor fire to ensure you have adequate hot coals before cooking.
- Use a thermometer and cook to 165°F for food safety.
- Let turkey rest 30 mins before carving for juicier meat.
Frequently Asked Questions
What kind of wood should I use?
Hardwoods like oak, maple, fruit and nut woods provide the best flavor. Avoid soft, resinous woods like pine.
How long does it take?
Plan for about 30 minutes per pound, so a 15 lb turkey will take 7-8 hours. Times vary based on factors like pit size.
Do I need special equipment?
You’ll need a shovel, bricks, foil, metal lid and other basic items. Specialized gear isn’t required.
Is it safe?
Yes, if you cook the turkey to 165°F as measured by a probe thermometer. Proper food safety is important.
Can I stuff the turkey?
Stuffing isn’t recommended, as it’s difficult to ensure the interior reaches a safe temperature. Cook stuffing separately.
Conclusion
Deep pit roasting a turkey is a time-honored tradition that results in incredibly delicious holiday meals. While it requires serious effort, the result of juicy, smoke-infused meat is well worth it. Follow these tips and enjoy your most flavorful turkey yet this holiday season using the deep pit method.
shovel: 3
bricks: 3
stones: 1
firewood: 3
oak: 2
hardwood: 2
metal lid: 2
sheet metal: 1
foil: 3
heavy duty foil: 2
aluminum foil: 1
burlap sacks: 2
poultry wire: 1
charcoal: 2
wire: 3
probe thermometer: 2
turkey: 20
frozen turkey: 1
giblets: 2
neck: 2
cavities: 1
aromatics: 1
coals: 6
ashes: 1
dirt: 2
lid: 1
thermometer: 3
165°F: 3
pine: 1
maple: 1
fruit woods: 1
nut woods: 1
stuffing: 2
How to Cook a Turkey in the Ground
It may sound odd or unsanitary, but humans have done this throughout the arc of history. Built correctly, an “earthen oven” will give you a juicy, tender, and flavorful bird. Here’s my eight-step guide.
Gather the Rocks: Find or buy some rocks. The rocks are put into a fire and serve as the heat source for the oven. Use granite or quartz and avoid limestone and sandstone (they can explode when heated). Note: Don’t get them from a river; your rocks need to be completely dry, as any moisture can cause them to break apart when heated.
Get Your Bird: A grocery store turkey will do. Somewhere in the 12- to 15-pound range is best. You can also cook a wild turkey or goose underground.
Dig the Oven: The cooking hole needs to be at least 3 feet deep. Width and length largely depend on the size of your bird, but a 3×3-foot square should do the trick. Try to make the walls of your oven as square as possible.
Cook Your Rocks: A “log cabin” style fire is the most useful for heating your rocks. That kind of campfire gives you a convenient place to drop the rocks directly into the fire. After you’ve got the flames going and you’ve got a good base of hot coals at the bottom, drop the rocks into the middle of the fire.
It may take an hour or more, but the rocks will begin to glow and spark a bit when they’re ready to go. Hint: You never have to admit to relying on lighter fluid to keep the fire hot, but it’s a good thing to have on hand.
Prepare the Bird: Just like with the traditional method of cooking a turkey, it first must be defrosted if it is frozen. Remove any of the innards, gizzard bags, gravy bags, or whatever else might be inside the turkey. Stuffing is yet another personal preference, but a mix of onions, garlic, and celery will do just fine.
Spice the outside of the turkey and then wrap it in several (5-6 is recommended) layers of aluminum foil. The traditional method is to wrap it in edible leaves. For beginners, the foil is the smart way to go.
Cook the Turkey! Once your rocks are hot, your hole is dug, and your turkey is prepared and wrapped, use a shovel to line the bottom of your hole with the hot rocks. Put the foil-wrapped bird on top of the bottom layer of rocks, and then completely cover and surround it with the rest of your piping hot rocks.
Use as many rocks as you can fit on top of and around the bird. Then simply bury everything using the soil that you dug out to create the hole.
The size of your bird will dictate cooking time, but if you’ve picked a bird that’s within the 12 to 15-pound range as prescribed above, it’ll take around 3.5 hours to cook, in my experience.
When you think it’s close, use a meat thermometer to check that the internal temperature is at least 165 degrees F. Then just dig it up, bring it in, unwrap and enjoy! —Rocky Brown is a park ranger in Indiana.