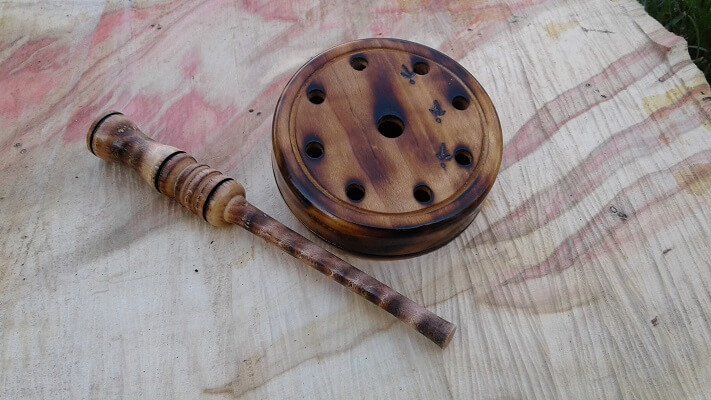
Glass turkey calls produce some of the most realistic and enticing sounds for calling in gobblers during turkey season. However, like any instrument, they require proper conditioning and maintenance to sound their best. In this article, we’ll explain the best practices for conditioning a glass turkey call so you can make crisp, clear yelps, cuts, and purrs that will pull in more birds.
Why Proper Conditioning is Crucial
The surface of a glass turkey call must have just the right texture to produce sound by scraping a striker across it. Brand new out of the package, glass calls are too smooth to generate adequate friction. You need to roughen up the surface through controlled abrasion or conditioning. This creates microscopic grooves and pits that the striker sticks to momentarily before releasing to make the sound.
Without proper conditioning, your glass call will be quiet and raspy. It may even fail to call at all. The striker will just skid across the glass without vibrating it enough to produce sound. That’s why every glass call user needs to learn proper conditioning techniques. It takes only minutes but makes a world of difference in performance.
Tools for Conditioning Glass Calls
You’ll need an abrasive tool made for conditioning glass turkey calls. The most common options are:
-
Conditioning stone – Usually a rectangular stick with abrasive material on one side. Often sold by turkey call manufacturers.
-
Drywall sanding screen – A stiff mesh screen in grades like 150-grit, Can be cut to size
-
Sandpaper – 150-grit aluminum oxide sandpaper works well. Cut a section about 2×3 inches.
Avoid using files, scrapers, or metal abrasives. Stick to conditioning products designed for glass turkey calls. They apply controlled abrasion without risk of excess scratching.
Technique for Conditioning
Follow these steps to properly condition a glass turkey call:
-
Wipe the surface completely clean with a dry soft cloth. Remove any oil, dust, or debris so conditioning abrasive contacts only glass.
-
Hold the call firmly on a flat surface at about a 20-degree angle. Position your conditioning tool at the 9 o’clock position.
-
Apply light downward pressure and make repeated strokes from the 9 o’clock position to the 3 o’clock position. Use the full length of the conditioning tool.
-
Make 8-10 strokes without lifting. This creates tiny uniform scratches aligned in one direction.
-
Rotate the call 90 degrees. Repeat #3-4, conditioning across the scratches you just made.
-
Rotate the call back to original position. Make 2-3 more passes to refine the scratch pattern.
-
Wipe away all abrasive dust and particles with a dry cloth. Blowing on the call can introduce moisture.
-
Visually inspect for a uniform scratch pattern. Refine areas with fewer scratches.
-
Play test the call. Condition more if needed to achieve clean sound.
-
Carry a ziplock bag for storage to keep the conditioned surface clean.
Some hunters like to wipe the call on their pant leg to remove abrasive dust. Others prefer blowing it off to avoid wiping oils onto the call. Either works fine as long as you remove the loose abrasive particles.
Avoid conditioning in a circular motion or criss-crossing directions. This polishes the glass back to a smooth surface rather than scratching it. Always make straight strokes in one direction only.
How Often to Condition Your Call
Brand new glass calls need initial heavy conditioning before use. But once properly scratched, light touch-up conditioning maintains the right surface texture. Here are some guidelines:
- Condition heavily before first using a brand new call
- Lightly recondition before each hunt morning and evening
- Do heavy reconditioning after 10-20 hours cumulative calling time
- Immediately recondition if striker starts to slip excessively
Heavily used calls may need heavy reconditioning after just 3-5 hunts. Lightly used calls might go for weeks. Judge by sound quality and striker grip.
Some hunters maintain a benchmark call so they can compare other calls to the proper scratch pattern. This helps identify when a call needs touching up.
Advanced Conditioning Tips
Here are some advanced conditioning tips to maximize glass call performance:
- Use lighter pressure on acrylic, heavier on classic glass
- Make 6-8 light strokes per conditioning pass instead of 10+ heavy passes
- Condition the ends 1-2 inches for ease in starting/ending calls
- Use a slate call striker for more friction and cleaner stops
- Line the inside label edge to avoid unscratched areas
- Condition 2-3 times more just before hunting season
Finally, don’t forget to condition your striker occasionally too. Strikers can also get glazed and need abrasion. Lightly condition the striking surface in the direction of use to restore grip on the glass call.
Troubleshooting Poor Call Sound
Here are some common glass call sound problems and likely causes:
No sound – Call surface too smooth; needs heavy reconditioning
Weak sound – Lightly recondition the surface
Squeaking/sticking – Surface over-conditioned; polish call with buffing ball
Short sound – Striker not releasing; try a slate striker
If poor call sound persists after the above steps, inspect for contamination or damage. Wipe thoroughly with alcohol then recondition. Replace cracked or badly scratched calls. Proper conditioning technique and care goes a long way toward consistent glass call performance.
Conditioning a glass turkey call properly is crucial for producing realistic turkey sounds. Use the right abrasive tools and techniques to create the ideal scratch pattern. Maintain the conditioned surface with occasional touch-ups. And remember to also condition your striker regularly. With practice, you’ll learn to quickly restore peak performance from your glass calls. The effort pays off in more gobbler responses when you hit the woods!
Conditioning a Ceramic Surface
The ceramic surface we offer on the SBO Ripper pot call is a very hard playing surface. It takes some work to condition properly. However, once you get the lines cut into the surface, it will hold a good conditioning for a long time.
To condition a pot call with a ceramic playing surface, you will need to use a conditioning stone. Sandpaper just doesn’t seem to work on the extremely hard material. Rub the stone back and forth in a consistent direction. You should be rubbing lines into the call surface perpendicular to the direction you will be pulling your striker. On a ceramic surface, you can sometimes see the individual lines being cut into the surface. Try to get many lines really close together, giving your striker a great series of cuts to bounce across for great yelps and purrs. Continue with the stone until you are satisfied, and then hit it with sandpaper a few times to even it all out a bit.
Conditioning a Glass Surface
The frosted glass surface on the SBO Ripper pot call usually doesn’t require much conditioning. The surface is naturally rough and scratchy, giving you some nice yelps and clucks right out of the box. To get the best sound, and really good purrs, you will need to condition it slightly.
Taking a piece of sandpaper or a conditioning stone, lightly rub the surface of the call back and forth in a consistent direction. You should be rubbing lines into the call surface perpendicular to the direction you will be pulling your striker. Use the edge of a piece of sandpaper as opposed to the middle. The edge of the sandpaper will give you more defined lines in the pot call surface, producing a much better purr sound.
How To Condition a Glass Surface Pot Call
FAQ
Should I sand my slate call?
Yes, you will either need a stone or 80 grit sandpaper for the initial rough spot. Generally, you only use a scotch brite pad for slate calls.
What is the best glue for turkey calls?
Brookside recommends GOOP, but I used Loctite with excellent results. It is essential to make sure the glue you use is waterproof. Oil-based polyurethane to protect the call.