Turkey hunters are no different than other hunters when it comes to wanting to have a physical memento from a successful hunt. For big game hunters it might be an antler mount, elk ivories, or even a deer hoof gun rack (don’t judge). Turkey hunters are fond of big toms’ beards, spurs, and tail feathers. That’s why we put together this comprehensive guide for how to preserve a turkey fan. onX’s own Lake Pickle snapped detailed photos showing just how to take these treasured feathers from field to fully preserved. You’re Going to Need a Turkey. Find one with onx. Turky hunters use onX Hunt to find more turkeys. Try it free for 7 days.
Cleaning and preparing a wild turkey fan for mounting as a trophy can be a satisfying end to a successful hunt With the right techniques, you can create a stunning display that will preserve your prized turkey tail feathers for years to come This complete guide will walk you through each step of the process, from safely removing the fan to drying, shaping, and mounting it. Follow these tips to create a turkey tail trophy you’ll cherish forever.
Remove the Fan Properly
The first step is removing the fan cleanly from the turkey’s body. It’s best to detach it as soon as possible after harvesting the bird, while the tail is still flexible and before the carcass has a chance to stiffen.
Use a sharp hunting or butcher knife to carefully cut around the base of the tail, separating it from the turkey’s body. You’ll need to cut through the skin, meat, and bone to remove the entire tail structure. About 8-10 inches of the tail bone should be intact to have enough length for mounting. Poultry shears can also work well for cutting through the bony tail vertebrae.
When removing the fan, be sure to make the cut as smooth as possible for a clean look once mounted. Also take care not to cut or bend any feathers. Place the detached turkey tail fan flesh-side up on a clean table or surface for cleaning.
Thoroughly Clean the Feathers
Now it’s time to clean the feathers. Properly cleaning the fan removes any dirt, blood, tissue, oils or other debris. This helps keep the feathers looking their best and prevents degradation over time.
Use a small, sharp knife to gently scrape off any remaining bits of flesh, membrane or dried blood from the base of the feathers and quill shafts. Avoid cutting off feathers.
Rinse the entire turkey tail under cool running water to wash away any loose debris. Avoid using high pressure that could damage feathers.
Mix a small amount of mild dish soap with warm water Use a soft brush or cloth to gently scrub along each feather, washing away any dirt or oils Take care not to bend or twist feathers during washing.
After scrubbing, thoroughly rinse away all soap residue with clean, cool water. Allow the fan to completely air dry before moving to the next steps. Proper drying is key.
Dry and Disinfect the Base
Once washed, it’s critical to fully dry and disinfect the base of the tail where it was cut from the skin and bone. This helps prevent rotting and insect damage during display.
Liberally sprinkle borax powder onto the feather bases, making sure to cover any exposed bone, tissue or raw flesh. Allow to sit for 24-48 hours. The borax absorbs moisture and helps kill bacteria and molds.
Alternatively, you can soak just the tail base in rubbing alcohol or a pickling solution like acetone. Let it soak for an hour or more before removing to air dry completely.
Inspect the base and reapply borax if any soft tissue is still visible after initial drying. The base should be stiff and dried out, with no moisture remaining.
Shape the Fan and Mount
To finish, shape the turkey tail fan into the desired display position using these tips:
-
Carefully arrange the feathers in the tail how you want them fanned out. Pursing feathers together more makes the fan look fuller.
-
Pin or wire feathers into position on a sturdy foam board or piece of cardboard. Place pins in the quill end only.
-
For a more permanent hold, apply small drops of clear-drying epoxy or craft glue on the feather quill bases where they contact the mounting board.
-
Ensure all feathers remain aligned and shaped correctly until the glue or epoxy has fully cured and dried.
-
For extra hold, lightly brush a small amount of glue directly onto the dried feather bases themselves.
-
After drying, position the shaped fan on your taxidermy mount or plaque backdrop. Consider adding additional pins or tie-downs across the fan for stability.
-
Display your mounted turkey tail fan in a clean, climate-controlled room out of direct sunlight to best preserve its condition.
With some care and attention to detail, you can successfully clean, preserve and mount a wild turkey fan to proudly display as a treasured keepsake of your hunting success. Follow these tips for stunning, long-lasting turkey tail taxidermy.
Frequently Asked Questions
Should I wash the feathers?
Yes, gently wash the turkey tail feathers in mild soap and water to remove any dirt, blood or oils that could degrade them over time. Rinse thoroughly afterwards.
How long does the fan take to fully dry?
A turkey fan should dry for a minimum of 2-3 days in a well ventilated area, longer if possible. Allow at least 5-7 days for the base to completely dry out before mounting.
What is the best way to shape the feathers?
Carefully wire, pin or glue the feathers into the desired fanned display position. Allow to fully dry in the proper shape before mounting the finished fan for long-term display.
Can I speed up the drying process?
You can use a fan or food dehydrator on a low setting to help draw moisture out faster. Avoid high heat. Moving air circulates around feathers to dry faster than air drying.
How can I prevent bug or rodent damage?
Thorough base drying and borax treatment prevents pests from damaging the mount. Keep the finished fan display in a clean, climate controlled space free of bugs.
What factors cause feathers to degrade?
Moisture, oils, dirt and UV light exposure will all degrade feathers over time. Proper cleaning and indoor display helps preserve the turkey tail.
How long will a prepared fan mount last?
A thoroughly cleaned and mounted wild turkey tail fan can potentially last over 20 years if kept in a clean, dry, climate controlled environment out of direct sunlight.
With some time and care taken during the cleaning and drying process, you can create a stunning mounted turkey fan that will last for many years. Follow this complete guide for beautiful, long-lasting turkey tail taxidermy.

Equipment Needed for Preserving a Turkey Fan
Preserving a turkey tail fan is quite simple overall. However, there are several additional steps one can take to make their fans more ornate or to have special uses. Some of these we will discuss. The basic tools and equipment needed for preserving a turkey fan are as follows:
- Sharp knife
- Borax
- T-pins
- Drying board
Additional, optional equipment:
- Coleman lantern or camp fuel
- Large metal coffee can
- Hair dryer
- Dawn dish soap
- Rubber gloves and eye protection
- Auto body filler with hardener
- Mounting plaque
Preparing the Turkey Fan
After your turkey has been harvested you can get to work on removing its breast and legs or immediately get its tail removed. The best way to remove a turkey tail for displaying as a fan is shown by Lake Pickle in the following video:
In essence, with the bird laying breast side down, you’ll want to use a sharp knife to cut into the meat between the bird’s vent and the base of the tail feathers where you’ll find a small knob. Take care not to cut into any part of the feathers, including the tissue that is holding the feathers together at their base.
As shown below, you can make a small exploratory cut with your knife to expose the knob before cutting toward the body of the bird.
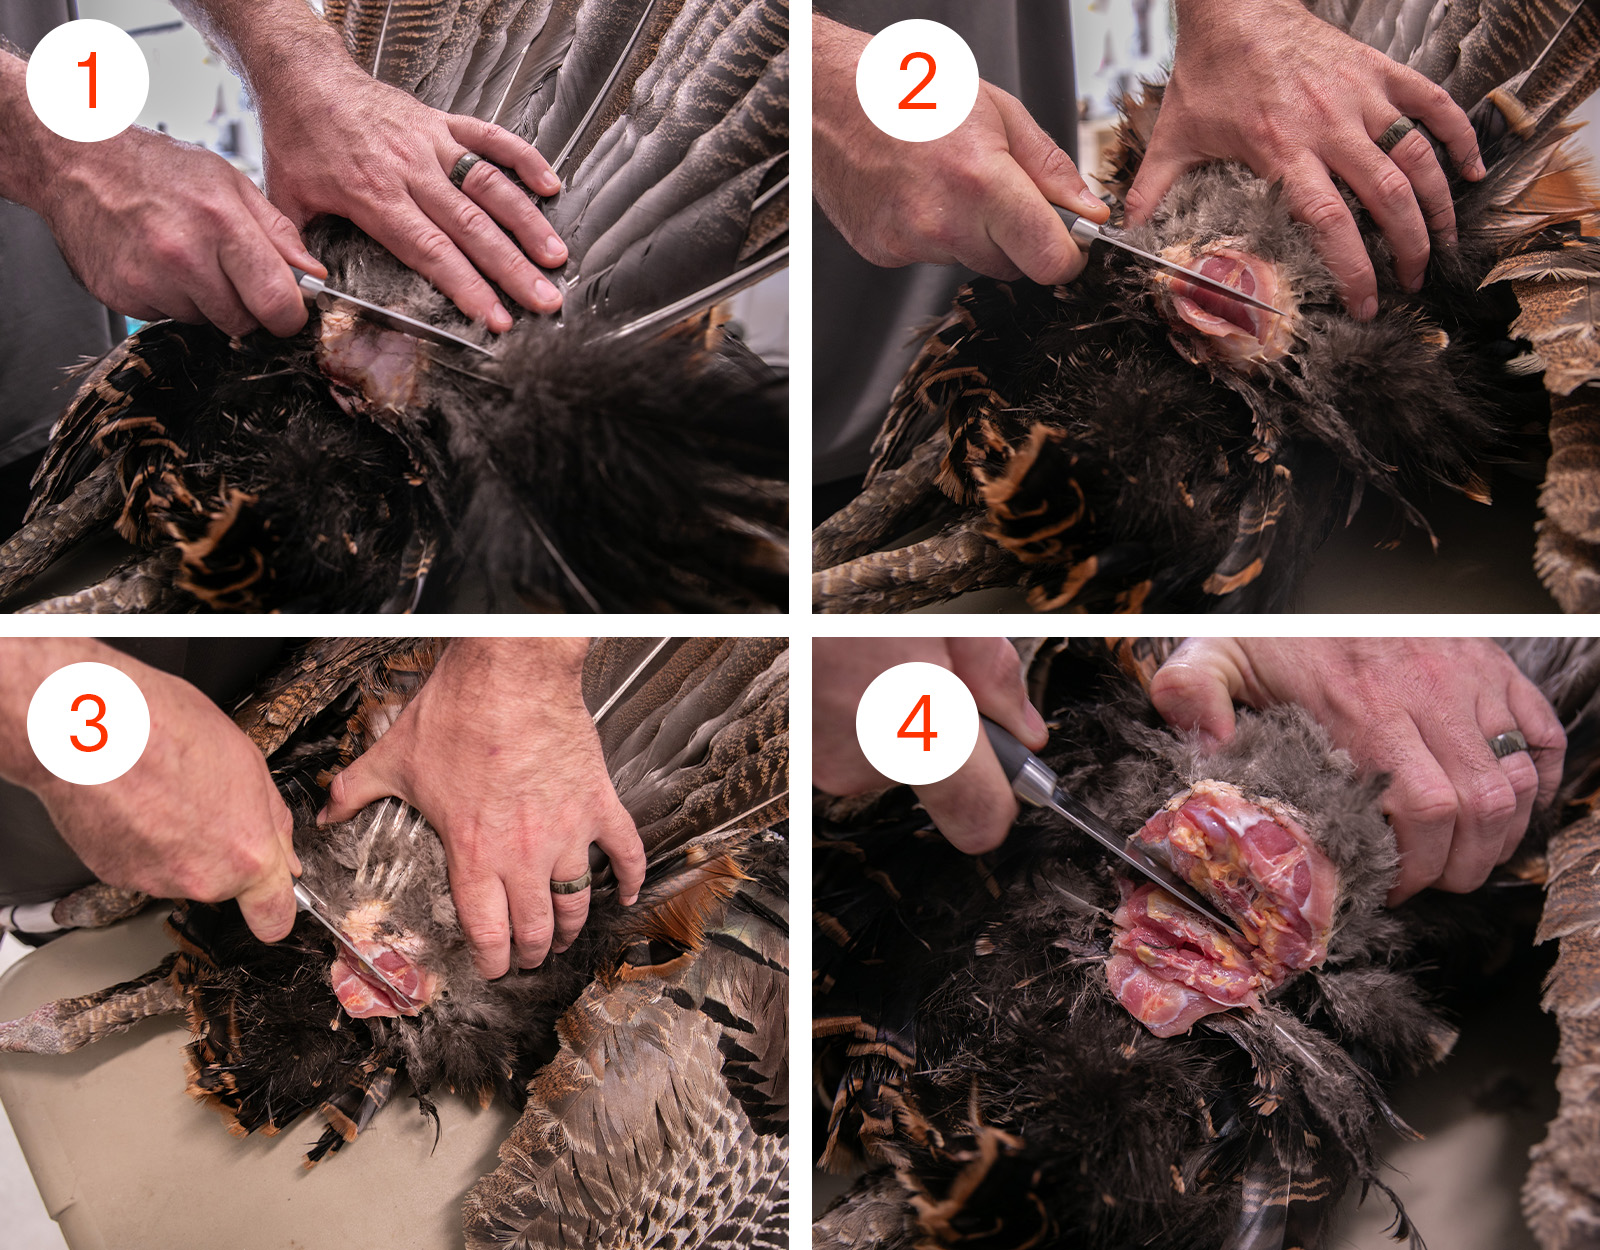
Once the tail fan has been removed, scrape away as much fat and meat as possible to make the drying process more efficient, again taking care not to cut through any connective tissue. You’ll see that some downy feathers might still be on the tail. You can remove those if you wish, but keep all the flat, color-tipped feathers you see. A turkey tail is typically made up of three different lengths of feathers.
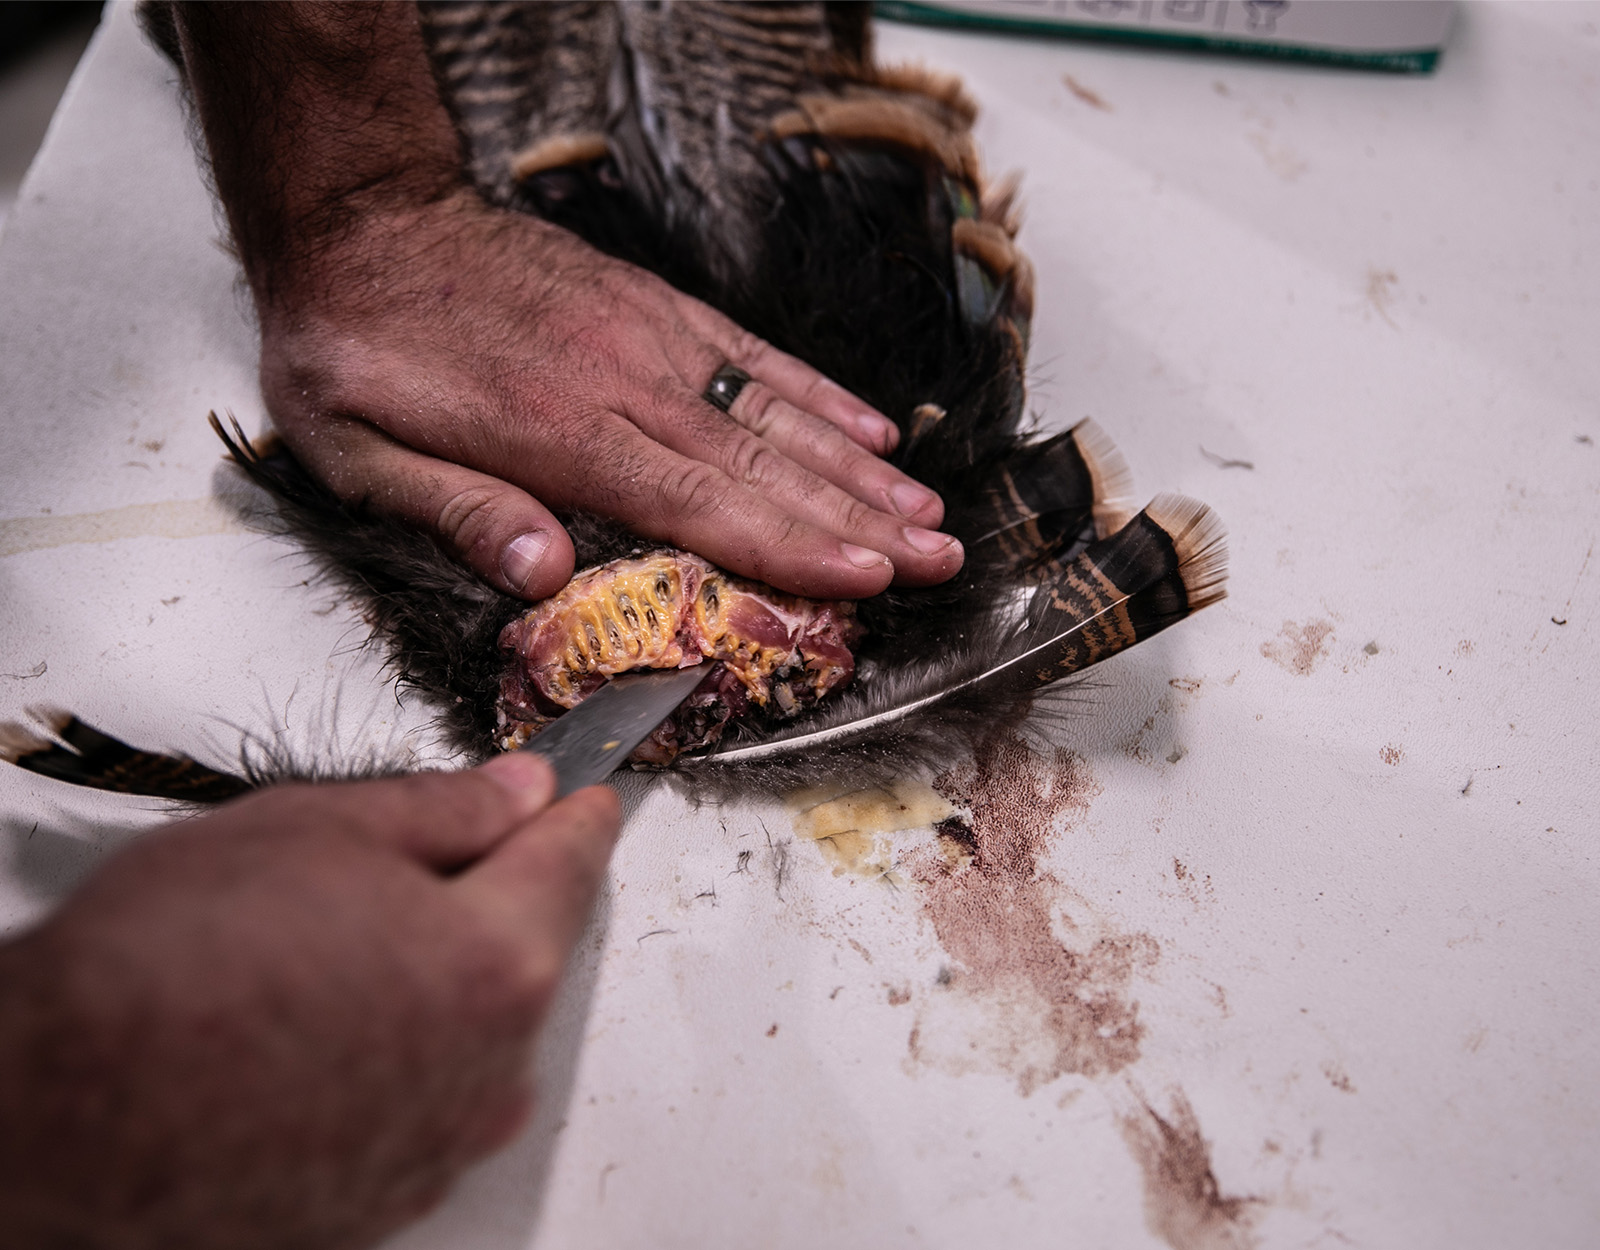
As an optional step for preparation, some hunters like to soak the fleshy part of the fan in a coffee can containing Coleman white gas for about an hour to help degrease the tail. After soaking for an hour, remove the fan and wash the part that was soaked with Dawn dish soap, and then use a hair dryer on Low/Medium heat to dry the feathers. This will help the feathers fluff after being washed.
Of course, gas is very flammable and the fumes can be harmful so do this step in a well-ventilated area. Many skip the gas and just wash the feathers and base with Dawn dish soap as much as needed.
Once cut, cleaned out, and washed, you’re ready to start the simple preservation process.
