It can be fun to raise quail for hunting, but you need some special tools to do it right. With a quail surrogator, you can keep day-old chicks safe outside until they are old enough to live on their own in the wild. If you want to save money, you can build your own quail surrogator instead of buying one that is already made. We’ll show you everything you need to know to build a fully functional quail surrogator from scratch in this complete guide.
What is a Quail Surrogator?
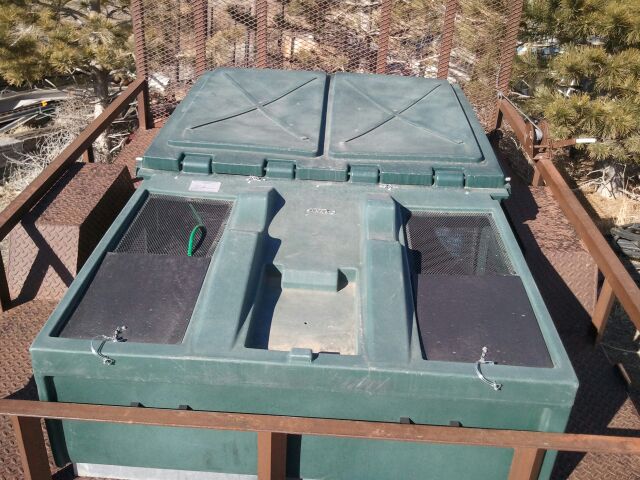
A quail surrogator is essentially an outdoor brooder specifically designed for raising young quail that will be released into the wild It allows you to raise chicks in their natural environment while protecting them from predators during the critical first few weeks of life The surrogator provides food, water, warmth and shelter until the birds reach 4-5 weeks old and can be released to live and breed in the wild.
The key benefit of using a surrogator is that the young quail develop natural survival instincts and become imprinted on the location where they were raised. This imprinting motivates them to live and nest in that same area after release. Birds raised in a surrogator have much higher post-release survival rates compared to pen-raised adult quail that are unfamiliar with the wild.
Why Build Your Own?
Purchasing a ready-made quail surrogator can cost $1,000 or more. By building your own, you can save hundreds of dollars and end up with a fully functional unit customized to your needs With basic DIY skills and the right materials, constructing a surrogator is a straightforward project
Building your own also allows you to modify the design if needed. For example you may want to build a larger surrogator to house more birds or make it mobile so it can be moved to different sites on your property. Customizing the design is easy when you are the builder.
Step-by-Step Building Instructions
Follow these steps to build a quail surrogator from start to finish:
Gather Materials and Tools
You will need:
- 1⁄4 inch hardware cloth – Enough to cover walls and roof
- Lumber for frame (2x4s recommended)
- Cedar shavings or pine chips for litter
- Enclosure for feed and water
- Heating unit (propane tank top brooder recommended)
- Feeders and waterers designed for quail
- Basic tools: hammer, drill, staple gun, saw, wire cutters, utility knife, screws or nails
Build the Frame
- Construct a rectangular frame out of 2×4 lumber. Recommended interior dimensions are 4’ x 8’ x 2’.
- The frame should sit with the bottom 2-3 feet off the ground to deter predators.
- Cut and attach hardware cloth to the walls and roof sections. Staple securely.
- Include hinges to create doors that allow access for cleaning and maintenance. Build doors from the same 1⁄4 inch mesh.
- Add a few roosting bars inside for the birds to perch on.
Attach the Feed Enclosure
- Build a small enclosed coop attached to the end of the surrogator. This will house the feed and water.
- Make sure the coop is completely enclosed with hardware cloth to prevent access by rodents or snakes.
- Include a lockable door to allow you to easily restock food and water as needed.
Add the Heating Unit
- Install a propane tank top brooder following manufacturer instructions.
- Position the brooder near one end of the surrogator and safely attach the propane tank to the outside.
- This will provide crucial warmth for the young chicks.
Add Litter Material and Roosts
- Cover the entire floor with 2-4 inches of cedar shavings for litter.
- The absorbent litter will help keep the interior clean and dry.
- Construct a few roosts bars from branches or lumber. Chicks will perch on these as they get older.
Select a Protected Site
- Place the surrogator in a quiet, secluded area away from human activity.
- Choose a location that will be convenient for regular maintenance.
- Try siting it near trees or brush to provide additional shelter.
And that’s it – your DIY quail surrogator is ready for occupants!
Operating Your Surrogator
Once constructed, operating a quail surrogator is straightforward. Here are some tips:
- Stock with day-old chicks ordered from a hatchery or local breeder. Most surrogators can hold 100-150 chicks.
- Use chick starter feed and mini waterers designed for quail. Keep feed and water stocked at all times.
- Perform maintenance visits about once per week. Briefly check the brooder, refill food/water, remove any dead birds.
- Maintain a brooder temperature of 90-95°F for the first 3 weeks, then gradually reduce to about 70°F.
- Release birds at 4-5 weeks old. Open doors and allow them walk out on their own.
Monitor the surrogator daily the first week after stocking to ensure systems are working properly. Once the chicks become acclimated, weekly checks are sufficient.
Releasing the young quail is the rewarding part! Give them the best chance of survival by providing good habitat and cover near the surrogator site. You want the birds to thrive in their new home.
Tips for Success
Here are some additional tips to help ensure your home-built quail surrogator accomplishes its goal of raising wild birds:
-
Minimize activity around the surrogator. Human interaction should be kept to a bare minimum to prevent the birds from imprinting on people.
-
Disguise or camouflage the surrogator if possible. This helps keep the birds wild.
-
Clear any weeds/debris from around the surrogator to eliminate places where predators can hide.
-
Make sure the release site has good quail habitat with plenty of cover and foraging opportunities. Food plots are a good idea.
-
Maintain a population of insects around the surrogator. Young quail depend on insects to supplement their diet.
-
Control any local predators that may threaten the newly released quail.
Troubleshooting Common Problems
Even with good plans and proper materials, issues can sometimes crop up when building a new quail surrogator. Here are some potential problems and how to address them:
Heating malfunction – Test the propane brooder thoroughly prior to stocking any birds. Monitor temperatures closely for the first few days and make any needed brooder adjustments.
Mesh damage – Use sturdy 1⁄4 inch or smaller hardware cloth. Repair any tears immediately to prevent predator entry.
Escaped quail – Ensure all doors seal tightly when closed. Clip flight feathers of young quail if needed to prevent escapes.
Rodents in feed coop – Close any gaps in the feed enclosure with wire mesh or caulk. Set traps if needed.
Insufficient litter – Add more shavings as needed to maintain 2-4 inches throughout. Remove wet areas promptly.
Water leakage – Use lock-on waterers designed to avoid spills. Absorbent litter helps minimize any leakage issues.
Predator attacks – Reinforce any vulnerable areas with additional wire mesh. Relocate surrogator if predation is excessive.
Final Thoughts
Building your own quail surrogator takes some work upfront, but the benefits are well worth the effort. By following the steps outlined in this guide, you can construct a fully-functional surrogator tailored exactly to your needs and property. Raise wild quail for restocking hunting areas or just for enjoyment.
The survival rate for birds raised in a surrogator and released on-site is remarkably higher compared to purchasing adult pen-raised quail. Give your young birds the best chance at survival, while saving money in the process.
If issues come up along the way, apply the troubleshooting tips provided here. Raising quail in a home-built surrogator can be a fun and rewarding experience when done properly. The end result is a thriving population of wild quail on your land.
Quail Station Assembly
FAQ
Do quail surrogators work?
What kind of grass do quail like?
What is a surrogator?
How many quail & pheasant chicks can a surrogator hold?
The bird’s natural homing instinct motivates them to live and reproduce where they were raised and released. The Surrogator® will hold 125 day-old quail chicks or 65 day-old pheasant chicks until they reach 4 to 5 weeks of age. The greatest mortality on the life of game birds happens in the nest and before three weeks of age.
How does a surrogator® work?
By placing the Surrogator® in a location where you would like to establish a huntable population of pheasant, quail, chukar, turkey, or other game birds, chicks raised in the unit become imprinted to that location. The bird’s natural homing instinct motivates them to live and reproduce where they were raised and released.
What is a surrogator®?
The Surrogator® is a self-contained field unit that will establish a huntable population of game birds on your property. This is NOT an adult bird release system! The Surrogator® functions as a “surrogate parent” by providing food, water, warmth and protection for the first 4 to 5 weeks of the bird’s life.
How many times a year should a surrogator be used?
A cycle can be repeated 3-5 times in a season, depending on the temperatures of your region. Depending on the habitat, we recommend one unit for every quarter section of property (every 160 acres or so). You may also like The Surrogator® is a self-contained field unit that will establish a huntable population of game birds on your property.