Chicken fried steak is a beloved comfort food, but it can be frustrating when the breading falls off during cooking. A bare, sad steak sitting in a pile of breadcrumbs is an all too common sight in many kitchens. But with the right techniques, you can avoid this breading blunder and achieve the perfect crunchy coating every time.
In this comprehensive guide, we’ll explore the science behind breading adhesion common causes of breading detachment and provide step-by-step solutions for crispy, flavorful chicken fried steak success.
Understanding Breading Adhesion
To troubleshoot breading issues, it’s important to first understand what makes it stick in the first place. Proper adhesion relies on two key factors:
Moisture
A slightly damp steak surface provides moisture for the breading to cling to like glue. Drying the meat thoroughly before breading allows excess moisture to evaporate.
Protein Bonding
Eggs in the breading mixture and meat proteins interact to form bonds during cooking This cross-linking helps seal the breading to the steak
Why Does Breading Fall Off?
With the science down let’s explore the common culprits behind breading mishaps
Insufficient Moisture
If the steak surface is too dry, the breading has nothing to grip onto. Allowing the meat to sit out too long can lead to evaporation.
Inadequate Binders
Not using enough egg or buttermilk in your breading mixture prevents protein bonding.
Improper Dredging
Breading needs to be pressed onto the steak firmly and evenly so no bare spots are left.
Overly Thick Batter
Excessive batter obscures the meat texture, so the breading can’t adhere correctly.
Wrong Cooking Temperature
Too low, and the breading absorts oil and falls off. Too high, and it burns before the meat cooks through.
Handling Issues
Rough handling of cooked steaks causes the crisp breading to flake off. Letting steaks steam and moisten on a piled plate also loosens the coating.
Step-By-Step Solutions
Follow these tips at each stage for guaranteed breading success:
Prep the Steak
- Pat the steaks dry thoroughly with paper towels
- Lightly score the surface in a crosshatch pattern to increase surface area
Bread Properly
- Allow steaks to rest for 5-10 minutes after breading to let moisture absorb
- Use an egg and buttermilk soak to increase protein bonding
- Apply a light, even coating of flour first to provide a tacky base
Fry Correctly
- Preheat oil to 325-350°F and use a thermometer for accuracy
- Cook steaks in batches to maintain oil temperature
- Fry for 3-4 minutes per side until golden brown
Handle with Care
- Let steaks drain on a wire rack, no piling
- Allow to rest for 5 minutes before cutting to set breading
Extra Tips for Adhesion
- Chill breaded steaks for 30 minutes before frying to help batter adhere
- Add cornstarch to the flour for extra crispness
- Use crackers blended into the breadcrumbs for crunch
- Refrigerate unused egg wash to prevent thinning
Common Questions
What’s the ideal oil temperature?
325-350°F is optimal. Any lower, the breading gets soggy. Any higher, it burns. Use a thermometer for precision.
Should I soak the steaks in buttermilk?
Yes, a 30-60 minute buttermilk bath tenderizes the meat and provides moisture, proteins, and tangy flavor for better adhesion.
How can I get the breading extra crisp?
Letting the breaded steaks rest in the fridge for up to overnight dries out the surface. Cornstarch blended into the flour also increases crispness.
What breading ingredients work best?
For the wet batter, use egg and buttermilk. For the dry, all-purpose flour provides a good base while crackers add crunch and panko gives an extra crispy texture.
Is it better to bake or fry chicken fried steak?
Frying allows you to fine tune the oil temperature for optimal adhesion and crisping. Baking can dry out the meat and cause the breading to separate.
Conclusion
With an understanding of breading science, avoiding common mistakes, and following these tried-and-tested techniques, you can serve up chicken fried steak with a perfect, flavorful crunch. Mastering breading adhesion takes practice, but the rewards of this crunchy, comfort food classic are well worth the effort. Just remember to thoroughly dry, properly bread, fry at the right temperature, and handle with care. Now go enjoy some crispy, home-cooked chicken fried steak!

How To Make Chicken Fried Steak
If you were able to purchase a good quality cubed steak then there is nothing left to do but season with kosher salt, black pepper, and garlic powder, and proceed to the portion of this post on breading the steaks.
For everyone who was able to obtain top round or eye of round, cut the roast into steaks which will naturally be about 3-4 inches in diameter. I like to cut them to be about 3/4 of an inch thick.
If your beef came in waxed butcher paper that is an excellent wrap to use, or use pieces of plastic wrap or wax paper to line a cutting board, place the steak down and place another piece of plastic wrap or wax paper on top. (See the video for a demonstration.)
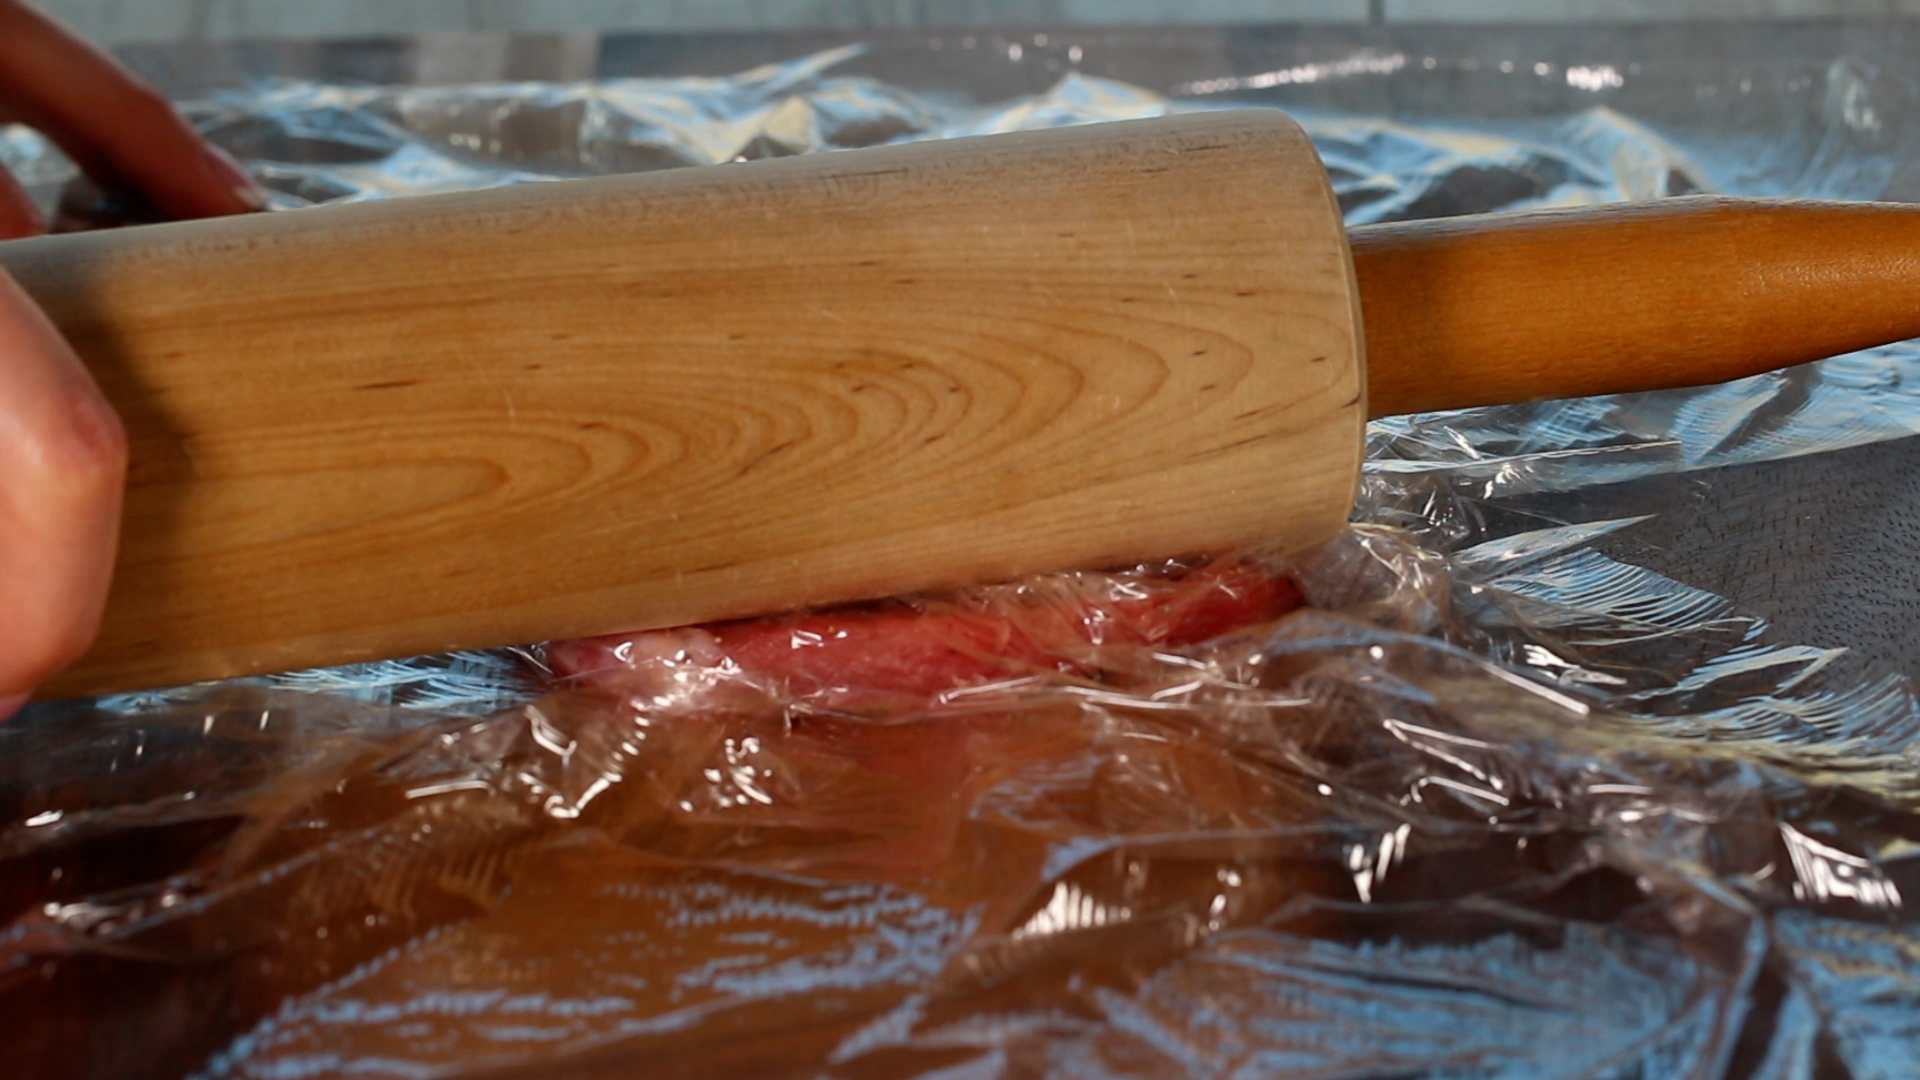
Using a meat mallet or a rolling pin, beat the steak until it spreads out and becomes thinner. I like my steaks to nearly double in size so that they are very thin. Repeat with the remaining steaks and transfer them to a baking sheet.
Finally, season the steaks with seasoning salt and black pepper.
What is Best Cut of Meat for Chicken Fried Steak?
Top round, top sirloin, or eye of round.
Cube steak, which was formally tenderized top round or top sirloin, was traditionally used for chicken fried steak for years. However, due to its lack of an official definition, many grocery stores began using other cuts of meat, such as brisket, sending it through a tenderizing machine, and selling it as cube steak. This results in a chicken fried steak that is difficult to chew. For this reason, most chefs and discerning home cooks buy top round, sirloin, or eye of round, and tenderize it themselves with a kitchen mallet.
Cube steak may be used if your butcher has assured you that the correct cuts of meat are being used to produce their cube steak.