Ever grabbed a frozen chicken pot pie from your freezer and wondered how to bring it back to its delicious glory? You’re not alone! As someone who’s messed up more pot pies than I care to admit, I’ve finally mastered the art of reheating these comfort food classics. Let me share my tried-and-tested methods with you!
Why Proper Reheating Matters
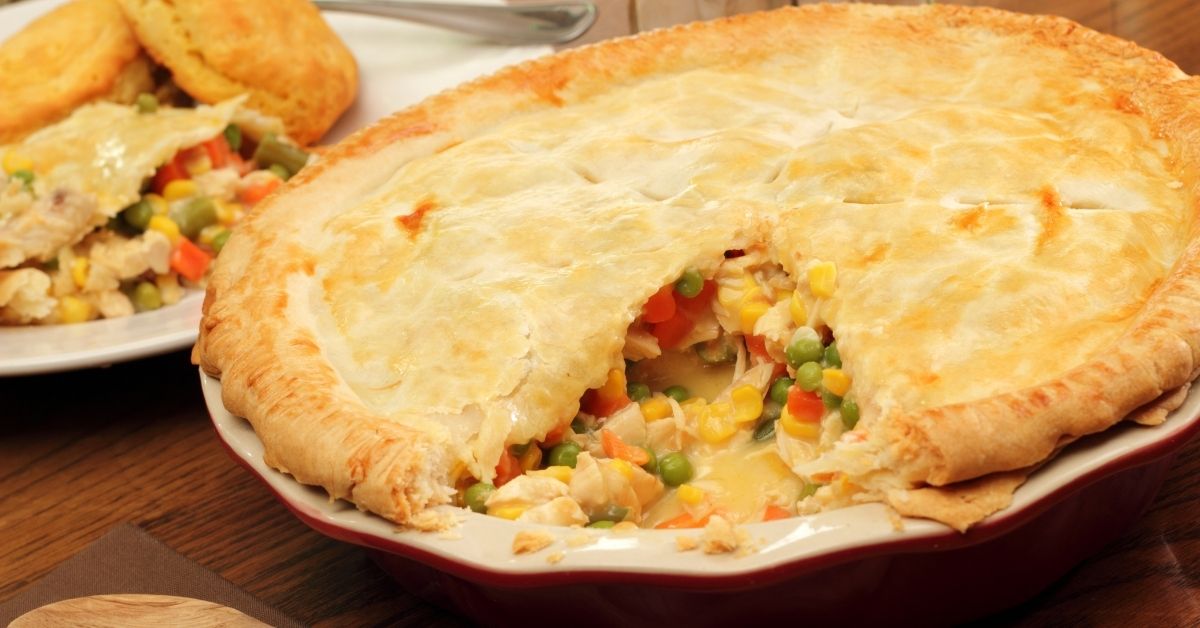
When it comes to frozen chicken pot pies, proper reheating isn’t just about warming them up—it’s about transforming that icy block into a mouthwatering meal with a crispy golden crust and piping hot filling. Nobody wants a soggy crust with cold spots in the middle, right?
The goal is simple get that perfect balance where the filling reaches a safe temperature of 165°F (74°C) while the crust becomes flaky and golden, Let’s dive into the best methods to achieve pot pie perfection!
Three Winning Methods to Reheat Your Frozen Pot Pie
There are three main ways to reheat your frozen chicken pot pie, each with its own pros and cons:
1. Oven Method: The Gold Standard
Pros:
- Even heating throughout
- Perfectly crispy crust
- Retains flavor and texture
- Most reliable results
Cons
- Takes longer (50-60 minutes)
- Uses more energy
- Requires planning ahead
2. Microwave Method: For the Impatient
Pros
- Super quick (3-5 minutes)
- Convenient
- Energy efficient
Cons:
- Often results in soggy crust
- Uneven heating
- Can make filling rubbery
- Considered a “last resort” by chefs
3. Air Fryer Method: The Promising Alternative
Pros:
- Crispy crust (maybe even crispier than oven!)
- Faster than oven (20-30 minutes)
- Uses less energy
- Great texture
Cons:
- Limited to smaller pot pies
- May need adjustment based on air fryer model
- Less predictable results
Detailed Step-by-Step Instructions
Now let’s break down each method in detail:
The Oven Method (My Personal Favorite)
-
Preheat your oven to 350°F (175°C)
This moderate temperature prevents the crust from burning before the filling heats through. -
Prepare your pot pie
Remove from packaging and place in an oven-safe dish or baking tray. -
Cover with aluminum foil
This is CRUCIAL! The foil shields the crust from direct heat to prevent burning. -
Bake for 50-60 minutes
Patience is key here, folks! Rushing this step will leave you with a half-frozen middle. -
Remove foil for the last 10-15 minutes
This allows the crust to crisp up and achieve that beautiful golden-brown color we all crave. -
Check internal temperature
Use a food thermometer to ensure the filling reaches 165°F (74°C). Safety first! -
Let it rest for 5-10 minutes
This resting period allows the filling to thicken slightly and prevents burns when eating.
The Microwave Method (When You’re Really Hungry)
-
Remove pot pie from packaging
Place on a microwave-safe plate. -
Pierce the crust several times with a fork
This lets steam escape and helps prevent a soggy nightmare. -
Microwave on medium power for 3-5 minutes
Using medium power rather than high is the secret to better texture. -
Check temperature frequently
The filling should reach 165°F (74°C). -
Let rest for 2-3 minutes
Be careful! The filling can be extremely hot even if the crust doesn’t look it.
The Air Fryer Method (For Crisp Enthusiasts)
-
Preheat air fryer to 325°F (163°C)
A slightly lower temp than the oven works best here. -
Place pot pie in air fryer basket
Make sure it fits without overcrowding. You might need to trim edges if it’s too large. -
Air fry for 20-30 minutes
Check occasionally to prevent excessive browning. -
Check internal temperature
As always, aim for 165°F (74°C) in the center. -
Rest for 3-5 minutes before serving
This helps stabilize the filling and prevents a molten mess.
Common Mistakes to Avoid (I’ve Made Them All!)
Let me tell you about some pitfalls I’ve encountered so you don’t repeat my mistakes:
-
Using too high temperature
This burns the crust while leaving the center frozen. Low and slow is the way to go! -
Skipping the foil cover
I once tried to save 10 seconds by not covering with foil and ended up with a burnt-top, cold-center disaster. -
Microwaving on high power
This creates a hot, rubbery exterior and cold interior. Medium power is your friend. -
Not checking internal temperature
Food poisoning isn’t worth saving a few minutes. Use that thermometer! -
Trying to rush the process
I know it’s tempting, but patience truly pays off with pot pies.
Troubleshooting Common Problems
Even the best-laid plans sometimes go awry. Here’s how to fix common pot pie problems:
Soggy Crust Blues
- Problem: Your crust is soft and sad instead of crispy
- Fix: Increase uncovered baking time in oven or air fryer. For microwave reheating, try placing a paper towel underneath to absorb moisture.
Burnt Crust Disaster
- Problem: The top is burnt while the filling isn’t hot yet
- Fix: Lower the oven temperature slightly and keep the pot pie covered with foil longer.
Lukewarm Filling Disappointment
- Problem: The crust looks great but the filling is barely warm
- Fix: Make sure your oven is properly preheated and extend cooking time while checking temperature regularly.
Dry, Sad Filling
- Problem: The filling is hot but seems dry
- Fix: Try adding a tablespoon or two of chicken broth or cream before reheating.
FAQ: Your Burning Questions Answered
Q: Can I reheat a frozen chicken pot pie directly from the freezer without thawing?
A: Absolutely! In fact, it’s recommended to reheat directly from frozen to maintain texture and prevent bacterial growth. Skip the thawing step.
Q: How long does a reheated pot pie stay good in the fridge?
A: A reheated chicken pot pie will last 3-4 days in the refrigerator if stored properly.
Q: Can I refreeze a chicken pot pie after reheating it?
A: I wouldn’t recommend it. Refreezing after reheating can compromise texture and increase the risk of bacterial growth.
Q: Can I use a toaster oven instead?
A: Yes! Follow the oven instructions but monitor closely as toaster ovens heat up faster. It’s a great option for smaller individual pies.
Q: My pot pie is bubbling over during reheating. Help!
A: Place a baking sheet lined with foil beneath your pot pie to catch drips. This has saved my oven from numerous cleaning sessions!
Q: What about convection ovens?
A: Lower the temperature by 25°F (14°C) and check for doneness earlier since convection ovens cook faster.
Q: My chicken pot pie doesn’t have reheating instructions. What should I do?
A: Follow the oven method outlined above. It’s the safest bet, and always prioritize checking the internal temperature.
Special Tips for Different Types of Pot Pies
Different pot pies may require slight adjustments:
-
Store-bought pot pies: These often have thinner crusts, so you might need to reduce cooking time by 5-10 minutes.
-
Homemade pot pies: These typically have thicker crusts and might need a full hour in the oven.
-
Individual pot pies: These smaller versions heat faster—check after 30-35 minutes in the oven.
-
Family-sized pot pies: These larger pies may need up to 60-90 minutes to heat properly, especially from frozen.
The Secret to Amazing Reheated Pot Pie
If you want to take your reheated pot pie to the next level, try this pro tip: brush the crust with a little melted butter or egg wash before the final 10 minutes of baking. This creates an even more golden, shiny finish that’ll make your pot pie look like it came straight from a bakery!
Final Thoughts: Which Method is Best?
While I’ve given you three solid methods for reheating frozen chicken pot pies, I gotta be honest—the oven method is king. Yes, it takes longer, but the results are consistently amazing. The microwave is great in a pinch, but the texture sacrifice is real. The air fryer is an excellent compromise if you have one and are reheating smaller pies.
Whichever method you choose, remember that the key to success is monitoring that internal temperature and not rushing the process. Good things come to those who wait—especially when it comes to chicken pot pie!
Now go forth and enjoy your perfectly reheated pot pie! Your taste buds (and dinner guests) will thank you.
How to Reheat Frozen Chicken Pot Pie in the Oven
Reheating a frozen chicken pot pie in the oven is simple, and my favorite method, but it can be time consuming, so be sure to keep this in mind when you are preparing dinner.
The rule of thumb is “low and slow,” so keep the temperature moderate and plan for a cook time of at least half an hour or longer if frozen when using the oven method.
Oven reheating will preserve the flavor of a pie and will keep the crust flaky and delicious. It’s the best method for reheating a whole pie or larger pieces at once.
Every oven is different and these instructions are generalized instructions that can help you begin to reheat your pot pie, but keeping an eye on your food is key.
You’ll want to periodically check to make sure that the crust isn’t cooking faster than the filling, and adjust your cook time, temperature, or aluminum foil covering if needed.
- Preheat the oven to 325°F and remove pot pie from any plastic wrap or other wrapping. If you prepared and stored your pot pie in a tin or aluminum dish, you can leave it there. If you are reheating leftovers from a pan, transfer to an oven-safe dish for best results.
- Wrap the perimeter of the pie in foil to prevent the edges from drying out or burning. The goal is to leave some room for heat to circulate, so keep the center of the pie exposed. The middle crust will become flakier due to the steam rising from the hot filling. Pay attention to the speed in which your pie is browning in relation to the filling heating up and adjust your oven as necessary to avoid a soggy mess.
- Place your pot pie on a baking sheet in the preheated oven and reheat for approximately 25-35 minutes for refrigerated pies and 45 minutes or longer for frozen pies.
- If you are reheating multiple pies, stagger them a few minutes apart so all pies will be hot and fresh at serving time.
For reheating a pot pie in a toaster oven, follow all of the aforementioned steps for reheating in a conventional oven but set the heat to 375-400°F.
Make a few small cuts in the crust so steam can escape, and check on the pie regularly to avoid burning or rapidly overcooking your crust.

How to Reheat a Frozen Pot Pie Quickly in the Oven
There is a quicker method to reheating your pot pie in the oven that will allow you to cut cook time while keeping your crust flaky and your filling fresh.
If you make last minute plans to cook your frozen chicken pot pie, this is the best option for reheating pot pie the quickest way but still preserving the flaky texture.
This is a rapid method that is simple and requires very few steps.
- Preheat oven to 360°F.
- Transfer your pie to an oven-safe and microwave-safe dish.
- Cover the pie with a damp paper towel and place in microwave. Heat on high for three minutes. This will begin to thaw the pie and will allow it to cook evenly in the oven.
- Transfer pot pie to baking sheet and cover the perimeter of the pie with aluminum foil.
- Place the pot pies on a baking sheet in the center of the oven and heat for 10-12 minutes, or until the crusts are golden brown and the filling is hot at the center.
- For the last 2-3 minutes of reheating, remove aluminum foil to allow the crust to brown.
- Check for an internal temperature of 165-170°F, or until the filling is bubbling out when the center is cut.
- Cool to a comfortable temperature then serve. (Hot chicken pot pie can easily burn your mouth so be careful!)