Have you ever tried making honey fried chicken at home only to end up with a sticky, burnt mess? Trust me we’ve all been there. After countless attempts and kitchen disasters I’ve finally cracked the code to creating that perfect, crispy-on-the-outside, juicy-on-the-inside honey fried chicken that’ll make your family think you’ve been hiding professional culinary skills all along.
Why Honey Fried Chicken Gets Sticky and Burns
Before we dive into the recipe, let’s understand why honey fried chicken can be so tricky Honey contains natural sugars that caramelize and burn quickly when exposed to high heat This is the main culprit behind that charred exterior and sticky texture that ruins what could’ve been an amazing dinner.
The good news? With a few simple techniques and the right timing, you can avoid these problems completely!
Essential Ingredients for Perfect Honey Fried Chicken
Here’s what you’ll need to make mouth-watering honey fried chicken:
- 2 pounds chicken pieces (I prefer thighs and drumsticks)
- 1/2 cup honey
- 1/4 cup soy sauce
- 3 cloves garlic, minced
- 1 tablespoon ginger, grated
- 2 cups all-purpose flour
- 1 tablespoon paprika
- 1 teaspoon black pepper
- 1 teaspoon salt
- 1/2 teaspoon cayenne pepper (optional for heat lovers)
- 2 eggs, beaten
- Vegetable oil for frying
The Secret Two-Stage Cooking Method
The biggest mistake people make is adding honey before or during the frying process. This is a recipe for disaster! Instead, we’re gonna use a two-stage approach that’ll give you that perfect honey flavor without the burnt, sticky mess.
Stage 1: Prepare and Fry the Chicken
-
Pat your chicken pieces dry with paper towels. This is super important! Excess moisture is the enemy of crispy chicken.
-
In a bowl, mix the flour, paprika, black pepper, salt, and cayenne pepper.
-
Dip each chicken piece in beaten eggs, then coat thoroughly in the flour mixture. For extra crispiness, you can double-dip (egg-flour-egg-flour).
-
Heat vegetable oil in a deep fryer or large, heavy-bottomed pot to 350°F (175°C). The oil should be about 2 inches deep.
-
Carefully place the coated chicken pieces in the hot oil, being careful not to overcrowd the pan. Work in batches if necessary.
-
Fry until golden brown and cooked through, about 12-15 minutes for larger pieces and 8-10 minutes for smaller ones. The internal temperature should reach 165°F (74°C).
-
Remove chicken and place on a wire rack over a baking sheet, NOT on paper towels (this helps maintain crispiness).
Stage 2: The Honey Glaze Magic
This is where the magic happens and what separates mediocre honey chicken from amazing honey chicken!
-
While the chicken is cooling slightly, prepare your honey glaze by mixing honey, soy sauce, minced garlic, and grated ginger in a small saucepan.
-
Heat the mixture over medium-low heat for about 3-5 minutes, stirring constantly until it thickens slightly. Don’t let it boil!
-
Now you have two options:
- Option A: Brush the honey glaze onto the fried chicken pieces
- Option B (my personal favorite): Quickly toss the chicken in the warm glaze for complete coverage
The key is to apply the honey mixture AFTER frying, not before or during. This prevents the honey from burning while still giving you that sweet, sticky goodness we all crave.
Advanced Tips for Honey Fried Chicken Perfection
After making this dish about a million times (okay, maybe not that many, but close!), I’ve picked up some tips that’ll take your honey fried chicken to the next level:
Temperature Control is Everything
Using a cooking thermometer is non-negotiable! Oil that’s too hot will burn the exterior before the chicken cooks through. Oil that’s too cool will make the chicken absorb too much oil and become greasy.
Maintain that 350°F (175°C) sweet spot throughout the cooking process. When you add chicken to the oil, the temperature drops, so adjust your heat accordingly.
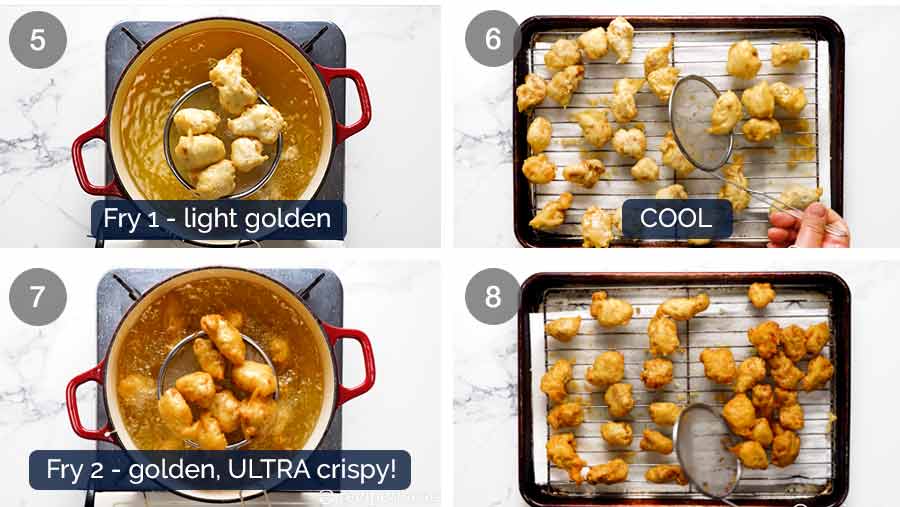
The Double Fry Technique
For the crispiest chicken that stays crispy even after adding the honey glaze, try the double-fry method:
- First fry: Cook chicken at 325°F (165°C) for about 8 minutes
- Rest: Let chicken rest on wire rack for 15 minutes
- Second fry: Return to oil at 375°F (190°C) for 2-3 minutes until extra crispy
- Then apply your honey glaze as described above
This technique creates a sturdy crust that holds up well to the honey glaze without getting soggy.
Honey Selection Matters
Not all honey is created equal! I’ve found that lighter honeys like clover or acacia work best for this recipe. They have a milder flavor that complements the chicken without overpowering it.
Darker honeys like buckwheat can be used if you want a stronger honey flavor, but you might want to use slightly less as they can be more intense.
Troubleshooting Common Honey Fried Chicken Problems
Even with the best recipe, things can go wrong. Here’s how to fix common issues:
Problem: Coating Falls Off During Frying
Solution: Make sure your chicken is completely dry before coating. Also, let the coated chicken rest for 15-20 minutes before frying to help the coating adhere better.
Problem: Chicken Is Cooked Outside But Raw Inside
Solution: Your oil is probably too hot. Lower the temperature and cook for longer. Using a meat thermometer to check for doneness (165°F/74°C) is always a good idea.
Problem: Honey Glaze Is Too Runny
Solution: Simmer your glaze a bit longer to reduce and thicken it. If you’re in a hurry, you can add 1/2 teaspoon of cornstarch mixed with 1 tablespoon of cold water to help it thicken faster.
Serving Suggestions for Honey Fried Chicken
This dish is versatile and pairs well with many sides. My favorite combinations include:
- Classic combo: Coleslaw and cornbread
- Asian-inspired: Steamed rice and stir-fried vegetables
- Southern style: Mac and cheese with collard greens
- Light option: Fresh green salad with vinaigrette
Make-Ahead and Storage Tips
Honey fried chicken can be prepared in advance, which is great for parties or busy weeknights:
- Fry the chicken as directed but don’t add the honey glaze
- Cool completely and refrigerate for up to 2 days
- When ready to serve, reheat in a 350°F (175°C) oven for 15-20 minutes until hot and crispy
- Prepare and add the honey glaze just before serving
Leftovers can be stored in the refrigerator for up to 3 days, though the coating won’t be as crispy when reheated. For best results when reheating, use an air fryer or oven rather than a microwave.
Why Our Honey Fried Chicken Recipe Works
After experimenting with countless variations, we believe this method succeeds where others fail because:
- It separates the frying and glazing processes, preventing sugar burn
- The coating recipe creates a barrier that helps the chicken stay juicy
- The glaze ingredients balance sweetness with savory notes
- Temperature control ensures even cooking without burning
Health Considerations and Modifications
Let’s be real – fried chicken isn’t health food, but there are ways to make it a bit better for you:
- Air fryer option: You can adapt this recipe for an air fryer by spraying the coated chicken with cooking oil and air frying at 370°F for about 25 minutes, flipping halfway through
- Skinless chicken: Using skinless pieces reduces fat content
- Honey alternatives: Agave nectar or maple syrup can be substituted for honey if preferred
Final Thoughts on Mastering Honey Fried Chicken
Making perfect honey fried chicken isn’t rocket science, but it does require attention to detail and respecting the cooking process. The key takeaway is to separate the frying from the honey application – this simple change will transform your results.
Remember that practice makes perfect, and even if your first attempt isn’t restaurant-quality, it’ll still taste pretty darn good! Each time you make this recipe, you’ll get better at judging cooking times, oil temperatures, and glaze consistency.
So go ahead, give this honey fried chicken recipe a try this weekend. Your family will be impressed, your taste buds will thank you, and you’ll finally have conquered one of home cooking’s stickiest challenges!
Don’t forget to share your results with us – we’d love to hear how it turned out for you!
CommentsAdd CommentPublicPrivate There aren’t any comments yet. Be the first to leave one.There aren’t any comments yet. Be the first to leave one.Private comments are only visible to you.
or to save this recipe.
Ratings4 out of 551 user ratingsYour rating
or to rate this recipe.Have you cooked this?
or to mark this recipe as cooked.
Private NotesLeave a Private Comment on this recipe and see it here.
Honey Butter Fried Chicken (too easy to make) #shorts #friedchicken #honey #butter #easyrecipe
FAQ
How to fry chicken in honey?
Heat the oil in a large frying pan or wok over a high heat and fry the chicken for 3-4 mins until lightly golden. Tip in the honey sauce and stir-fry for 10 mins, or until the chicken is cooked through and the sauce has reduced enough to coat the back of a spoon.
What is honey chicken sauce made of?
Honey chicken contains pieces of fried breaded chicken in a sauce of honey, soy sauce, sesame oil and vinegar. What to serve with honey chicken? While I often serve this dish over steamed white rice, other great grain options include crispy fried rice noodles, quinoa, brown rice, or a boiled rice or egg noodle.
What are the ingredients in honey butter fried chicken?
Ingredients Boneless chicken thigh or breast- season with white pepper and soy sauce Coating – egg white and cornstarch or potato starch For Honey butter sauce – garlic, honey, butter, brown sugar, soy sauce, cornstarch +water , and crushed chillies. Garnish – sesame seeds, spring onions.
Can you fry something with honey on it?
Dredge honey-coated chicken pieces in flour mixture, coating completely. Fill a large, heavy skillet with oil to a depth of 1 inch. Heat over medium-high heat. Fry until chicken is no longer pink at the bone and the juices run clear, about 5 minutes per side.