Let’s face it – sometimes you’re craving that perfect crispy fried chicken but don’t have buttermilk in your fridge. Maybe you’re dairy-free or perhaps you just forgot to grab some at the store. Whatever the reason, I’m here to tell you that incredible fried chicken doesn’t require buttermilk at all!
As someone who’s been perfecting fried chicken recipes for years I’ve discovered that the double-dredging method creates chicken that’s just as juicy and crispy as traditional buttermilk recipes. In fact some Southern cooking experts even prefer it this way!
In this guide, I’ll share my foolproof method for making mouthwatering fried chicken without buttermilk that’ll have your family begging for seconds.
Why This No-Buttermilk Fried Chicken Works
Before diving into the recipe, let me explain why this approach works so well:
- Double dredging technique creates an extra-crispy outer layer that seals in juices
- Egg coating provides moisture and helps the flour adhere perfectly
- Simple seasonings allow the natural chicken flavor to shine
- Cast iron cooking ensures even heat distribution for perfect frying
The best part? This recipe is actually simpler than many traditional methods that require marinating chicken in buttermilk overnight!
Ingredients You’ll Need
For this recipe, you’ll need:
- 2-4 pounds chicken pieces (thighs, drumsticks, wings, or breasts)
- 1½ cups all-purpose flour
- 3 large eggs, beaten
- 1½-2 tablespoons salt (divided)
- 1 teaspoon black pepper
- 1 teaspoon paprika
- ½ teaspoon cayenne pepper (optional)
- 1 teaspoon dried thyme or herbs of choice
- 1 teaspoon onion powder
- ½ teaspoon garlic powder
- Vegetable oil for frying (enough for 1-2 inches in your pan)
The Secret to Extra Crispy Fried Chicken
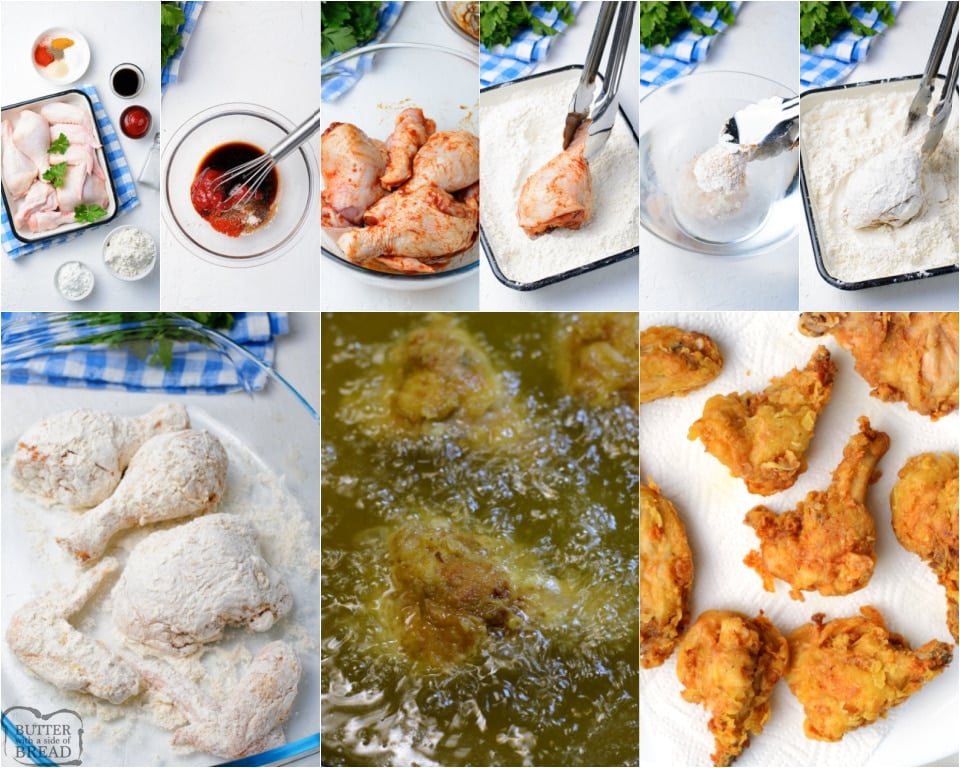
The absolute key to achieving that perfect crispy crust without buttermilk is in the double dredging technique. This means coating the chicken in flour, then egg, then flour again.
This creates multiple layers that fry up incredibly crispy while sealing in the chicken’s natural juices. Trust me, you won’t miss the buttermilk at all!
Step-by-Step Instructions
1. Prepare Your Stations
First, set up your dredging stations to make the process smooth:
- Station 1: Chicken pieces (lightly salted)
- Station 2: Seasoned flour mixture
- Station 3: Beaten eggs
- Station 4: Wire rack over a baking sheet
Having everything organized before you start makes the process much cleaner and more efficient.
2. Season the Chicken and Flour
Sprinkle about 1 teaspoon of salt directly onto your chicken pieces and mix to ensure they’re evenly seasoned.
In a large bowl, combine the flour with the remaining salt, pepper, paprika, cayenne (if using), thyme, onion powder, and garlic powder. Mix thoroughly.
3. The Double-Dredge Process
Here’s where the magic happens:
- Take a piece of chicken and dredge it completely in the seasoned flour
- Shake off excess flour
- Dip the floured chicken into the beaten eggs, ensuring complete coverage
- Let excess egg drip off
- Dredge again in the flour mixture, pressing gently to help it adhere
- Place on the wire rack
Repeat with all chicken pieces. The wire rack allows air to circulate around the chicken while the coating sets.
4. Heat Your Oil
In a deep cast iron skillet or heavy-bottomed pan, heat about 1-2 inches of vegetable oil to approximately 350°F (175°C).
If you don’t have a thermometer, you can test the oil by dropping a small pinch of flour into it. If it sizzles and floats to the top, the oil is ready.
Pro tip: Keep your heat at medium to medium-high. If the oil is too hot, the outside will burn before the inside cooks. If it’s too cool, the chicken will absorb too much oil and become greasy.
5. Fry to Golden Perfection
Working in batches (don’t overcrowd the pan!), carefully place chicken pieces into the hot oil, skin side down if applicable.
- Fry smaller pieces like wings or breast nuggets for about 5 minutes per side
- Boneless thighs take approximately 5-7 minutes per side
- Bone-in pieces like drumsticks need 7-10 minutes per side
The chicken is done when it reaches an internal temperature of 165°F and has a beautiful golden-brown crust.
6. Drain and Rest
This step is crucial! When the chicken is done, transfer it to a clean wire rack placed over a baking sheet. Don’t put it on paper towels, as this will create steam and soften your perfect crispy crust.
Let the chicken rest for about 5 minutes before serving. This allows the juices to redistribute throughout the meat.
Troubleshooting Tips
Even experienced cooks sometimes run into issues with fried chicken. Here are solutions to common problems:
Coating falls off during frying:
- Make sure to shake off excess flour before dipping in egg
- Let the coated chicken rest on the rack for 5-10 minutes before frying
- Don’t flip the chicken too frequently while frying
Chicken is golden outside but raw inside:
- Your oil is likely too hot
- Lower the heat and continue cooking
- For thick pieces, finish in a 350°F oven for a few minutes
Greasy chicken:
- Oil temperature was too low
- Make sure oil returns to temperature between batches
- Drain thoroughly on a wire rack, not paper towels
Variations to Try
While the basic recipe is fantastic, here are some variations to keep things interesting:
Extra Crispy Version:
Replace half the flour with cornstarch for an even crispier crust.
Spicy Kick:
Double the cayenne and add 1 teaspoon of hot sauce to the egg mixture.
Herb-Infused:
Add 1 tablespoon of fresh herbs like rosemary, thyme, or sage to the flour mixture.
KFC-Style:
Add ½ teaspoon each of dried thyme, dried basil, dried oregano, celery salt, and ground ginger to your flour mixture.
Serving Suggestions
Pair your crispy fried chicken with these classic sides:
- Homemade mashed potatoes
- Coleslaw
- Cornbread or biscuits
- Green beans or collard greens
- Mac and cheese
- Country gravy
Storage and Reheating
Leftover fried chicken? Lucky you! Here’s how to store and reheat it:
Storage: Place cooled chicken in an airtight container and refrigerate for up to 4 days.
Reheating: For best results, reheat in a 350°F oven for 15-20 minutes. This maintains the crispy exterior better than microwave reheating.
Why This Recipe Beats Buttermilk Versions
After making fried chicken both ways, I’ve found several advantages to skipping the buttermilk:
- No advance planning needed – no overnight marinating
- Works for dairy-free diets
- Cleaner, crispier crust that doesn’t get soggy as quickly
- Pure chicken flavor shines through
- Less mess overall in the kitchen
Final Thoughts
Making crispy, juicy fried chicken without buttermilk isn’t just possible—it might become your preferred method! The double-dredge technique creates a perfect crust that seals in moisture and flavor, while the simple seasonings let the chicken’s natural tastiness be the star.
Next time you’re craving homemade fried chicken but don’t have buttermilk on hand, don’t worry! This recipe delivers restaurant-quality results with ingredients you probably already have in your kitchen.
FAQs About Fried Chicken Without Buttermilk
Q: Is plain flour good for frying chicken?
A: Absolutely! Regular all-purpose flour works perfectly for creating a crispy crust.
Q: How do I know when the oil is the right temperature?
A: If you don’t have a thermometer, drop a pinch of flour into the oil. If it sizzles and floats on top, the oil is ready.
Q: Can I make this recipe gluten-free?
A: Yes! Substitute the all-purpose flour with cornstarch or potato starch for a gluten-free alternative.
Q: Should I wash my chicken before cooking?
A: The USDA actually recommends against washing chicken as it can spread bacteria. If you want to clean your chicken, simply wipe it with a wet paper towel.
Q: What’s the best oil for frying chicken?
A: Vegetable oil, peanut oil, or avocado oil all work well due to their high smoke points.
Step 2: Bread and Fry the Chicken
Line a plate with a few layers of paper towels and set it next to the stove. Pour the oil into a large, high-sided pot or Dutch oven until it reaches a depth of about 1 inch. Heat the oil over medium-high heat until shimmering (about 350°F or 175°C).
In a medium bowl, whisk the egg and milk until evenly combined.

In another medium bowl, whisk the flour, cornstarch, baking powder, garlic powder, pepper, Accent, paprika, and the remaining ¾ teaspoon salt.

Drizzle 4 tablespoons of the egg mixture into the flour mixture.

Mix with a fork until the flour mixture is evenly clumpy.

Line a baking sheet with aluminum foil for easy cleanup. Remove the chicken from the brine and pat dry with paper towels. One at a time, dip each breast into the egg mixture, letting any excess drip off, and then into the flour mixture, turning a few times and pressing firmly so that the clumps adhere.

Set the breaded chicken on the lined baking sheet and repeat with the remaining breasts.

Carefully place a few pieces of breaded chicken into the hot oil without crowding the pot. Cook, turning a few times, until golden brown and crispy on both sides, 4 to 5 minutes total.

Place the cooked chicken on the paper towel-lined plate to drain. Fry the remaining breasts in the same manner, adjusting the heat as necessary to maintain the temperature of the oil.

What You’ll Need To Make Fried Chicken Sandwiches
