Are you tired of dry, flavorless chicken? Looking to up your grilling game with juicy, mouth-watering chicken thighs that’ll have everyone asking for seconds? You’ve come to the right place! I’ve been perfecting my pellet grill chicken thigh technique for years, and I’m excited to share all my secrets with you
Chicken thighs are arguably the best cut of chicken for grilling – they’re forgiving, packed with flavor, and when done right on a pellet grill, they’re absolutely irresistible. Whether you’re a pellet grill newbie or a seasoned pitmaster, this guide will help you create competition-worthy chicken thighs right in your backyard.
Why Chicken Thighs Are Perfect for Pellet Grilling
Before we dive into the how-to, let’s talk about why chicken thighs are such a great choice
- More Flavorful: Compared to chicken breasts, thighs have a richer, more savory flavor profile
- Higher Fat Content: This means they stay moist and tender, even if you accidentally overcook them a bit
- Affordable: Typically less expensive than other cuts, making them perfect for feeding crowds
- Versatile: They take on flavors from marinades, rubs, and smoke beautifully
When I first started using my pellet grill, I was amazed at how the combination of consistent temperature control and wood-fired flavor transformed ordinary chicken thighs into something spectacular.
What You’ll Need
Let’s gather our supplies before we start:
- Bone-in, skin-on chicken thighs (for best flavor, though boneless works too)
- Your pellet grill (any brand works – Pit Boss, Traeger, Camp Chef, etc.)
- Wood pellets (hickory, apple, cherry, or competition blend work great)
- Meat thermometer (digital instant-read is best)
- Marinade or dry rub of your choice
- Aluminum pans (optional, for certain cooking methods)
- BBQ sauce (optional, for finishing)
- Butter (optional, for extra juiciness)
Prepping Your Chicken Thighs
Proper prep is crucial for amazing results. Here’s my step-by-step process:
1. Trim and Clean
Start with high-quality chicken thighs. I look for uniform-sized pieces with good skin coverage.
- Rinse thighs under cold water and pat dry thoroughly with paper towels
- Trim any excess fat, loose skin, or tendons
- If desired, scrape excess fat from underneath the skin (this helps achieve crispy skin)
- For competition-style presentation, trim the meat so the skin can fold neatly underneath the thigh
2. Consider Brining (Optional but Recommended)
A brine adds moisture and flavor. Here’s a simple brine recipe I use:
- 2 cups apple cider
- 2 cups water
- 6 tablespoons dark brown sugar
- 1/2 cup kosher salt
- 2 bay leaves
- 1/4 cup apple cider vinegar
- 1/4 cup honey
Combine ingredients in a saucepan over medium heat until sugar and salt dissolve. Cool completely before using.
Place chicken thighs in a large ziplock bag, pour in the brine, seal, and refrigerate for 3-4 hours. After brining, rinse the chicken thoroughly and pat dry again.
3. Season Generously
You have two main options:
Option 1: Dry Rub
Apply a generous amount of your favorite BBQ rub or make your own. Make sure to get some under the skin for maximum flavor. My basic rub combines:
- 2 tablespoons paprika
- 1 tablespoon brown sugar
- 1 tablespoon garlic powder
- 1 tablespoon onion powder
- 1 teaspoon salt
- 1 teaspoon black pepper
Option 2: Marinade
Marinate for at least 30 minutes, but overnight is better. Some marinade ideas:
- Basic: Olive oil, lemon juice, garlic, herbs
- Asian-inspired: Soy sauce, ginger, sesame oil, honey
- Spicy: Olive oil, chili powder, cumin, cayenne
After applying rub or marinade, let the chicken rest at room temperature for about 30 minutes before grilling.
Firing Up Your Pellet Grill
Now comes the fun part – grilling! Here’s how I set up my pellet grill:
- Fill the hopper with quality wood pellets (I prefer fruit woods like apple or cherry for chicken)
- Preheat the grill to 350°F (this temp creates the perfect balance for juicy meat and crispy skin)
- Clean and oil the grates to prevent sticking
Three Ways to Cook Chicken Thighs on Your Pellet Grill
I’ve experimented with several methods, and these three deliver the best results depending on what you’re going for:
Method 1: Direct Grilling (Fastest Method)
This method is great when you’re short on time but still want tasty results:
- Place chicken thighs skin-side down directly on the grates
- Grill for 5-7 minutes until skin begins to crisp and turn golden
- Flip thighs and continue cooking for another 10-15 minutes
- If using sauce, brush it on during the last 5 minutes
- Cook until internal temperature reaches 165°F at minimum (I prefer 175°F for thighs)
Pro tip: For extra crispy skin, crank up the heat to 400°F for the last few minutes.
Method 2: Competition-Style (Most Flavorful)
This is based on competition BBQ techniques and delivers amazing results:
- Place a tablespoon pat of butter in an aluminum pan for each thigh
- Arrange chicken thighs skin-side up on the butter pats
- Smoke at 250°F for about 1 hour
- Warm your favorite BBQ sauce in a small pot
- Dunk each thigh in the warm sauce, letting excess drip off
- Place thighs directly on the grill grates, skin-side up
- Continue cooking for 20-30 minutes until internal temp reaches 180-185°F
- Remove, cover with foil, and rest for 10-15 minutes
Method 3: Low and Slow Smoking (Deepest Flavor)
For the richest smoke flavor:
- Set grill to 225°F with indirect heat
- Place thighs on the grill grates, skin-side up
- Smoke for 1.5-2 hours until they reach 165°F
- For crispy skin, increase temperature to 375°F for the last 5-10 minutes
- Let rest for 5-10 minutes before serving
Temperature: The Key to Perfect Chicken Thighs
The most important tool in your grilling arsenal is a good meat thermometer. Here’s what to aim for:
- 165°F: Minimum safe temperature (USDA guideline)
- 175-180°F: My recommended target for chicken thighs (more tender, juicy results)
- 185°F: Competition-style doneness (fall-off-the-bone tender)
Remember to check the temperature at the thickest part of the thigh, avoiding the bone.
Troubleshooting Common Issues
Even experienced grillers sometimes run into problems. Here are some fixes:
Problem: Skin isn’t crispy
Solution: Finish with 5 minutes on high heat (400°F) or briefly under a broiler
Problem: Chicken is dry
Solution: Try brining next time; cook to a lower internal temperature; use butter pats under the thighs
Problem: Not enough smoke flavor
Solution: Use stronger wood pellets like hickory; cook at a lower temperature for the first hour
My Favorite Chicken Thigh Recipe
Here’s my go-to recipe that never fails to impress:
Sweet & Smoky Pellet Grilled Chicken Thighs
Ingredients:
- 8 bone-in, skin-on chicken thighs
- 2 tablespoons olive oil
- 3 tablespoons brown sugar
- 1 tablespoon smoked paprika
- 1 tablespoon garlic powder
- 1 teaspoon salt
- 1 teaspoon black pepper
- 1/2 teaspoon cayenne (optional)
- Apple or cherry wood pellets
Instructions:
- Mix all dry ingredients to create a rub
- Coat chicken thighs with olive oil, then apply rub generously
- Let sit for 30 minutes at room temperature
- Preheat pellet grill to 350°F
- Grill chicken thighs using Method 1 (direct grilling)
- Serve with your favorite sides
Final Thoughts
Grilling chicken thighs on a pellet grill isn’t just about cooking – it’s about creating an experience your taste buds won’t forget. The combination of juicy dark meat, crispy skin, and that unmistakable wood-fired flavor is hard to beat.
Don’t be afraid to experiment with different rubs, sauces, and techniques until you find your perfect method. The beauty of pellet grills is their consistency, which makes it easier to replicate your successes.
So fire up that pellet grill, grab some chicken thighs, and get ready for some seriously delicious results. Your friends and family will think you’ve been taking secret grilling lessons!
What’s your favorite way to season chicken thighs? Drop a comment below – I’m always looking for new flavor combinations to try!
FAQ About Grilling Chicken Thighs on a Pellet Grill
Q: How long does it typically take to grill chicken thighs on a pellet grill?
A: At 350°F, expect about 20-30 minutes total cooking time. At 225°F, it will take closer to 1.5-2 hours.
Q: Should I use bone-in or boneless chicken thighs?
A: Bone-in, skin-on thighs generally have more flavor and stay juicier, but boneless work well too if you prefer them.
Q: What’s the best wood for smoking chicken thighs?
A: Fruit woods like apple, cherry, and peach provide mild, sweet smoke that complements chicken beautifully. Hickory and maple are slightly stronger but still excellent choices.
Q: Do I need to flip the chicken thighs while grilling?
A: It depends on your method. For direct grilling, yes, start skin-side down then flip. For indirect methods, you can often cook them skin-side up the entire time.
Q: Can I use frozen chicken thighs?
A: I don’t recommend it. Thaw completely for even cooking and better flavor absorption.
Happy grilling!

How to get the crispiest chicken skin using a pellet grill
I used chicken thighs for this guide as they are one of my favorite cuts to cook on the smoker, but the advice applies to any cut. Here’s the full recipe for my smoked chicken thighs.
Prepare the chicken by laying it on an elevated wire baking rack with a baking pan underneath and pat them dry with a paper towel.
I like placing the chicken on a wire rack to ensure it doesn’t sit in its own juices while it is drying out.
I like to use Kosher salt so I can see the flakes to make sure I cover each piece evenly. This also ensures I don’t over-salt the chicken.
Simply sprinkle Kosher salt all over the chicken and refrigerate it uncovered.

The salt will start drawing the moisture out from the skin and leaving it uncovered also aids in the drying process as the air circulates around it.
Allow the chicken to salt brine for a minimum of 4 hours and up to 24 hours.
After removing the chicken from the refrigerator pat any excess moisture and salt from the chicken skin with a paper towel.
Add a little drizzle of olive oil to each piece of chicken, rub it all over the skin, then sprinkle on cornstarch and your favorite seasoning or rub. I used Smoke Kitchen Honey Garlic rub. From Our Shop
- Made & packed fresh in the USA from the highest quality ingredients
- 45-Day Money-Back Guarantee
Make sure you get good coverage of both the seasoning and cornstarch on the chicken skin.
Heat your pellet grill to 225°F.
Place the chicken directly on the grill. Make sure you have a bit of space between each piece.
Smoke your chicken for the first 30 minutes at 225°F. Chicken tends to take on smoke better than most proteins you only need a short time smoking to impart some flavor.
If you want crispy chicken skin the key is to turn up the heat! High heat is essential to remove moisture and tighten up the skin.
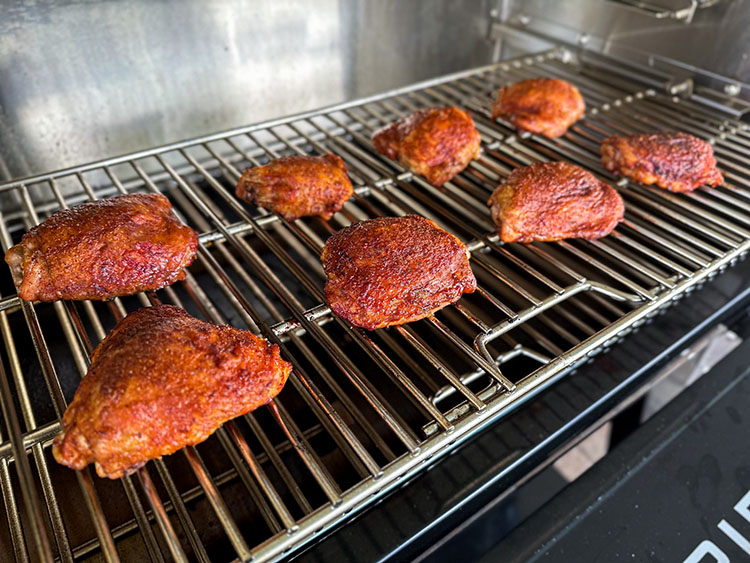
So, crank the heat up to 375°F and continue cooking your chicken until it reaches an internal temperature of 165°F.
For dark meat like chicken thighs or wings, you can take the internal temperature to 185°F and still have juicy, tender chicken.
After you remove the chicken from the grill, let it cool down and rest for 10 minutes. The skin will firm up a tad more while it rests and you will be rewarded with crispy chicken skin on the outside and tender and juicy chicken on the inside.
What’s the key to crispy chicken skin?
The key to crispy chicken skin is removing the moisture. There are several ways you can achieve that:
- Salt brine and air dry
- Use cornstarch with your seasoning
- Smoke at high heat for part of the cook
I use all three methods to ensure crispy skin, whether I’m making wings, chicken thighs, breasts, or whole chicken. High heat is the most important part, so don’t skip that.