Have you ever craved that delicious smoky flavor of grilled chicken but didn’t have access to an outdoor grill? Maybe the weather’s bad, you live in an apartment with restrictions, or you simply don’t own an outdoor grill Don’t worry – I’ve got the perfect solution that’ll have you enjoying restaurant-quality grilled chicken right from your stovetop!
As someone who cooks a LOT of chicken (seriously, my family thinks I’m obsessed), I’ve perfected the art of making juicy, flavorful chicken using just a grill pan. Today, I’m sharing all my secrets so you can enjoy that authentic grilled taste without stepping outside.
Why Use a Grill Pan for Chicken?
Before diving into the how-to. let’s talk about why grill pans are awesome
- They provide those beautiful grill marks we all love
- They allow excess fat to drain away from the meat
- They’re perfect for year-round grilling regardless of weather
- They’re apartment-friendly (no outdoor space needed!)
- They’re relatively inexpensive compared to outdoor grills
Essential Tools You’ll Need
Getting the right equipment makes all the difference
- A heavy-duty grill pan – Cast iron with ridges works best (I use a Lodge Cast Iron Grill Pan), but stainless steel is good too
- Tongs – Long, sturdy ones that won’t pierce the meat
- Meat thermometer – Digital is best for accuracy (target 165°F)
- Basting brush – For applying marinades or oil
- Paper towels – For patting chicken dry
Choosing the Best Chicken Cuts
Different cuts work better than others:
- Boneless, skinless chicken breasts – Lean option, cooks quickly
- Chicken thighs – More flavorful and forgiving (harder to overcook)
- Chicken tenders – Cook super fast, great for quick meals
- Bone-in pieces – Take longer but offer richer flavor
I personally prefer boneless chicken breasts for their versatility, but thighs are my go-to when I want more flavor.
The Secret to Perfect Grill Pan Chicken: Brining!
Here’s something many home cooks skip but shouldn’t – brining your chicken! This is especially important for chicken breasts, which can easily dry out.
Simple Brine Recipe:
- 1 quart (4 cups) cold water
- 2 tablespoons kosher salt (Diamond Crystal brand recommended – if using table salt, use only 1 tablespoon)
Brining Process:
- Combine water and salt in a large bowl
- Submerge chicken completely
- Refrigerate for 30 minutes to 1 hour (no longer for thin cuts)
- Remove, rinse and pat completely dry with paper towels
Why does this work? The salt dissolves muscle proteins in the chicken, allowing it to absorb and retain more moisture during cooking. This makes your chicken juicier and more flavorful throughout!
Seasoning Your Chicken
After brining, it’s time for flavor! Here’s my favorite seasoning mix (per 4 chicken breasts):
- 1 teaspoon dried basil (or cilantro/parsley)
- 1 teaspoon dried oregano
- 1/2 teaspoon cumin
- 1/2 teaspoon garlic powder
- 1/2 teaspoon brown sugar (helps with caramelization)
- Salt and pepper to taste
- 1 tablespoon olive oil
Feel free to switch things up! Taco seasoning, Italian herbs, or just simple salt and pepper work great too.
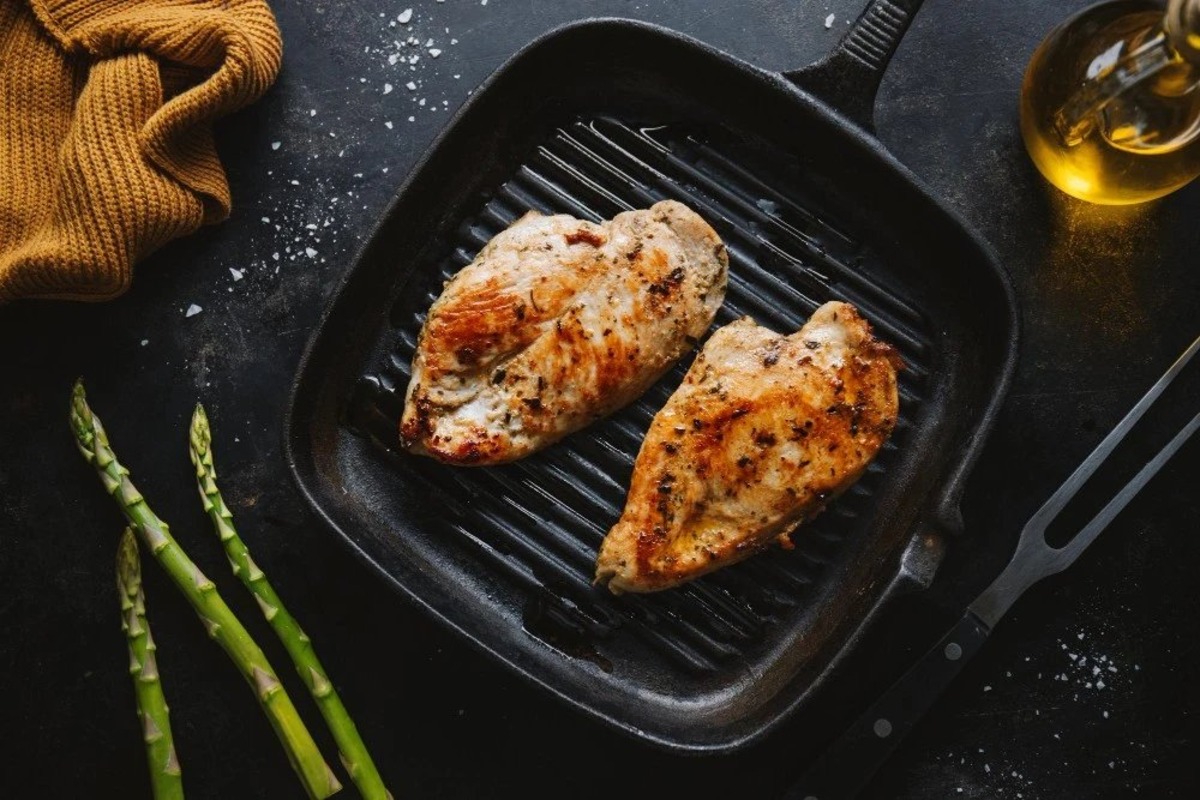
Step-by-Step Grilling Method
Now for the main event – let’s grill that chicken!
-
Prepare the chicken
- If using chicken breasts, consider pounding to even thickness (optional but helpful)
- Pat chicken completely dry after brining
- Season both sides generously
-
Preheat the grill pan
- Place pan over medium-high heat for 2-3 minutes until hot
- To test readiness, sprinkle a few drops of water – they should sizzle and evaporate immediately
-
Oil the pan
- Lower heat to medium-high
- Add 1 tablespoon of oil (olive, avocado, or grapeseed work well)
- Ensure entire cooking surface is coated
-
Add the chicken
- Place chicken on pan with breasts positioned vertically (imagine a clock – point them toward 10 o’clock)
- DO NOT MOVE the chicken for 5-6 minutes (this ensures proper grill marks)
-
Create crosshatch marks (optional but pretty!)
- After 5 minutes, rotate chicken to 2 o’clock position
- Cook for another 5 minutes
-
Flip the chicken
- Turn chicken over using tongs (avoid piercing)
- Cook second side for 5-6 minutes
- Consider covering loosely with foil to help it cook through
-
Check temperature
- Use meat thermometer to ensure internal temperature reaches 165°F
- Cooking times vary based on thickness:
- Boneless breasts: 6-7 minutes per side
- Chicken thighs: 8-10 minutes per side
-
Rest before cutting
- Remove chicken from pan
- Let rest for at least 5 minutes before slicing
- Finish with a squeeze of lemon or lime (optional but delicious!)
Common Mistakes to Avoid
I’ve made plenty of mistakes over the years – learn from them!
- Overcrowding the pan – Cook in batches if needed
- Turning too soon – Be patient for those beautiful grill marks
- Not preheating properly – A hot pan is essential
- Skipping the resting period – This locks in juices
- Using low heat – Medium-high is needed for proper searing
- Constantly moving the chicken – Let it sear undisturbed
Making it Your Own: Marinade Ideas
Want to take your chicken to the next level? Try these marinades (30 mins minimum, but overnight is best):
Lemon Herb:
- 1/4 cup olive oil
- Juice of 1 lemon
- 2 garlic cloves, minced
- 1 tablespoon fresh herbs (thyme, rosemary, oregano)
Honey Mustard:
- 2 tablespoons Dijon mustard
- 2 tablespoons honey
- 1 tablespoon olive oil
- 1 teaspoon apple cider vinegar
Smoky BBQ:
- 1/4 cup BBQ sauce
- 1 tablespoon olive oil
- 1 teaspoon smoked paprika
- 1/2 teaspoon liquid smoke (if you have it)
Serving Suggestions
Now that you’ve made perfect grill pan chicken, here’s what to do with it:
- Meal Prep – Slice and store for salads, wraps, and bowls
- Family Dinner – Serve with veggie medley and rice
- Sandwiches – Slice and add to bread with lettuce, tomato and mayo
- Salad Topper – Dice or slice for an instant protein boost
- Pasta Addition – Cut into strips and toss with your favorite pasta
- Wraps & Burritos – Dice and use in tortillas with veggies
My Favorite Grill Pan Chicken Recipe
Here’s my go-to recipe that never fails to impress:
Perfect Grill Pan Chicken Breasts
Serves 4
Ingredients:
- 4 medium boneless, skinless chicken breasts (6-8 oz each)
- 2 tablespoons kosher salt (for brine)
- 1 quart cold water (for brine)
- 1 teaspoon dried basil
- 1 teaspoon dried oregano
- 1/2 teaspoon cumin
- 1/2 teaspoon garlic powder
- 1/2 teaspoon brown sugar
- Salt and pepper to taste
- 1 tablespoon olive oil
- 1 lemon, cut into wedges
Instructions:
- Brine chicken for 30-60 minutes in salt water solution
- Remove, rinse, and pat completely dry
- Combine all seasonings and rub onto both sides of chicken
- Heat grill pan over medium-high heat for 2-3 minutes
- Add oil to coat pan
- Place chicken on pan and cook for 5-6 minutes
- Rotate for crosshatch marks (optional) and cook 5 more minutes
- Flip and cook other side 5-6 minutes or until internal temp reaches 165°F
- Rest for 5 minutes before slicing
- Serve with lemon wedges
FAQs About Grill Pan Chicken
Q: Can I use frozen chicken?
A: No, always thaw completely first for even cooking.
Q: My chicken always sticks to the pan. Help!
A: Make sure your pan is properly preheated and oiled. Also, don’t try to flip the chicken too early.
Q: How do I clean my grill pan?
A: For cast iron, use hot water and a stiff brush (no soap). For non-stick, warm soapy water is fine.
Q: Can I use this method for other meats?
A: Absolutely! It works great for pork chops, steak, and fish too.
Q: No grill pan. Can I use a regular skillet?
A: Yes, though you won’t get grill marks. The cooking method remains the same.
The Bottom Line
Grilling chicken on a grill pan is a game-changer for indoor cooking. With the right techniques – brining, proper preheating, correct timing, and good seasoning – you can achieve juicy, flavorful chicken with those beautiful grill marks right on your stovetop.
Do you have any special tricks for grilling chicken indoors? Share in the comments below!
This post contains affiliate links. If you purchase through these links, I may earn a small commission at no additional cost to you.
Set up your oven
After at least one hour or up to 24 hours of marinating, take your marinated chicken out of the fridge to bring its temperature up just a bit, for at least 20 minutes. Place your oven rack in the top third of the oven and then preheat it to the lowest broil setting. Line a large sheet pan with foil from edge to edge—this will allow for easy cleanup later! Place a wire rack on top of your lined sheet pan and spray with nonstick cooking spray or brush with oil. Remove chicken from the marinade, letting any excess marinade drip off before placing the chicken on your oiled wire rack.
Marinate your chicken in yogurt
First, start with a yogurt-based marinade. Hana’s recipe, similar to that of tandoori chicken recipes, calls for a plain yogurt, which acts as a gentle meat tenderizer that renders a ridiculously moist interior while the dairy’s natural sugars result in a crisp, almost caramelized exterior on the chicken.
For 1½ to 2 lb. of preferably boneless, skinless chicken thighs (but you can use wings, or even chicken breast in a pinch) start with ½ cup of plain or greek yogurt. From here, choose your own marinade adventure. You can throw in chili pastes (like gochujang, sambal oelek, or red curry paste) or even go minimal with a squeeze of lemon juice and freshly grated garlic.