Have you ever struggled with grilling chicken that ends up burnt on the outside while still raw near the bone? I’ve been there too! Grilling half chickens can be tricky, but after years of trial and error (and some epic fails at family BBQs), I’ve figured out the secrets to nailing this classic dish every time.
Today, I’m gonna share my foolproof method for grilling chicken halves that’ll make your neighbors jealous and have your family begging for seconds. The best part? It’s way easier than you might think!
Why Chicken Halves Rock on the Grill
Before diving into the how-to, let’s talk about why grilling half chickens is so awesome:
- You get the perfect combo of white and dark meat
- The presentation looks impressive (without much extra work)
- The half chicken cooks more evenly than whole birds
- It’s cheaper than buying separate cuts
- Leftovers make amazing sandwiches the next day
But there’s a challenge too As Moody’s Butcher Shop points out, “Chicken on the grill can be great, crispy and moist at the same time; but more often than not, this can be difficult, resulting in chicken that is burnt on the outside and still raw in the center”
Let’s solve that problem once and for all!
Essential Prep Work: Setting Up For Success
Choosing Your Chicken
For best results, start with a quality chicken. I prefer free-range birds weighing between 3-6 pounds. Bigger birds (like the 6.24-pound chicken mentioned on the Virtual Weber Bulletin Board) work great too but they’ll need more cooking time.
The Butterfly Method
If your chicken isn’t already halved:
- Place chicken breast-side down
- Cut along one side of the backbone with kitchen shears
- Cut along the other side to remove the backbone completely
- Flip the chicken over and press down firmly on the breastbone until it cracks and lays flat
- Cut down the middle to create two halves
The Brine Debate: Wet vs. Dry
There’s some healthy debate among grill masters about wet brining versus dry brining. Both methods work great, so I’ll cover both!
Wet Brine Recipe:
Based on Chris Allingham’s method from the Virtual Weber Bulletin Board:
- 1 cup table salt
- 1 gallon water
- Brine time: 1 hour
Dry Brine Alternative:
- 1 tablespoon kosher salt per half chicken
- 1/2 teaspoon baking powder (helps crisp the skin)
- Apply directly to chicken, focusing on thicker parts
- Let sit uncovered in fridge for 2-24 hours
Pro tip: If you’re short on time, the 1-hour wet brine works surprisingly well, though many folks (including me) find dry brining less messy and just as effective.
My Go-To Seasoning Blends
Keep it simple or go bold – both work great! Here are two options I love:
Classic Seasoning:
- Salt & pepper
- Garlic powder
- A tiny pinch of MSG (optional but adds amazing flavor)
Zesty Alternative:
- Italian dressing as a marinade
- 2 tablespoons Dijon mustard
- Fresh herbs (rosemary and thyme work great)
The Grill Setup: The Two-Zone Method
This is absolutely CRUCIAL for chicken success! As Moody’s Butcher Shop advises, “On your grill, make certain you have a high heat and low heat side. You will need to move the chicken from one to the other in order to get your perfect chicken.”
Here’s how to set it up:
For Gas Grills:
- Turn half the burners to high (400-450°F)
- Turn the other half to medium-low (300-325°F)
For Charcoal Grills:
- Pile most coals on one side
- Leave fewer coals on the other side
- Allow grill to preheat fully (about 15 minutes)
The Secret Microwave Trick
This little hack from Moody’s Butcher Shop is a game-changer: “Cover any bone-in chicken, breasts, quarters and halves, and put in the microwave for 2 minutes. The microwave cooks from the inside out and your grill or oven cook from the outside in.”
I was skeptical at first, but this really helps solve the “burnt outside, raw inside” problem! The microwave gives the bones a head start on cooking.
Step-by-Step Grilling Method
Now for the main event! Here’s my foolproof method:
- Prep the grill: Oil the grates to prevent sticking
- Initial sear: Place chicken halves skin-side down on the hot zone
- Watch for flare-ups: Grill for 2-4 minutes until skin starts to brown
- Move to cooler side: Continue cooking skin-side down for 5-7 minutes
- Flip the chicken: Turn pieces over and move back to the hot side
- Brown second side: 3-5 minutes on the hot zone
- Finish cooking: Move to cooler side to finish, about 10-15 minutes more
Total cooking time is typically 16-24 minutes, but this varies based on chicken size. The chicken is done when it reaches an internal temperature of 165°F in the thickest part of the thigh.
Basting Tips For Extra Flavor
If you want to add an extra layer of flavor, basting is the way to go. Here’s when to do it:
- Oil or wine-based marinades: Baste throughout cooking process
- Sugar-based sauces/BBQ sauce: Only during the last 5 minutes (otherwise it’ll burn)
Common Problems & How to Fix Them
Problem: Flare-Ups
Solution: Keep a spray bottle of water handy to quickly tame flames, and move chicken to the cooler side until flames subside.
Problem: Skin Not Crispy Enough
Solution: Make sure chicken is thoroughly dried before grilling, and finish skin-side down on the hot zone for the last minute.
Problem: Chicken Still Pink Near Bone
Solution: Use the microwave trick before grilling, and verify doneness with a meat thermometer (165°F in the thickest part).
Serving Suggestions
Your perfectly grilled chicken halves deserve some great sides! Here are my favorite pairings:
- Grilled corn on the cob
- Simple green salad with vinaigrette
- Roasted potato wedges
- Crusty bread for soaking up the juices
Real-Life Success Story
Chris Allingham from the Virtual Weber Bulletin Board shared a success story about grilling a large 6.24lb chicken for his dad. He butterflied it, brined it for an hour, seasoned simply, and grilled it indirectly at about 375°F on his Summit 450 grill. The results looked amazing!
Another member, Jon Tofte, even used his chicken grilling skills at his son’s wedding rehearsal dinner, seasoning with “Barnyard Dust” and using Lillies Smoky Barbecue Sauce.
For the “Chicken-Hearted”: Oven Option
Not everyone has access to a grill, and that’s OK! As Moody’s Butcher Shop humorously notes, there’s an “Option for the chicken-hearted”:
Use all the same ingredients and simply bake or broil in the oven! The same seasonings and prep work will still give you delicious results, even without a grill.
Meal Planning Bonus: What To Do With Leftovers
If by some miracle you have leftovers, here are some awesome ways to use them:
- Chicken Sandwiches: Slice and layer with mayo, lettuce and tomato
- Chicken Salad: Dice and mix with mayo, celery, and grapes
- Quesadillas: Shred and stuff between tortillas with cheese
- Soup Base: Use the bones to make an amazing stock
Final Thoughts
Grilling chicken halves might seem intimidating at first, but with these techniques, you’ll be serving up perfectly cooked chicken every time. The key points to remember are:
- Use the two-zone grilling method
- Consider brining (wet or dry)
- Try the microwave trick for bone-in pieces
- Use a meat thermometer for perfect doneness
- Be patient and adjust your technique as needed
I’d love to hear how these tips work for you! Drop a comment below sharing your grilling successes (or hilarious fails – we’ve all had ’em!).
Happy grilling!
FAQ: Your Burning Questions Answered
Q: Can I use this same method for chicken quarters?
A: Absolutely! The cooking time might be slightly shorter, but the same principles apply.
Q: How long should I let the chicken rest before serving?
A: Let it rest for 5-10 minutes under loose foil to allow juices to redistribute.
Q: Is brining really necessary?
A: Not absolutely necessary, but it makes a huge difference in moisture and flavor. If you’re short on time, even a 30-minute brine helps.
Q: Can I use a marinade instead of a brine?
A: Yes! Marinades add flavor but don’t tenderize as deeply as brines. For best results, marinate at least 4 hours or overnight.
Q: What’s the best way to check if chicken is done?
A: Always use a meat thermometer inserted into the thickest part of the thigh (not touching bone). The safe temperature is 165°F.
Now get out there and grill some chicken! Trust me, once you master this technique, it’ll become your go-to for summer cookouts and family dinners. There’s nothing quite like seeing your guests’ faces light up when you bring out those perfectly grilled chicken halves!

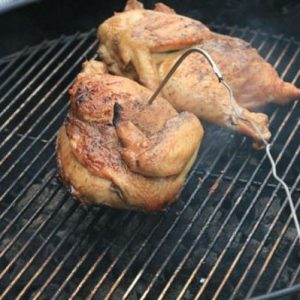
Perfectly Grilled Chicken Halves are Delicious!
There is something about cooking over open flame and charcoal that makes a family cookout special. Especially on a lazy summer day, which I am SO looking forward to.
And my Perfectly Grilled Chicken Halves are all the rage at our cookouts. And for good reason. Were talking succulent, juicy, tender bites of perfectly grilled (hence the name) chicken.
Were just entering grilling season here–although I have to commend those who grill all year, even in our harshest Midwest winters.
Completely yum and worthy of being made again and again. Tailgating, cookouts, family barbecue–name your poison.
Ive got to say, I think Im going to have to grill out tonight.
Ive never quite been able to get into going outside in subzero temps to flip a burger or chicken halves. Although I would love to enjoy the taste and aromas of summer all yearlong.