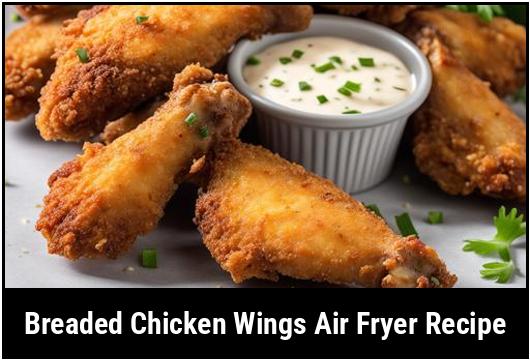
Have you ever tried to make restaurant-quality chicken wings at home but ended up with soggy, flavorless disappointments? Well, I’ve been there too! After countless experiments with my trusty air fryer, I’ve finally cracked the code to achieving that perfect crispy exterior while keeping the inside juicy and tender Today, I’m gonna share my foolproof method for breading chicken wings for the air fryer that’ll make your taste buds dance with joy!
Why Air Fryer Wings Are Simply Better
Before diving into the breading process, let’s talk about why air fryer wings are awesome. Traditional deep-fried wings are delicious but leave your kitchen smelling like a fast-food joint for days. Plus, all that oil isn’t exactly doing your health any favors. Air fryer wings give you that same satisfying crunch with way less oil and mess. It’s a win-win situation!
Air fryers use rapid hot air circulation to create that crispy exterior we all crave. When you add a proper breading to the mix, you’re elevating your wing game to professional levels. Trust me, your friends will be begging for your secret recipe after trying these!
What You’ll Need for Perfect Breaded Wings
Let’s gather our ingredients before we get started
- 2 pounds fresh chicken wings (drummettes and flats)
- 1 cup all-purpose flour
- 1 tablespoon garlic powder
- 1 tablespoon onion powder
- 1 teaspoon paprika (smoked paprika adds extra flavor!)
- 1 teaspoon salt
- 1/2 teaspoon black pepper
- 1/4 teaspoon cayenne pepper (adjust according to your spice preference)
- 2 large eggs
- 3 tablespoons milk
- 1 1/2 cups panko breadcrumbs (the secret to extra crispiness!)
- Cooking spray (olive oil or avocado oil preferred)
The Perfect Breading Method
Now, let’s get down to business. The key to perfectly breaded wings lies in the technique and setup. Here’s my step-by-step guide:
Step 1: Prep Your Wings
First things first, make sure your wings are completely dry. I cannot stress this enough! Excess moisture is the enemy of crispiness. Here’s what you should do:
- Pat the wings dry with paper towels
- If you have time, place them on a wire rack in the refrigerator for 30 minutes to an hour to dry further
- Let the wings come to room temperature before breading (about 20 minutes on the counter)
Step 2: Set Up Your Breading Station
Organization is crucial for efficient breading without creating a huge mess:
- Bowl #1: Mix the flour, garlic powder, onion powder, paprika, salt, pepper, and cayenne
- Bowl #2: Whisk together eggs and milk for your egg wash
- Bowl #3: Pour in your panko breadcrumbs
Pro tip: I like to add a little bit of the spice mixture to the panko as well for consistent flavor throughout!
Step 3: The Breading Process
Here’s where many people go wrong. The order and technique matter a lot:
- Dredge each wing in the flour mixture, shaking off excess
- Dip into the egg wash, allowing excess to drip off
- Roll in the panko breadcrumbs, pressing gently to ensure they adhere
- Place breaded wings on a wire rack and let them sit for about 10 minutes (this helps the breading stick better during cooking)
Remember, don’t stack your breaded wings! They need space to prevent the breading from getting smudged or coming off.
Step 4: Prep for Air Frying
Here’s a crucial step that many recipes skip:
- Lightly spray your air fryer basket with cooking spray
- Place wings in a single layer in the basket, making sure they don’t touch
- Lightly spray the tops of the wings with cooking spray (this helps achieve that golden-brown color)
If you skip the cooking spray, your breading might look pale and floury, and nobody wants that!
The Perfect Air Frying Technique
Now that your wings are perfectly breaded, let’s cook them to crispy perfection:
- Preheat your air fryer to 380°F for 3 minutes
- Cook the wings for 10 minutes
- Flip the wings over and cook for another 8-10 minutes
- Increase the temperature to 400°F for the final 3-5 minutes to get that extra crunch
Total cooking time should be around 22-25 minutes, but this can vary depending on your air fryer model and the size of your wings. Always check for an internal temperature of 165°F to ensure they’re safely cooked.
Common Mistakes to Avoid
Through my many wing-making adventures, I’ve made pretty much every mistake possible. Learn from my fails:
- Not drying the wings properly: Moisture is the enemy of crispiness!
- Skipping the resting period: Letting the breaded wings sit for 10 minutes helps the coating adhere better
- Overcrowding the air fryer: Work in batches if needed; wings need space to get crispy all around
- Not using cooking spray: A light mist makes a huge difference in achieving golden-brown perfection
- Forgetting to flip: Turning the wings ensures even cooking and crispiness
- Using regular breadcrumbs instead of panko: Panko gives that extra crispy texture we’re aiming for
Taking Your Wings to the Next Level
Want to get fancy? Here are some variations to try:
Flavor Boosters for Your Breading
Mix any of these into your flour mixture for extra flavor:
- Italian seasoning
- Ranch seasoning packet
- Cajun seasoning
- Lemon pepper
- Parmesan cheese (finely grated)
Double Breading for Extra Crunch
If you’re a texture fanatic like me, try double breading:
- Flour → Egg Wash → Flour again → Egg Wash again → Panko
- Let rest for 15 minutes before air frying
- You might need to add 3-5 minutes to the cooking time
Sauce Options
While these wings are amazing on their own, you can toss them in sauce after cooking:
- Classic buffalo
- Honey garlic
- Korean-style gochujang
- Lemon pepper butter
- Parmesan garlic
Pro tip: If saucing your wings, do it immediately after cooking and serve right away to maintain crispiness!
Serving Suggestions
These crispy breaded wings pair perfectly with:
- Classic blue cheese or ranch dressing
- Fresh vegetable sticks (celery, carrots, cucumber)
- A side of air fryer french fries (might as well use that air fryer for the complete meal!)
- Coleslaw for a refreshing contrast
Troubleshooting Your Air Fryer Wings
Sometimes things don’t go as planned. Here’s how to fix common issues:
| Problem | Cause | Solution |
|---|---|---|
| Breading falls off | Too much moisture or not enough rest time | Dry wings thoroughly and let breaded wings rest before cooking |
| Wings aren’t crispy enough | Air fryer not hot enough or overcrowded | Preheat properly, cook in batches, finish at higher temp |
| Breading looks pale | No cooking spray used | Lightly spray with oil before and halfway through cooking |
| Wings are dry inside | Cooked too long | Reduce cooking time or lower temperature slightly |
| Uneven cooking | Not flipping wings | Be sure to turn wings halfway through cooking time |
Storing and Reheating Tips
Made too many wings? No problem:
- Refrigerating: Store leftover wings in an airtight container for up to 3 days
- Reheating: Place in air fryer at 350°F for 3-5 minutes to re-crisp
Avoid microwaving if possible as it makes the breading soggy!
My Final Thoughts
After making literally hundreds of batches of wings (my family never complains about being taste testers!), I’ve found that breaded wings in the air fryer are unbeatable for home cooking. They give you that deep-fried taste and texture without all the oil and mess.
The key takeaways for perfect breaded air fryer wings are:
- Dry your wings thoroughly
- Use panko breadcrumbs for maximum crunch
- Don’t skip the resting period after breading
- Use cooking spray for that golden-brown finish
- Don’t overcrowd your air fryer basket
Follow these steps, and I promise you’ll have wings that rival your favorite sports bar! They’re perfect for game day, movie night, or anytime you’re craving something crispy and delicious.
Happy air frying, everyone!
FAQ Section
Q: Can I use frozen wings for this recipe?
A: While fresh is best, you can use frozen wings. Just thaw them completely first and pat them extra dry before breading.
Q: How do I know when my wings are done?
A: Wings should reach an internal temperature of 165°F and have a golden-brown, crispy exterior.
Q: Can I bread the wings ahead of time?
A: You can bread them up to 30 minutes before cooking and keep them in the refrigerator. Any longer and the breading might get soggy.
Q: What if I don’t have panko breadcrumbs?
A: Regular breadcrumbs will work, but the texture won’t be quite as crispy. You can also crush cornflakes or even pork rinds for a gluten-free option!
Q: Can I make these wings spicy?
A: Absolutely! Add more cayenne to the flour mixture or toss in hot sauce after cooking.
Now go forth and create the most amazing breaded air fryer wings your taste buds have ever experienced!
How to Bread Chicken
Any traditional fried chicken recipe can probably also be air fried. It should work.
The one exception might be if you like a very thick breading on your fried chicken. If you double dip your chicken in flour for the coating, it’s going to be hard to hydrate all that flour in an air fryer, and you’ll almost certainly end up with floury spots that haven’t really cooked.
For my air fryer chicken, I like to soak the chicken in buttermilk to give it that classic fried chicken tenderness. Then, I dip it once in very well seasoned all-purpose flour. That provides a nice layer of breading on the chicken, but it isn’t so much flour that it’ll be a problem in the air fryer.
What’s the Best Chicken to Use?
For my money and taste buds, nothing beats buying a whole chicken and cutting it up yourself. This way, you get some dark meat and some white meat. I also believe in using skin-on and bone-in chicken, which leads to more flavorful and juicier chicken.
That said, my family is not actually a huge fan of the same kind of fried chicken I like. They prefer simple chicken strips, so I did some of those, too, and they work really well.
Chicken strips cook faster than bone-in pieces, so you run the risk of overcooking them and drying them out. Be sure to check strips frequently until they’re just cooked through (165° to 170 ̊F in the thickest part).
:max_bytes(150000):strip_icc()/Air-Fryer-Chicken-LEAD-4-c026683bae0b4c1db108e014d50845bb.jpg)