Are you staring at those chicken quarters wondering exactly how long they need to be on the grill? I’ve been there too! Grilling chicken quarters can be tricky – cook them too little and they’re unsafe, cook them too long and they’re dry as cardboard. After years of trial and error (and some embarrassingly overcooked chicken), I’ve figured out the perfect timing for grilled chicken quarters.
The Short Answer
For perfectly grilled chicken quarters, you’ll need approximately 45-55 minutes at a temperature of around 375°F. But don’t run off to your grill just yet! The exact timing depends on several factors that we’ll explore in this comprehensive guide.
What Are Chicken Quarters Anyway?
Before we dive into grilling times, let’s clarify what we’re working with. Chicken quarters (also called leg quarters) include both the thigh and drumstick portion of the chicken plus part of the back. They’re usually the most budget-friendly cut of chicken you can buy – often around $0.79 per pound – making them perfect for feeding a crowd without breaking the bank.
Factors That Affect Grilling Time
Several things impact how long your chicken quarters need to cook
- Size of the quarters: Bigger quarters = longer cooking time
- Starting temperature: Cold chicken straight from the fridge takes longer than room temperature chicken
- Grill temperature: Higher heat cooks faster but risks burning the outside
- Type of grill: Gas grills and charcoal grills distribute heat differently
- Lid position: Keeping the lid closed retains heat and cooks more evenly
Step-by-Step Grilling Method and Timing
Let me walk you through my foolproof method for perfectly grilled chicken quarters every time:
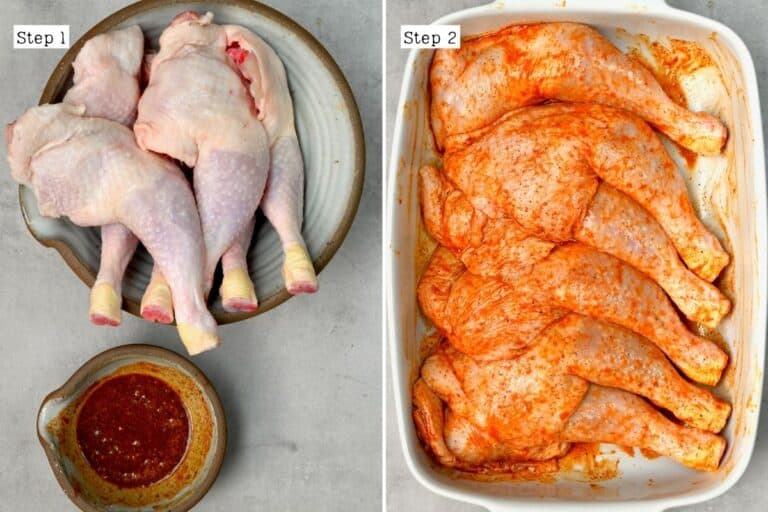
1. Preparation (10 minutes)
- Pat the chicken quarters dry with paper towels
- Drizzle with oil (about 2 tablespoons for 5 quarters)
- Season well with your favorite spices (I use salt, pepper, garlic powder, onion powder, and paprika)
2. Initial Direct Heat Phase (10 minutes)
- Preheat your grill to around 400°F
- Place chicken quarters skin-side down over direct heat
- Flip every 2-5 minutes to prevent burning
- This phase is about developing color and starting the cooking process
3. Indirect Heat Phase (30-40 minutes)
- Move chicken to indirect heat (the cooler side of your grill)
- Maintain a grill temperature of about 375°F
- Cook with the lid closed, flipping occasionally if not using sauce
- If using BBQ sauce, start brushing it on when internal temperature reaches about 160°F
4. Final Temperature Check and Rest (5 minutes)
- Remove when internal temperature reaches 185°F (more on this below!)
- Let rest for 5 minutes before serving
The Truth About Chicken Temperature
Here’s something that changed my grilling game forever dark meat chicken quarters are SAFE at 165°F, but they’re not necessarily DONE at that temperature
The USDA recommends 165°F as the safe temperature for chicken, but for dark meat like quarters, taking them to 185°F results in much more tender, juicy meat. At 165°F, dark meat can still be rubbery and have an unpleasant texture. The higher fat content in dark meat keeps it juicy even at higher temperatures, unlike chicken breasts which dry out quickly.
Always use a reliable meat thermometer and check the thickest part of the thigh, making sure not to touch bone with the probe.
Common Mistakes to Avoid
I’ve made all these mistakes so you don’t have to:
- Not setting up two-zone heating: You need both a hot zone for searing and a cooler zone for finishing
- Cooking at too low a temperature: This results in rubbery skin nobody wants to eat
- Cooking at too high a temperature: Burns the outside before the inside is done
- Flipping too often with sauce applied: Your sauce will end up on the grill grates, not the chicken
- Not letting the chicken rest: Cutting immediately means all those juices run out
Pro Tips for Amazing Grilled Chicken Quarters
After grilling hundreds of chicken quarters, I’ve discovered some game-changing tricks:
- For crispier skin: Leave chicken uncovered in the fridge for an hour before grilling to dry out the skin, or dust with baking powder to draw out moisture
- For more flavor: Season under the skin as well as on top
- For even cooking: Let chicken come to room temperature for about 20 minutes before grilling
- For added smoky flavor: Add wood chunks to your charcoal or use a smoker box on a gas grill
- For sticky, caramelized BBQ sauce: Apply in layers during the last 15 minutes of cooking, allowing each layer to set
FAQ About Grilling Chicken Quarters
Q: Do I need to marinate chicken quarters?
A: Nope! While marinating can add flavor, it’s not necessary. You can get great results with just oil and seasonings. But if you have time, seasoning them and leaving them overnight in the fridge creates even more flavorful chicken.
Q: Do I have to flip chicken quarters while grilling?
A: It depends on your method. If you’re using a simple oil and dry rub, flipping every 5 minutes helps for even cooking. If you’re applying BBQ sauce, minimal flipping is better so the sauce stays on the chicken rather than burning on the grates.
Q: Can I grill frozen chicken quarters?
A: Technically yes, but I don’t recommend it. You’ll get uneven cooking and potentially dangerous partially cooked sections. Always thaw completely first.
Q: What sides go well with grilled chicken quarters?
A: So many options! Grilled corn, potato salad, coleslaw, baked beans, or grilled vegetables are all fantastic choices.
Make-Ahead and Storage Tips
If you’re meal prepping or have leftovers:
- Refrigerator: Store cooled chicken quarters in an airtight container for up to 4 days
- Freezer: Freeze in airtight containers for up to 3 months
- Reheating: While the microwave works, using an oven or air fryer for a few minutes helps maintain that crispy skin
Why This Method Works
I’ve tested dozens of methods, and this approach consistently delivers the best results because:
- The two-zone grilling method prevents burning while ensuring thorough cooking
- The higher final temperature (185°F) breaks down connective tissues in dark meat
- The initial searing locks in juices while the slower indirect cooking ensures even doneness
Final Thoughts
Grilling chicken quarters isn’t rocket science, but it does take a bit of patience and technique. The good news is that they’re one of the most forgiving cuts of chicken due to their higher fat content. Even if your timing isn’t perfect, you can still end up with delicious results.
Remember the key points: preheat properly, use two-zone grilling, take the temperature to 185°F for best texture, and let them rest before serving. Master these basics, and you’ll be known for your amazing grilled chicken quarters at every cookout!
So fire up that grill, grab some chicken quarters, and get cooking. With these guidelines, you’re all set for success. And remember – the best part about grilling is that even the “mistakes” are usually still pretty tasty!
Why You’ll Love This Recipe
- I find chicken leg quarters to be a pretty budget-friendly cut of chicken, and it is more likely to go on sale! So this is a delicious but budget-friendly meal you can whip up for dinner or as a meal prep for the week.
- You can make this with or without the bbq sauce. I love brushing the bbq sauce onto the leg quarters, but the chicken and seasoning are flavorful enough to stand on their own if needed.
- It takes under 40 minutes to make these grilled chicken leg quarters! You can even season them in advance and quickly throw them on the grill for a speedy weeknight dinner.
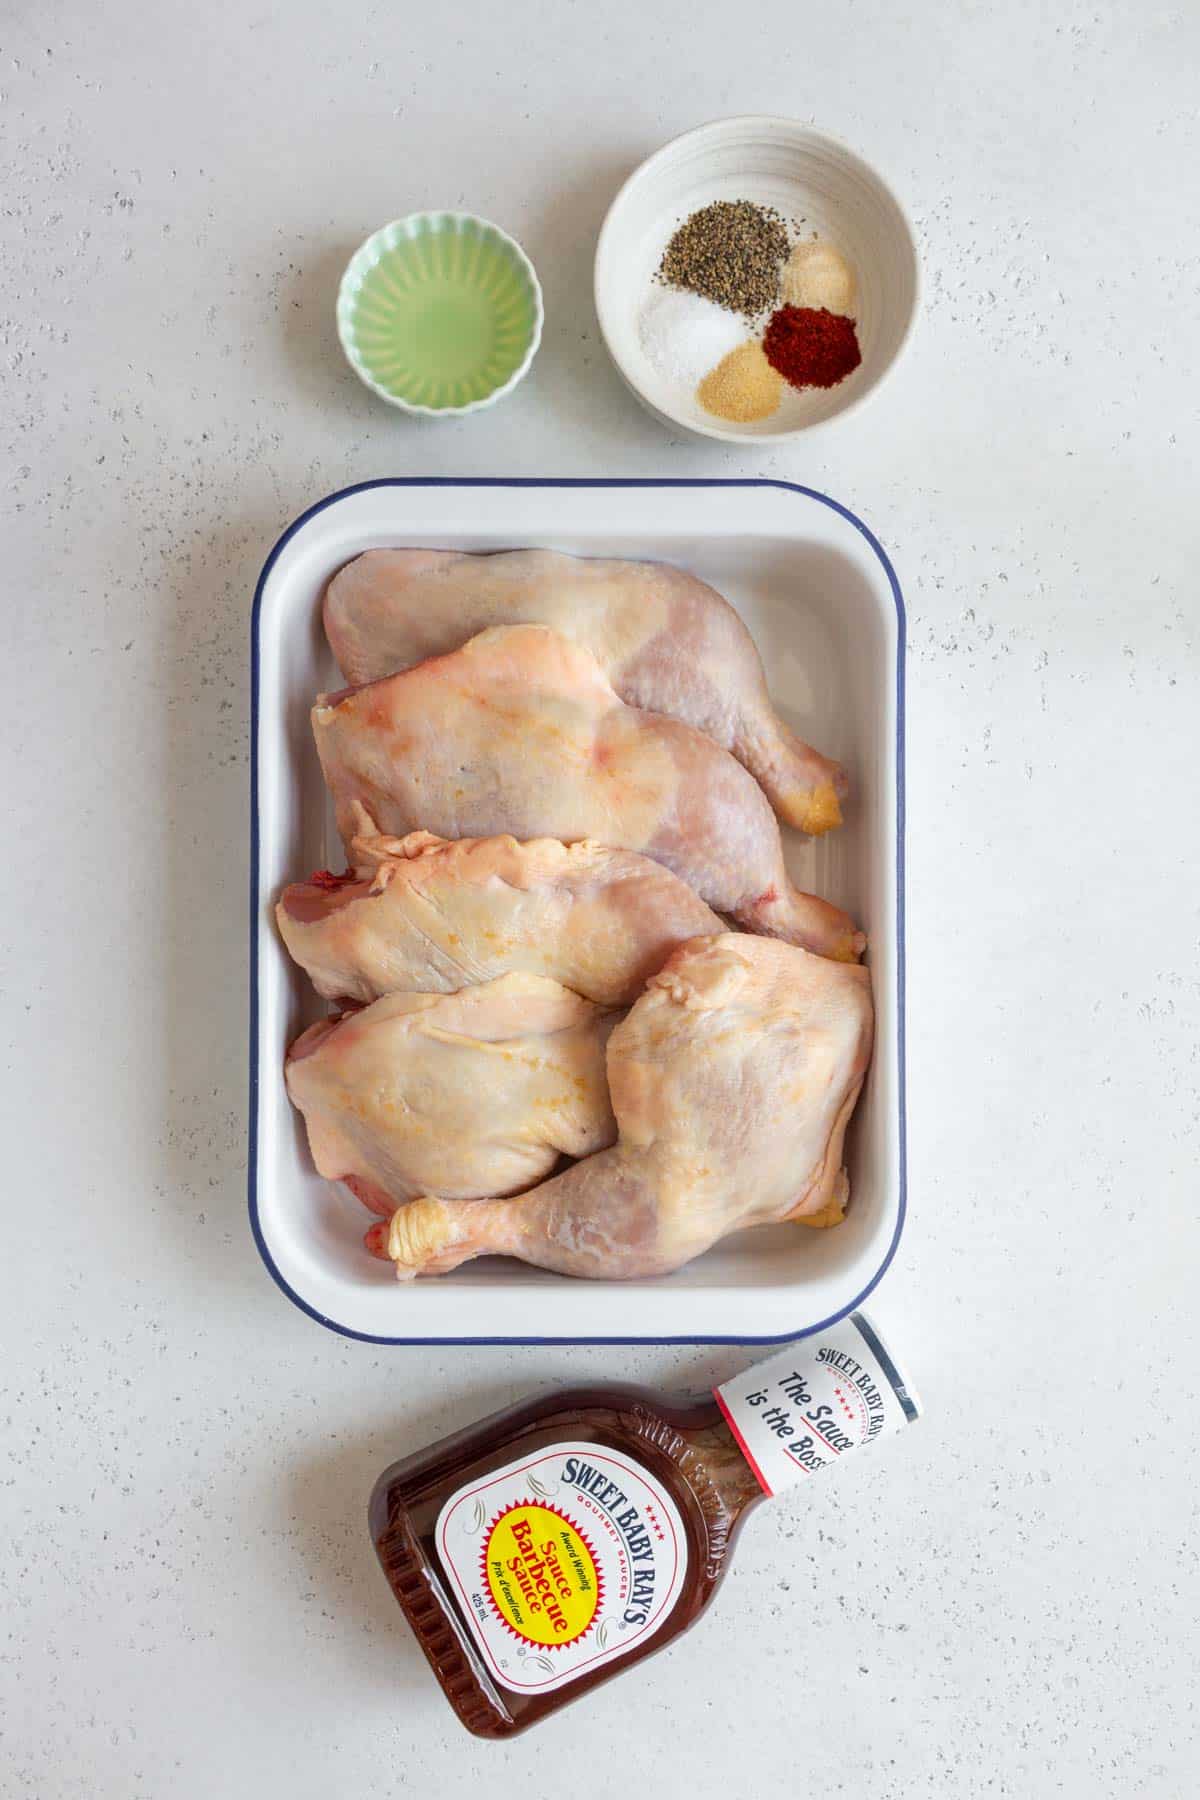
- chicken quarters — the chicken leg quarter is made up of the thigh, drumstick, and part of the back of the chicken, so it’s quite the hearty serving of meat for a really good price! Got extra? Try my baked chicken quarters recipe!
- oil — you’ll need some oil to get the seasoning to stick to the chicken legs.
- seasoning — I use a simple mixture of salt, pepper, garlic powder, onion powder, and paprika. If you want to add some heat, mix in some cayenne powder.
- bbq sauce — use your favorite bbq sauce! I love the sweetness of Sweet Baby Ray’s!
Recipe Tips and Notes
- Similar to chicken wings, I like to leave the chicken quarters in the fridge, uncovered, for a while so they dry out a bit, leading to wonderfully crispy skin.
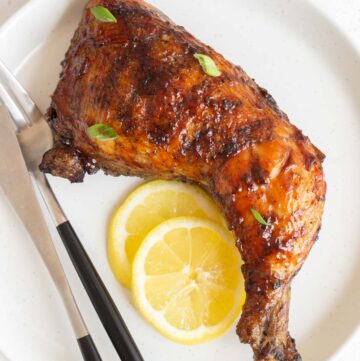
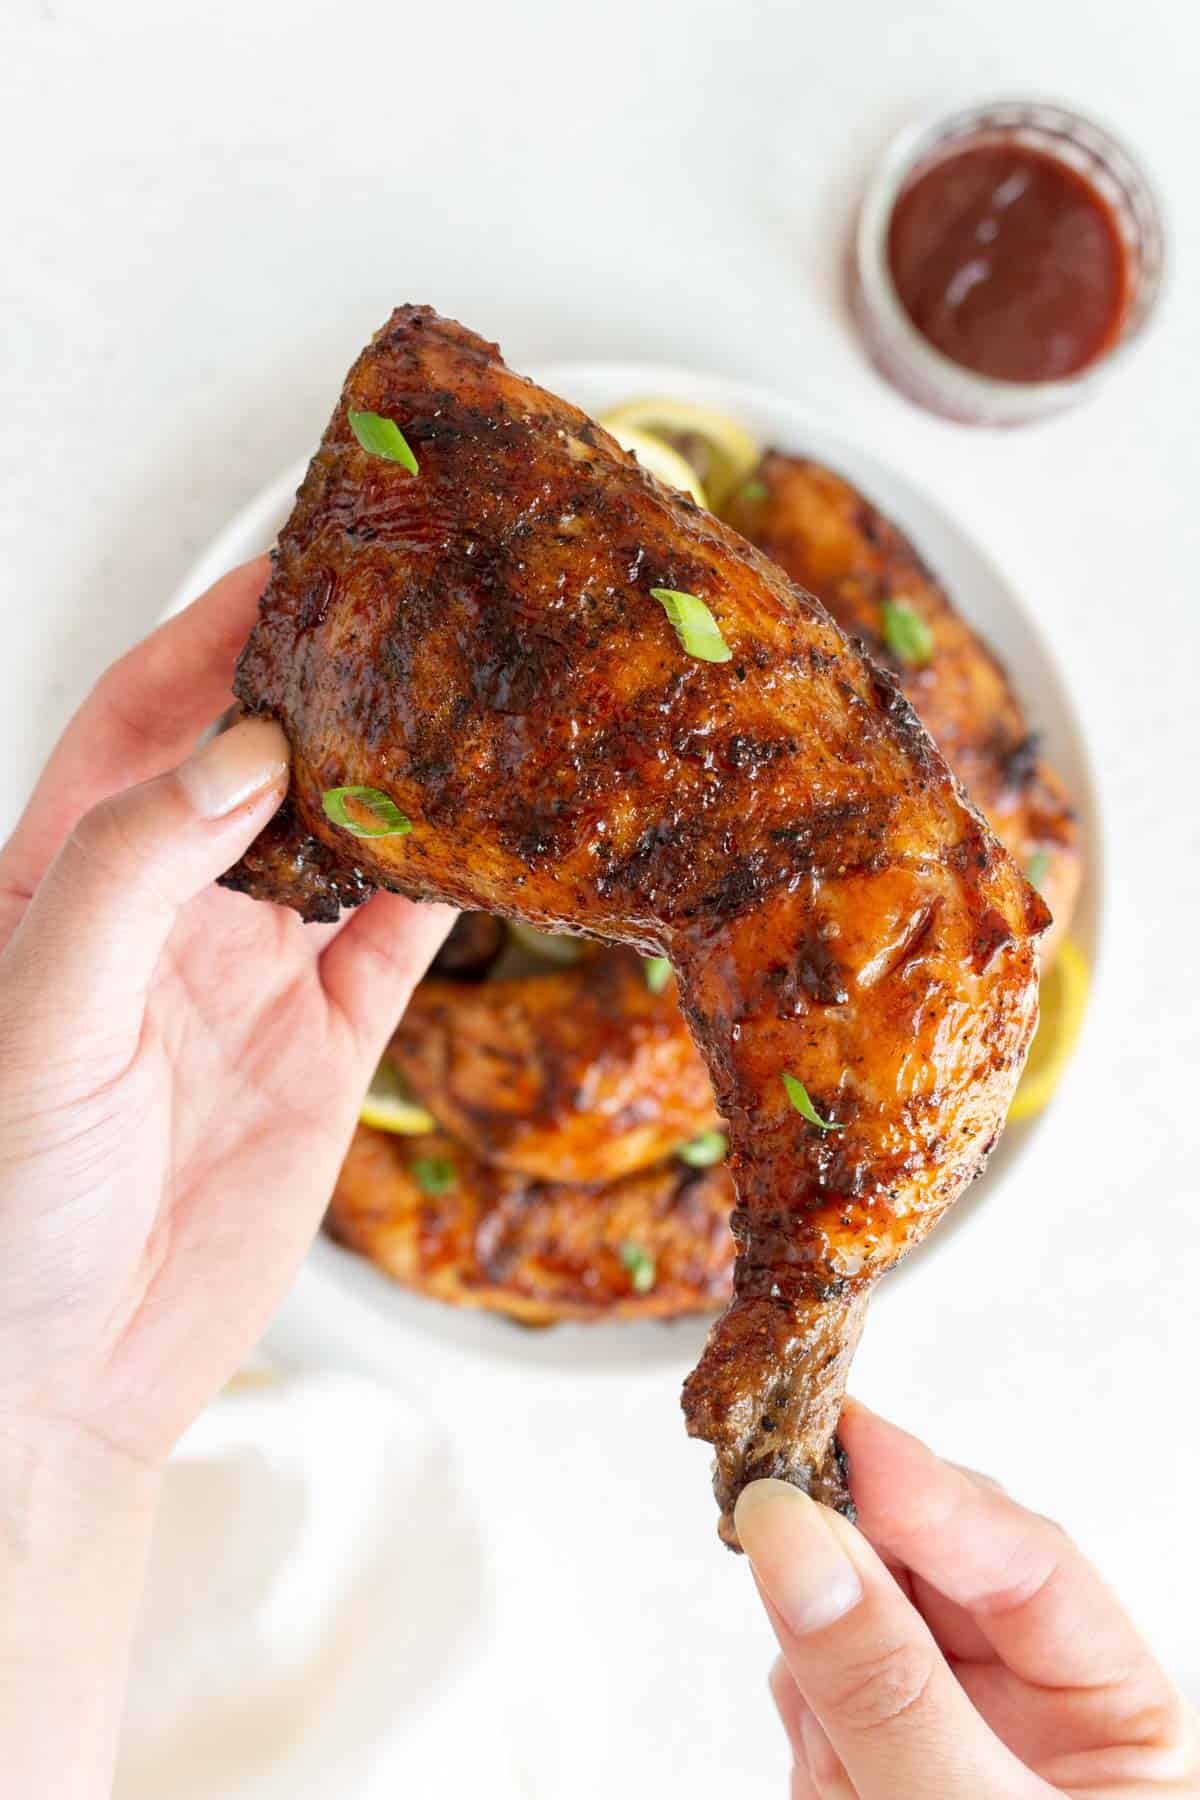
- I love serving my grilled chicken with some lemon slices or with a bit of lemon squeezed on top for some extra brightness!
- When you grill the chicken drumsticks, keep the lid on. This will trap the heat so the chicken will cook evenly.
- The internal temperature of the chicken should reach 165°F (74°C) before taking them off the grill.
- If the chicken is getting too dark too quickly, you can move it to indirect heat. My grill has a second set of grates on the lid to pop the chicken onto, so it still cooks but not directly over the flames.
- If the chicken legs are stuck to the grill, give it a few more extra minutes. Similar to pan-searing chicken, the chicken should release once it’s ready to be flipped. You can also brush some oil onto the grill grates if you’re worried about the chicken sticking.
- Try to get the seasoning underneath the skin of the chicken as well. This will make it even more flavorful!
- Let chicken legs come to room temperature before grilling so the chicken cooks evenly.
- Always let the chicken rest before serving. This gives the chicken time to redistribute the juices and remain moist. If you cut too early into the chicken, all the juices will run out.
- While you don’t have to marinate this chicken leg recipe, if you have the time, you can season them and leave them overnight in the fridge for even more flavorful chicken!
- Meal prep: once cooled, store the cooked chicken legs in an airtight container for up to 4 days in the fridge.
- Freezer: allow the grilled chicken legs to cool before transferring them into an airtight container and storing them in the freezer. They can last for up to 3 months frozen.
- Reheat: while you can reheat chicken legs in the microwave, you can reheat the chicken legs in the oven or air fryer for a couple of minutes so the skin stays crispy!