Raising chickens in your backyard can be an extremely rewarding experience. Fresh eggs every morning charming and quirky personalities to observe natural pest control, and free fertilizer are just a few of the benefits backyard chickens provide.
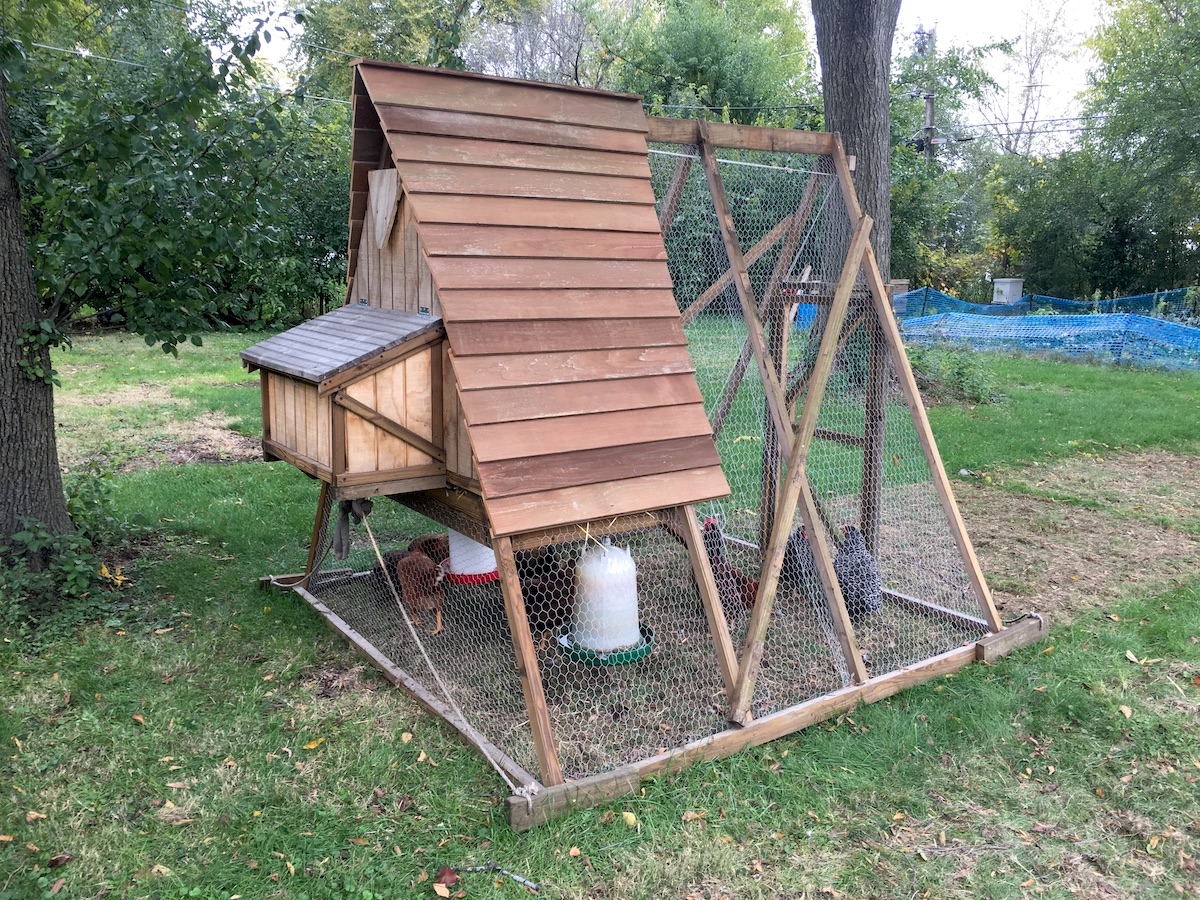
However, keeping chickens safe and healthy while allowing access to fresh air and pasture requires housing them in a secure outdoor enclosure or chicken tractor. An A-frame design is one of the most popular styles for chicken tractors. The sloped roof provides plenty of interior space for roosting and egg laying, while still being relatively lightweight and mobile.
In this article, I’ll walk through the entire process of building an A-frame chicken tractor for a small backyard flock We’ll cover
- Benefits of an A-frame design
- Materials needed
- Step-by-step building instructions
- Tips for use and maintenance
Why Choose an A-Frame Chicken Tractor?
An A-frame chicken tractor provides the perfect balance of security, shelter, ventilation, and mobility. Here are some of the key advantages of this style:
-
Lightweight and easy to move – With a narrow base and sloped sides, A-frame tractors are much lighter than rectangular tractors built from wood framing. A single person can move them by hand.
-
Good ventilation – The peaked roof allows hot air to rise and escape while bringing fresh air in through the sides. Very important for healthy chickens.
-
Weather protection – Sloped sides and roof allow the rain to run off. The roof overhang gives shelter from sun and rain.
-
Plenty of interior space – Vertical space under the peaked roof can be used for roosting bars and nest boxes. More spacious than a rectangular design.
-
Secure from predators – Fully enclosed on all sides with hardware cloth. Locking doors keep chickens safe inside at night.
-
Allows access to pasture – Frequent movement to fresh grass and insects provides natural forage.
If you want a tractor that maximizes space and ventilation for a small flock, while still being easy to move, A-frame is the way to go. The sloped roof adds a lot of functional interior space without making the tractor overly heavy.
Planning Your A-Frame Chicken Tractor
Before starting construction, take some time to think about your goals and specific needs for the tractor:
-
Flock size – Scale the coop dimensions appropriately for your number of chickens.
-
Frequency of movement – Lightweight materials if you’ll move it daily, more sturdy if only occasionally.
-
Accessibility – Doors for you and doors/ramps for the chickens.
-
Interior fixtures – Roosting bars, nest boxes, feed and water.
-
Weather considerations – Overhangs, rain protection, and ventilation for your climate.
-
Material choices – Pressure treated wood framing is sturdy and weather resistant. Hardware cloth instead of chicken wire for predator protection.
-
Mobility method – Skids, wheels, carrying handles.
-
Visual appeal – Match the style of your yard and coop. Fun paint colors make it look snazzy.
Take measurements of your existing coop as well to allow easy access between the two structures. Plan the tractor dimensions to make the most of the space available in your yard.
Acquiring Materials
Part of the fun is shopping for the necessary materials and hardware. Here are the main items you’ll need:
-
Lumber: 2x2s or 2x4s for the framing. Treated is recommended for weather resistance.
-
Plywood: For the side walls and roof panels. 1/2″ exterior grade.
-
Hardware cloth: 1/2″ or 1/4″ mesh for maximum predator protection.
-
Hinges and latches: For access doors. Galvanized so they won’t rust.
-
Handles: For lifting and moving the tractor.
-
Roofing: Sheet metal or corrugated plastic to cover the plywood roof.
-
Paint or stain: To decorate and weatherproof.
-
Misc hardware: Screws, staples, brackets, nails. Make sure they are compatible with your lumber choices.
Shop around online and at local home improvement stores to find the best deals. Buying in bulk saves money. Don’t skimp on the hardware cloth quality – it’s the first defense against predators.
Step-By-Step Building Instructions
Now that you have all the materials ready, it’s time to start construction.
Frame
Cut all the lumber to size according to your plans. Treating the cut ends will help the wood last longer. Assemble into panels using screws or nails.
-
Floor – Plywood or lumber panels. Attach skids if desired.
-
Front and back walls – Vertical 2×2 studs between top and bottom plates. Add diagonal bracing.
-
Side walls – 2×2 rafters attached to front and back walls. Include ventilation windows.
-
Roof – 2×2 rafters joined at the peak. Overhangs if wanted.
Check all corners for square and reinforce connections. Don’t forget the bracing!
Siding and Roof
-
Wrap the walls with plywood and hardware cloth. Staple or nail in place. Add access doors.
-
Cut roofing panels to size. Hinge one for easy cleaning access. Attach metal roofing with screws.
-
Install handles or grips in key locations to aid in moving the tractor.
-
Caulk around any gaps. Prime and paint the exterior.
Interior Fixtures
-
Roosting bars mounted on brackets below the roof peak.
-
Nest boxes attached to the walls or hanging down from the roof.
-
Feeder and waterer mounts positioned for easy access.
-
Optional extras like a dust bath spot.
Get creative with ways to maximize the usable space under the roof.
Tips for Use and Maintenance
Your A-frame chicken tractor is ready for action! Here are some tips to get the most out of it:
-
Move frequently to fresh grass. Chickens will graze an area down quickly.
-
Check for signs of damage or holes, repair promptly. Don’t allow access by predators.
-
Clean the roofing and nest boxes regularly to prevent buildup.
-
Consider adding wheels or casters to make moving even easier.
-
If you need more space, join two tractors together with fencing or hardware cloth.
-
During winter, you may need to keep them in a more protected, stationary coop.
-
Close up the tractors securely at night when they can’t watch for danger.
Take time to observe your chickens using their new A-frame tractor. Make any modifications needed to keep the flock clean, safe, and healthy. The right chicken tractor will keep them thriving for years to come.
Enjoy the Rewards!
Building your own A-frame chicken tractor is deeply satisfying and provides great benefits for your flock. Take pride in your DIY accomplishments while reaping the daily rewards of farm-fresh eggs from happy backyard chickens. This classic coop design is the perfect intersection of form and function.
HOW TO Build an EASY DIY A-Frame Chicken Coop | Part #1 (Pallet Project)
FAQ
What are the disadvantages of a chicken tractor?
Drawbacks of a Chicken Tractor
Risk of too much exposure to weather elements: Because chicken tractors are designed to be lightweight and movable, they may not provide as much protection from the weather as a stationary coop would.
How many chickens are in a 10×12 chicken tractor?
10×12 Mobile Coop. The 10×12 mobile coop gives you space for 60 layers and 80 broiler chickens. It includes 2 wheels for easy moving, a 4′ walk-in door, a heavy-duty canvas, and roosting bars.
Is it cheaper to make or buy a chicken coop?
Generally cheaper to build your own unless you need to buy too much material for for use. Sometimes you might be able to find something pre-built that suits you needs.
How many chickens per square foot in a chicken tractor?
A general rule of thumb is to have four square feet per chicken for egg layers and two square feet per chicken for meat chickens. What is this?Sep 11, 2024