When it’s fall, it’s time to butcher the animals. It’s both a happy and sad time because the lives of your beautiful, healthy animals have ended. Now is the time to treat the animals with the same kindness and respect you showed them while they were alive. Good farmers raise their animals free from fear, anxiety and stress. The animals should meet their end as they lived, without the terror of the slaughterhouse.
Making careful preparations will help you remain calm. After years and years of butchering I still feel a strong adrenaline rush when the animal is killed. Be prepared for that and use it to make sure the death is as painless as possible. A smart person can use their strong emotions to get the job done right instead of letting their feelings get in the way and messing it up.
When it only gets to 40° during the day and the grass isn’t good enough to eat, it’s time to kill the animals. Sheep and goats should be nine months or under. Pigs should be just slightly jowly.
People used to think that 250 pounds was the best weight for a pig to be butchered, but once your pigs reach 225 pounds, a lot more of their weight gain will be fat.
After many years of experimentation, I try for 200 pounds. At that point my pigs have no more of a fat covering than my goats. There’s still enough fat for lard and sausage, but there’s no need to keep giving them food only to find that their kidneys are buried in fat and hard to find. When I buy my pigs in early May, they are already eating so much by mid-November that I know it’s no longer possible to keep them.
In the past, calves were kept until they were 10 to 15 months old, but that can be a problem for a family that raises their own meat. If the calf was born in February it could be butchered in December. In a place like Montana, however, December is late for butchering. With the temperatures around 0°, your meat would have to hang a very long time to age.
If you chose to keep the calf until spring, you would have to choose whether to kill it after feeding it all winter or let it grow on the pasture.
By the time the calf is looking really big, it’s midsummer. If it was cool, you could quickly kill it, but you would have to pay someone to hang it to let it age. If you can help it, you don’t butcher between May and October in most places because of the bugs. So then you’re up to fall when you have all the other butchering to do. If you can manage it, I think that is your best option.
Here are a few additional suggestions to think about ahead of time. Butchering pigs and cows is easier if you withhold food for 24 hours before butchering. You don’t have to do this, and if it would make you feel bad to leave your animal hungry on its last day, don’t. Just be extra careful with the guts.
When you butcher only certain members of a herd, avoid frightening the others. Don’t run through the herd chasing the one you want. Move slowly and calmly. Try not to kill one animal in front of the others. Don’t slaughter in the animal’s home.
The exception to this is when you are slaughtering pigs. Go ahead and kill their friend; pigs won’t mind. If they can, they’ll rush over to drink the blood.
It makes sense to wait until the very end to kill the pig so that they can eat what’s left. Don’t feed surplus fat to pigs, though. Only poultry can convert fat into useable production calories. That is because of their high rate of metabolism. If you feed fat to pigs, it will provide calories, but it can only become fat, not meat.
Before butchering, decide what parts you will save. I think I’ve tried saving just about everything, and I think there’s some value in that. But if no one wants to eat it, it’s only useful for learning, trying new things, and being aware of what could happen.
There is a certain satisfaction in using everything. Ears and tail can flavor a pot of beans. Hooves can make gelatin. Stomachs can hold blood sausage and other things. Lungs are edible. Intestines can be used to make sausage casings or cooked in some other additional dishes.
I will talk about the things I keep, but you and your family are welcome to choose what you want to try.
A word about using the intestines for sausage. In situations where the hose has running water, it’s pretty simple to clean them. Otherwise you’ll have to do it indoors, which is a lot of work. After that you have to turn them inside out and scrape them.
If you don’t scrape them, they’ll still be edible but they’ll be tougher than you might like. These days I feed the intestines to the animals and buy prepared ones. If you buy them from a butcher house, they’re already prepared and quite inexpensive. Try not to buy them in the grocery store, as they demand ridiculous prices.
Make sure you save enough fat to make lard, sausage, and ground beef if you’re killing a cow.
A goat is shot in the back of the head. The front is too hard. Draw lines in your mind from the top of each ear to the other eye on a cow or pig. Where the lines cross is where you shoot. One shot with a . 22 should do it.
We shoot pigs in their pen. That is the least traumatic for everyone. But if you do this, you should get the pig out of the pen quickly so you can cut its throat on clean ground.
Throw a noose around its neck and drag it out. To get all the blood out, you want to cut the throat while the heart is still beating.
Stick the point of your big knife into the throat and cut outward through the skin. Never try to cut into the skin through the hair. Make sure you’ve severed the main veins and arteries.
Any male animal that is to be used as food should have been castrated. If that wasn’t done, however, remove the head and testicles right away. That’s easy for a goat, but be careful because a cow or pig can really kick. This is done so the meat won’t be tainted.
If you are butchering a pig, you will want to wash it down now. A pig is a clean animal in a natural environment but gets pretty dirty when confined. Be especially careful in cleaning the rear feet, for they’ll stay on unskinned.
Remove the head by cutting all the way around with your big knife. As always, avoid cutting into the hair. Instead keep your knife between the flesh and the skin and cut out. With a goat, twist the head until the bone snaps. With a pig or cow, use your meat saw.
Make slits between the achilles tendon and the ankles and insert the gambrel. It’s possible to boil a pig at this point, but since meat can be frozen, there’s really no reason to. In days past, the skin was left on the bacon and hams to protect them. It’s traditional, but there’s no other reason to leave it on since we don’t eat it anyway. And logistically it’s just much simpler to skin.
Remove front feet at the joint. Lift the animal into the air to a height that makes working on the back of the animal easy. For a goat, use a pulley and for a pig or cow, use a come-along.
Look at Figure 1. Put your short-pointed knife into the cut you made in the achilles tendon and cut around the foot, this time cutting out instead of in. Be very careful not to cut the tendon. Cut a line through the skin down each leg to the middle with the knife, between the meat and the skin. Then cut down the body to the neck (Figure 2).
Now take your skinning knife and begin skinning at the junction where the leg cuts meet the centerline. Pull hard on the skin with one hand or your hook to make it tight while you use your knife to separate the flesh from the skin. Work out from the center (Figure 3).
If you are not going to use the hide, you won’t have to worry about keeping it intact. Just be concerned about the meat in that case. You’ll have to be much more careful if you want to use the hide.
Pull the skin off the belly with your hand or the hook and keep cutting between the hide and the flesh until the belly is skinned. This will relieve the tension of the skin on the rump. Now work around the leg from front to back.
Start at the top of the “Y” and skin up and over the crotch. The skin is tightest here, so be especially careful if you’re saving the hide. Pull skin out and down to create tension on your work while you slice with your knife. A layer of fat makes the animal relatively easy to skin. Leave as much fat on the body as possible.
Work over the anus to the tailbone. Give the tail a sharp jerk and it will separate from the vertebrae. From here on, the weight of the skin practically skins the animal for you. Work all around the body. If there is too much movement on the gambrel, lean against the animal.
Raise the beast when it becomes difficult to reach your work. Bring the work to you and stay comfortable. The forelegs are a bit difficult near the shoulders. Start on the outside of the leg (Figure 4). Work around to the front. Skin the neck and the inner forelegs and shed the skin.
Lower the animal so that you can comfortably work on the rear of it. At this point you want to separate the large intestine from the body. You will begin by cutting around the anus with your short pointed knife. Be careful not to make any holes in the intestine. When it is cut free, pull it slightly out and tie it off. It is helpful to have a partner here. This step (tying) is unnecessary if you are butchering a goat.
Cut down the belly with your pointed knife. Cut from inside out as before. With your other hand hold the guts away from the point of the knife (Figure 5). Cut through the belly fat all the way down to the sternum. Next, cut the meat between the legs.
If the animal is a male, cut out the penis. Place a large container underneath to catch the guts. By now they will be bulging out of the body. When you are cutting up a ruminant, a greenish liquid may come out of the neck at some point. This is just the cud and nothing to worry about.
First, cut through the fat that covers the guts. Then, cut any tissue that connects them to the back wall of the body cavity. Pull the anus through to the inside and then out. Separating the intestines from the body is tedious, so take your time. You don’t want to spill the contents into the meat.
Be careful also not to rupture the bladder. Some people tie it and then cut it off, but I’ve found that to be more likely to leak.
Pull the intestines and bladder out of the body. Most of the stomach will also be free now. You will need to reach in and under to lift it all over the sternum. Some people cut through the sternum, but it’s easy enough just to lift the guts out. Most everything will now be hanging out of the body.
Strip away as much of the surrounding belly fat as you can to feed to the chickens. Get out the bowl for the innards you want to keep. Remove the kidneys and fat. Cut out the liver and put it into the keeper bowl along with the kidneys. Cut off the last bit of flesh that holds the stomachs to the bodies, and everything should fall into the gut bucket.
Cut out the diaphragm and remove the lungs and heart by severing the connective tissue behind them. Separate the heart from the lungs and squeeze out the blood from the heart. The heart is a keeper, while the lungs aren’t.
From the neck end, cut out the windpipe. Be sure the opening is clear all the way through the body cavity. Clean all over with cold water. (Now you see how the dirt from a pig’s back feet could get into the meat if you hadn’t cleaned them.) ).
All of our meat, except for pork, is aged, from chicken to beef, and you should do the same. Pork should only hang overnight to chill, and all meat should be cut up in a chilled state.
A goat should age one week in 40° weather, longer in colder weather. It’s a shame to butcher when it’s too warm to age the meat because it won’t be as tender as it could be. A goat is hung whole.
If you want to cut a bigger animal in half, hold the body and help guide the saw from the back while facing the belly. Use your fingertips on the blade to guide your cut.
Four parts should be cut off of a cow to make it easier to handle and to let the meat cool down as quickly as possible. Merely cut between the 2nd and 3rd ribs and be ready to hold the fore section. It should be hung for two weeks under the proper conditions.
Once you’re done with the body of the animal, it’s time to save the brains and tongue from the head. There is a soft spot in the middle of the jaw where you can cut to get to the tongue. When you have slit this open, reach in and cut the tongue loose from its mooring. Working through the mouth is much harder.
While cutting the skull in half with an axe will get the brains out, cutting it in half with a meat saw is a more elegant way to do it.
If you plan to use the rest of the head, you will have to skin it now. Remove the ears, eyes, nose and anything that doesn’t look like meat or bone. Clean thoroughly. You may want to brush the teeth. You could make goat’s head soup or you could make headcheese. The only heads I use these days are pigs.
Some people make bacon out of the jowls, but there won’t be much there if you kill the pig before it gets too fat. I use the head meat for scrapple, tamale meat and pozole. I used to use some in liverwurst, but we prefer these other dishes.
In any case, you’ll need a pot large enough to hold the head. If you use a wood stove like I do, just cover the meat with water, put the lid on, and let it cook on low heat until the meat is soft. It’s less convenient if you use some other kind of fuel.
Remove the meat and bones from the pot and separate them. Take out anything that looks strange and you’re ready to use whatever recipes you’ve decided on. Your broth should be boiled down until it’s easy to handle. You can then use it in recipes or freeze it for later use.
When you are ready to cut up your meat, refer to the section that applies to your animal. Cutting up a deer or a sheep is the same as a goat.
Butchering your own pigs can be a rewarding experience for the home farmer or processor. However an important question arises – how long should you let the pork hang before cutting it up? Proper chilling is essential for meat quality and safety so understanding the ideal hanging time is key. In this complete guide, we’ll walk through the factors that determine chill time and best practices for processing pork.
Why Hang Pork Before Butchering?
Hanging, also known as aging, serves an important purpose in the butchering process. It allows the carcass time to gradually lose its natural body heat and complete rigor mortis. This leads to more tender meat that is easier to cut.
When muscles are converted to meat, they undergo rigor mortis which causes them to stiffen. This starts around 12 hours after slaughter and can last up to 24 hours. If meat is butchered too soon, it will be tough.
Proper chilling also inhibits microbial growth leading to safer pork. Warm conditions allow bacteria to rapidly multiply, so quickly cooling meat to 40°F or below is crucial. Hanging facilitates this temperature drop before cutting and grinding.
How Long Should You Hang Pork?
The ideal hanging time for pork is 24-48 hours. Unlike beef which can age for weeks, pork does not benefit much from extended hanging times. After 48 hours, the quality may actually start to decline.
In commercial facilities, carcasses are chilled rapidly to prevent spoilage. Small processors often lack refrigeration capabilities so outdoor autumn or winter weather is best for DIY hanging.
If ambient temperatures are above 40°F, it will be difficult for pork to chill in less than 48 hours without ice or mechanical refrigeration. Hot humid days can quickly lead to meat spoilage
While personal preferences vary, most people find 24 hours provides an ideal balance of tenderness without losing freshness. For those new to the process, staying on the low end of the 24-48 hour range is recommended.
Proper Temperature for Hanging Pork
For safety and quality, pork should hang at ideal temperatures between 33-40°F. Below freezing is too cold and can damage meat texture through freeze-thaw cycles. Above 40° allows more rapid bacteria growth.
Monitor the temperature by inserting a meat thermometer deep into the ham. It may take 24 hours for the innermost sections to drop to the desired 33-35°F range after the outside has chilled.
If weather is too warm, ice or mechanical refrigeration will be needed. Have a plan for supplemental cooling in place before slaughtering if ambient temperatures will be above 40°.
Don’t attempt to cut meat that is above 40°F internally. Leaving pork to hang until it hits the proper chilling temperatures is a crucial safety step.
Tips for DIY Hanging Methods
For those butchering pigs at home, here are some DIY methods for hanging pork:
-
Hang carcasses in a barn or shed without heat/AC. Open windows or doors for airflow.
-
Build an open air frame from wood and hooks under a tree or carport roof.
-
Place a tarp over the frame if rain is expected. Avoid directly wrapping meat which reduces air circulation.
-
Elevate carcasses so they are not accessible to dogs, coyotes, etc. Hang at least 8 feet off the ground.
-
In warm weather, place bags of ice inside the abdominal cavity before hanging. Refill ice as needed.
-
Submerge carcasses in ice water in a large trough, replacing ice frequently. Rotate sides up to evenly chill.
-
If no refrigeration is available, slaughter when autumn or winter nights drop below 40°F. Avoid hot, humid periods.
Signs Pork Has Been Hung Too Long
It is possible to leave meat hanging too long, resulting in deterioration of quality. Watch for these signs that pork has been hung too long:
- Darkening color, converting from pinkish-red to darker, deeper shades of red.
-noticeable off odors described as sour, sharp, or acidic.
-Slimy or sticky areas on meat surface, indicating bacterial growth.
-Dryness on outer areas of carcass which hardens into crust.
If pork exhibits any of these traits, it should no longer be considered fresh. Trim any diseased parts and cook the salvageable meat immediately to 165°F. Curing is also an option to preserve overly aged pork.
Butchering Tips After Proper Hanging
Once chilled to 33-40°F, you’re ready to begin butchering! Follow these tips for the cutting process:
-
Use a clean chainsaw, hand saw, or reciprocating saw to split the carcass in half lengthwise.
-
Clean tools between each carcass to avoid cross contamination.
-
Chill equipment by placing in the freezer for 30 minutes prior to use.
-
Cut loins, chops, ribs and tenderloin first since they are quick to spoil.
-
Leave whole bone-in hind legs, shoulders, and bellies intact for longer storage life.
-
Grind trimmings right away instead of storing them before use.
-
Vacuum seal all cuts, marking contents and date on package.
-
Use cured cuts within 3-6 weeks. Freeze fresh pork lasting over 2 weeks.
Following proper hanging times and butchering methods allows you to enjoy the highest quality pork from pigs you raised yourself! Let us know if you have any other questions.
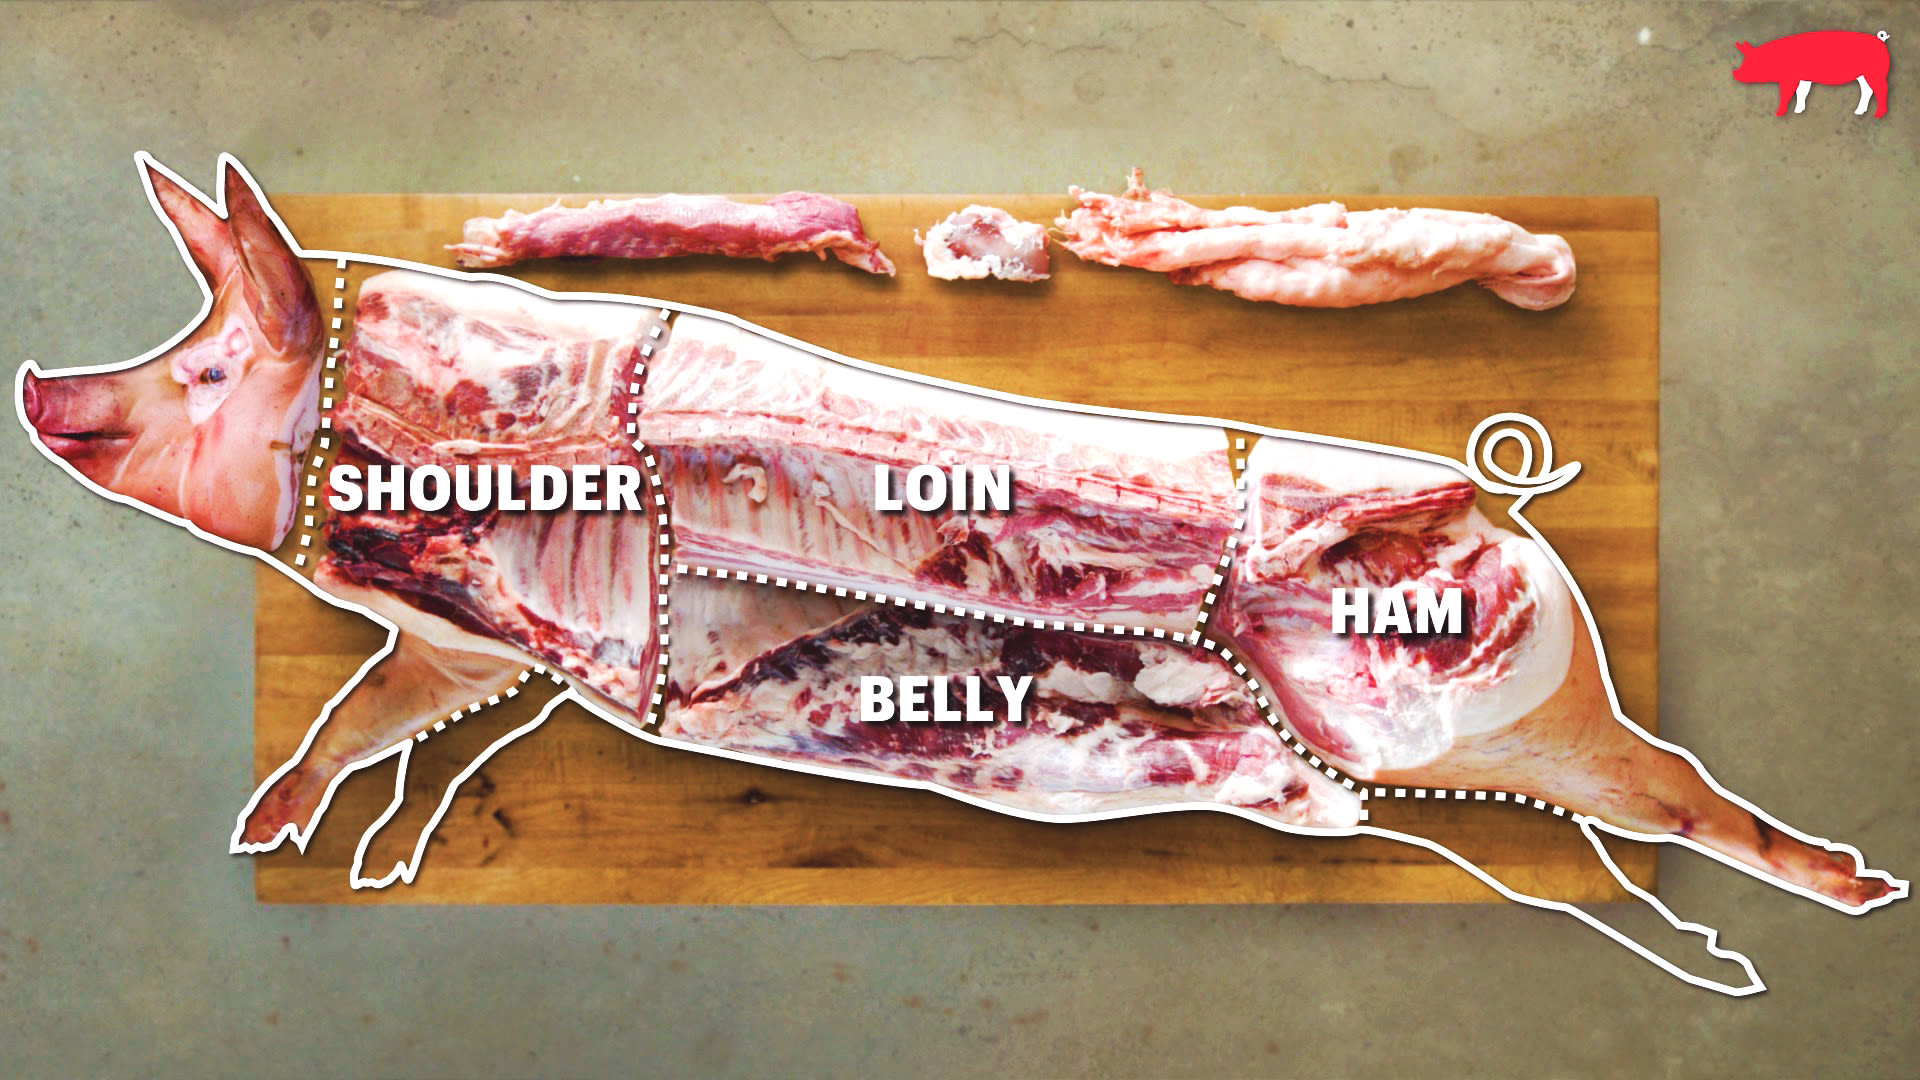
Cutting up a pig
There are many ways to cut up a pig and many ways to cure meat. I’m going to tell you how I do it and why I use this method. If you’re doing your own curing, you have the vagaries of weather to contend with. Below freezing and it doesn’t cure. Fifty degrees and it spoils.
In my first experiments I used an old fashioned cure. It was very salty. The hams and bacon hung in a cool room all year and didn’t spoil. If you don’t have a freezer, you could do that.
You can use a dry cure or a brine cure. In the brine cure, the strength of the brine is determined by the amount of meat. Theoretically it can’t get too salty that way, and I have found that to be true.
If you cut the meat when it’s 40°, it could go bad around the bone if it warms up to 50°, freezes for a while, and then warms up to 50° again. By the time it’s in the warm smokehouse, you’ve really got trouble. For this reason I bone the hams. I have never had a problem since I began doing this. Also it makes the ham nice to cut when it’s rolled and tied.
 Figure 9. Separating the ribs from the chops. Figure 9. Separating the ribs from the chops. |
Your pig should have hung overnight so that the meat is firm. Now you will want to cut your side of pork into thirds. This is done by cutting the backbone straight down through the aitch bone with a meat saw. This will separate the rear ham from the body. (Blue tape, Figure 7. ) The cut should go right through the ball and socket joint. Remove the foot.
In order to separate the front third, cut between the second and third ribs, going straight down from the core. (Blue tape, Figure 8. ) Look carefully at the muscle bundles and try to keep them intact.
Take the middle section and make another cut after the 11th rib. Then cut across the ribs parallel to the backbone to separate the ribs from the chops. (Blue tape, Figure 9. ) Look at both ends of the meat to see where to cut. Remove the belly fat and save it for sausage and lard.
Saw through the backbone for chops and finish your cuts with a knife. It’s helpful to have a partner to hold it steady. Trim off the extra fat but as always, leave some.
Now trim out the loin. Feel the bone with your fingers and just cut out the muscle bundle as well as you can. This is your best roast. Cut it into whatever size you want (Figure 10).
 Figure 10. Rolled poark roasts and the bone they came from. Figure 10. Rolled poark roasts and the bone they came from. |
Trim the excess fat from the ribs. Choose whether you want ribs with a lot of meat or bacon with most of the meat cut off. Cut the bacon from the ribs (Figure 11). Cut the ribs into easily packaged pieces, but leave the bacon whole until after smoking (Figure 12).
You need to decide how big or small you want your hams to be and how much meat you want for sausage, stir fry, etc. before you cut them. Cutting hams and roasts takes some practice, but don’t worry too much. They can always be trimmed to look nice and nothing is wasted. It can always go into the sausage bucket.
Begin two piles of trimmings. One will be for sausage and the other will be better pieces for stir fry. Take the front third and cut off the hock. You could turn this into a shoulder roast, but the meat is not as good quality or as low in fat as the rear. It could also be used for sausage or stir fry.
When you roast the meat, look at the muscle bundles and try to keep them together as much as possible. To bone, cut as close as you can to the bone and all the way around it. Then, cut along the backbone to the third rib. Cut off the front muscle bundle and put it into the sausage bucket. Roll it up as it would be with the bone in and trim it to look nice. Trim off excess fat.
Take the rear third and decide how much hock you want and cut that off. Bone out the rear hams and trim off excess fat. This is tedious, so just take your time. Make your cut in to the bone and cut it out as well as possible. Trim end for looks (Figure 13).
 Figure 11. The bacon separated from the ribs. Figure 11. The bacon separated from the ribs. |
Put your bacon, hams and hocks into the curing bucket. Be sure to save enough fat for sausage and lard, and you’re finished with this part.
Cutting up a goat
Cut behind the shoulder blades to remove the front legs. Cut off leg at elbow. These lower legs can be soup bones, but they’re not much good for anything else. You can package the shoulder as is, or you can remove the bones, roll it up, and tie it up to make a rolled roast. You could also cut it up for stew meat. Take as much meat from the neck as you can. Use that for soup.
You could cut chops if you wanted. You would have to saw through the backbone between every rib to do that. You could bone out the chops to avoid all the sawing. Or you could just cut out the whole muscle bundle along the backbone. It’s called the backscrap and is the best meat on the animal (that’s what I do).
 Figure 8. Separating the front third of a pig. Figure 8. Separating the front third of a pig. |
Next take your meat saw and cut the ribs from the backbone. Then cut them in half with your knife for easy packaging. Underneath the backbone is the tenderloin. Cut that out.
Now for the rear third. Cut off the foot. Next cut off the leg at the knee. These are your shanks. Separate the legs at the pelvis. These are the only roasts I keep from a goat. I use the front shoulders for stew or stir fry. You can package the leg as it is or bone it. One-bone roasts take up less room, and they’re easy to cut once they’re done.
All that’s left is to go through all the bones and get any last bits of meat for your sausage bucket. I save one goat just for sausage and one for jerky. You may want to do that, or you may have other favorite uses. Goat meat (or chevon as it’s called) is really wonderful when it’s properly handled.
BUTCHER EXPLAINS AGING MEAT VS ROTTEN MEAT – How Do You Age Meat Safely?
FAQ
How long should you let a pig hang before you butcher it?
How long to age pork before butchering?
How long does pork need to be hung?
What temperature is good for hanging pork?
How long to hang pork?
7 days to hang pork is fine. I home butcher and only age the meat for 2-3 days, but if the pigs were at a professional butcher’s they were certainly kept cold enough and a week hang time will be absolutely fine. As with most things, it looks like opinions vary on this subject. I’ll just post what I know and you all can take it from there.
How long should a pork carcass be hung?
I did a lot of tests on hang time and found that hanging the carcass for about five days to a week produced excellent pork. Older animals benefit from longer hanging up to 14 days. Additionally, vacuum packing preserves the meat better and chilling it to 27°F is the ideal storage temperature while still keeping it fresh.
Do you let meat hang for a few days?
some folks swear by letting meat hang for a while. the enzymes break down in the meat and do some tenderizing. when i can I let my deer and sheep hang for a few days. lately thats not always been possible tho seems either it warms up up here in the frozen tundra, or I dont have the cooler space to hang said meat. You will enjoy it, for sure!
How long do you hang a pig?
Some butchers chill it as recommended and then cut. This is a big improvement but not good enough. We slaughter pigs every week year round. I did a lot of tests on hang time and found that hanging the carcass for about five days to a week produced excellent pork. Older animals benefit from longer hanging up to 14 days.