Making your own beef jerky is incredibly satisfying, and even more so when you can create it using only natural ingredients found in the wild. With minimal equipment, simple seasoning, and basic meat preservation techniques, you can make mouthwatering jerky to provide vital protein when living off the land.
In this article, I’ll share my step-by-step method for making beef jerky in the wilderness using wild-harvested ingredients. You’ll learn how to build a natural smoker, properly slice and season meat, control your smoking temperature, and test doneness. I’ll also provide tips for ensuring food safety when making jerky without modern conveniences. Follow my guide to become a backcountry beef jerky master!
Why Make Jerky in the Wild?
Jerky offers many advantages for survival situations:
-
Provides essential protein from meat without refrigeration
-
Lightweight compact and non-perishable for bug-out bags
-
No cooking fuel needed after initial smoking
-
Can utilize wild game or store-bought meat
-
Delicious high-calorie snack to boost energy
-
Lasts for months if kept dry
With minimal equipment, you can make jerky from foraged or hunted meat to create a long-lasting protein source packed with flavor.
Choosing the Best Meat for Jerky
For ideal homemade jerky texture and flavor:
-
Use lean beef cuts like flank, round or sirloin tip steak.
-
Trim off excess fat and silverskin for best results.
-
Partially freezing meat makes slicing easier.
-
Game meat like venison, elk, moose or caribou also works beautifully.
While you can use chicken, turkey, fish or other meats, beef produces the most authentic jerky texture and robust flavor. For food safety, always use the freshest meat possible.
Creating Your Wilderness Jerky Smoker
You’ll need to build a primitive smoker to properly preserve your jerky. Here’s how:
-
Construct a tripod from green hardwood branches.
-
Lash together a grill from branches using natural cordage.
-
Position grill about 3 feet over a smoldering fire or coals.
-
Cover smoker with green leaves or boughs to contain smoke.
Controlling the temperature by managing your fire is crucial for making delicious jerky without overdrying or undercooking it. Monitoring the smoking conditions vigilantly is key.
Prepping and Slicing the Meat
Proper slicing technique ensures your jerky dries effectively:
-
Partially freeze meat for easier slicing.
-
Use a sharp knife to slice meat very thinly, between 1/8 to 1/4 inch thickness.
-
Slice with the grain for a pleasantly chewy texture.
-
Cut long, uniform slices to expose maximum surface area for efficient moisture removal.
Take your time slicing the meat neatly for the highest quality homemade jerky.
Flavoring Your Jerky to Perfection
To infuse bold flavor without electricity:
-
Make a simple dry rub with salt, pepper and wild herbs.
-
Ground sumac, juniper, rosemary or sage make great additions.
-
Optionally marinate strips in vinegar-based liquid seasoning for 1-2 hours.
-
Pat off excess marinade and allow meat to form tacky outer layer or “pellicle” before smoking.
With a basic homemade spice blend, you can impart incredible flavor into your jerky without access to commercial seasonings.
Monitoring Your Jerky As It Smokes
Maintaining ideal low-heat smoking conditions is vital:
-
Keep temperature between 100-140°F for food safety.
-
Add minimal fuel to avoid spikes in heat.
-
Position fresh fuel to ignite slowly before adding fully to fire.
-
Rotate strips and racks periodically for even drying.
-
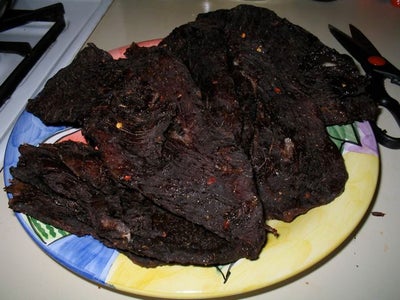
Smoke until jerky is dry but still pliable, about 8-48 hours.
By carefully managing your primitive smoker, you can achieve perfect results. Patience is required!
Testing Jerky Doneness
When is jerky ready to enjoy?
-
Meat should be stiff but still flexible without cracks.
-
No moisture should seep out when squeezed.
-
Color will deepen and texture will dry and roughen.
-
Cut a piece in half – check for dried interior with no glossiness.
It’s easy to confirm doneness with a simple bend or cut test. Your patience will be rewarded!
Storing Your Jerky to Enjoy Anytime
Properly stored, homemade jerky can last for months:
-
Allow jerky to fully cool before packaging.
-
Use zip-top bags or airtight containers if available.
-
Otherwise, wrap tightly in cloth or paper and store in cool, dark location.
-
Check periodically and discard if mold develops.
With minimal storage methods, you can keep enjoying your homemade jerky for weeks on the trail or in camp.
Enjoying Delicious Homemade Jerky in the Wild
With basic tools and ingredients, you can create amazing beef jerky completely from scratch:
-
Construct a sturdy wilderness smoker from foraged materials.
-
Prepare meat by removing fat and slicing thinly.
-
Season strips with a simple dry rub full of wild flavors.
-
Smoke meat low and slow while diligently managing your fire.
-
Dry until perfectly chewy, then cool, and store properly.
Now you have the knowledge to make mouthwatering beef jerky during your next backcountry trip using wildcrafting skills. You’ll enjoy nourishing protein packed with smoky flavor wherever your adventures take you.
/how-to-make-beef-jerky-4775124-hero-01-1-7bf42ab1525849738c55bb02c436f5cc.jpg)
Step 1: The Meat
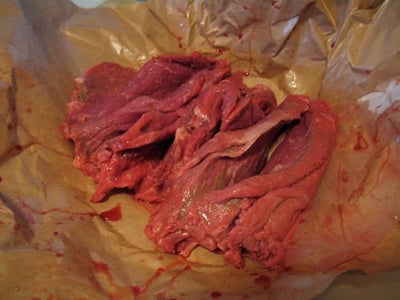
First and foremost is the choice of the meat used. Go to your butcher and ask for the leanest hunk of beef they have. Unlike looking for a great steak, were looking for the least fat / ribboning possible. This will normally take the form of a rump roast, london broil or a brisket. You could also use venison, lamb (mutton?), buffalo (yes, it’s legal to buy in some parts of the country), or any other game meat. I would avoid pork. Pork is much more suitable for sausages. If you heat the process of dehydration to 160°F (71°C) or cook the jerky in the oven for at least 30 minutes at 160°F (71°C), you can use turkey or chicken. Any wild game should be frozen below -16°C for about 6 weeks to make sure that any diseases the animal may have had are gone. Fish? Sure. Why not. But Id change the marinade quite a bit. Last week, the local grocery had sirloin steak on sale. It fell under the above qualifications. Most of it would be eaten by the dogs, so it wasn’t worth grilling. But the one I bought made great jerky. This week, I went to purchase some more. Unfortunately, that ultra-tough sirloin wasnt available. This time they had a wonderful boneless rump roast, almost devoid of ribboning or fat. I told the butcher I was making jerky and he agreed that it was perfect for that. He even offered to cut it for me! Every other butcher I’ve been to has told me the slicer wouldn’t cut that thin! It’s nice to meet a butcher who shares your views every once in a while. If the butcher won’t or can’t cut the meat for you, freeze it until you can barely see through it when you press on it. You want it firm, but not solid. Then using a good serrated knife or electric knife, slice it against the grain as thin as practical. I try for about 1/8th inch. If you use a serrated knife, you might want to cut the first piece of meat in half and freeze the other half until you’re ready to use it. This will avoid it thawing to much before you get to it.
Introduction: Old West Beef Jerky
This instructable is going to show you a way of making great jerky. Nothing really new, unless you consider my marinade new. It’s my own recipe, but I’ve seen a lot of others that are very similar to it on the web. Yes; I realize there are other Jerky Instructables already. What’s different about this one? It will show you how to do it right and safely. Youre free (and expected) to deviate to some degree. I do strongly recommend that you stick with the safety precautions and temperatures. I made this jerky in the summer sun of Las Vegas by hanging the meat on a clothesline. For this to work, the temperature needs to be over 90°F (30°C) at sunrise and over 130°F (55°C) during the day. Basically a day thats too hot for the flies to come out. This process can only be done in certain parts of the country and on certain days because it takes 8 to 12 hours in the 100° sun. I will make comments about this process throughout the Instructable. For my birthday, last week, my wife gave me a great commercial dehydrator. It’s possible for me to make another Alton Brown jig, but the dehydrator is better because it heats the meat to 160° (71°C), which kills any bacteria and makes cleanup a lot easier. It also works anywhere in the world, at any time of the year. This is still home-made jerky. Its not important how the drying is done as long as its done correctly and safely. What matters is how you prepare the meat—getting rid of the bugs and drying it enough so you can enjoy the best jerky you’ve ever had.
Survival Instructor Teaches How to Preserve Meat in Wilderness: Survival Food Rations
How to make a good beef jerky?
To make a good beef jerky, use extremely lean cuts of beef and trim off any large pieces of fat. Recommended cuts include: Freeze the meat for a few hours before slicing to help keep the shape and ensure uniform thin slices. Chili flakes and cayenne pepper are optional spices to add.
How do you make ground meat jerky?
If you don’t have large premium cuts of meat to trim down, you can make ground-meat jerky. Remove all the silver skin and fat from the meat, and run it through a meat grinder through the smallest grinder plate as if you’re making burger—twice.
What kind of meat should I use for jerky?
We suggest beef, but you can use any meat. Pork, or any meat that may contain trichinae, should be heated until the internal temperature is at least 160°F (71°C). Choose lean meat, such as beef bottom round or top round, because fatty meat processed into jerky turns rancid quickly.
Can beef jerky be frozen?
Before slicing beef jerky, it’s recommended to freeze the meat for 1 to 2 hours to make it easier to cut. When making beef jerky, it’s important to start with a well-trimmed, lean cut of meat, as fat does not dry out and accelerates spoilage. An eye of round roast is ideal.