Dry aging beef is a technique that has been used for centuries to enhance the flavor and tenderness of meat. By controlling temperature, humidity and air flow, the natural enzymes in the beef break down connective tissues over time, resulting in a more tender and concentrated, beefy flavor. Traditionally, dry aging is done by hanging large primal cuts in temperature and humidity controlled environments. But is it possible to dry age beef at home using a dehydrator?
What is Dry Aging?
Dry aging is the process of storing beef in a temperature and humidity controlled environment for an extended period of time, typically between 2 to 4 weeks. During the dry aging process, the beef loses moisture which concentrates the flavor. The natural enzymes also break down the connective tissue which results in more tender meat.
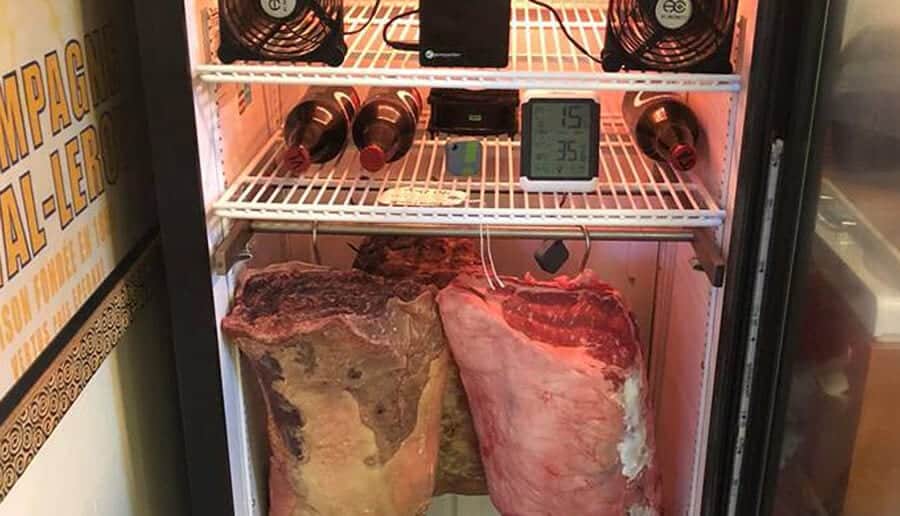
The ideal conditions for dry aging beef are temperatures between 34°F to 38°F and humidity levels between 75% to 80%. Maintaining the right temperature inhibits bacteria growth while the humidity prevents the meat from drying out completely. Special dry aging fridges are used to control these conditions but it can also be done using household appliances.
Can You Dry Age Beef in a Dehydrator?
Yes, it is possible to dry age beef in a dehydrator! While a dehydrator cannot precisely control temperature and humidity like a professional dry aging fridge, it can mimic the process by gently removing moisture from the exterior of the meat
To dry age in a dehydrator the following steps should be taken
-
Choose a well-marbled primal or subprimal cut like ribeye or sirloin. Trim off any excess fat or silver skin
-
Cut the meat into 2-3 inch sections. This allows for even drying.
-
Season the meat lightly with salt, which draws out moisture. Pat dry with paper towels.
-
Place the meat in a single layer on dehydrator racks, leaving space for airflow.
-
Set the dehydrator to 130°F. Dry for 36-48 hours.
-
Every 12 hours, rotate the meat and blot with paper towels to remove surface moisture.
-
Once dried, vacuum seal and refrigerate for 1-4 weeks to age.
-
Trim off any dried crust before cooking as desired.
The key to success is regulating temperature and frequently blotting to remove moisture. Drying time may vary based on humidity and size of cuts. Monitor closely until the exterior feels dry but the interior remains moist.
Step-by-Step Instructions
Follow these steps for properly dry aging beef in a dehydrator:
1. Select the Cut
Choose a high-quality, well-marbled primal or subprimal cut like ribeye, sirloin, or tenderloin. Avoid pre-cut steaks, as you need a large, whole piece of meat. Lean cuts like eye round are not suitable.
2. Trim the Meat
Trim off any large deposits of surface fat, silver skin or sinew. Leave a thin layer of fat to protect the meat. Excess fat can go rancid during aging.
3. Cut into Sections
Cut the meat into 2-3 inch cubes or sections. This exposes more surface area to dry evenly. Uniform sizing means pieces dry at the same rate.
4. Apply Salt
Lightly salt the meat, using around 1 tsp kosher salt per pound. Salt draws out moisture. Let sit 1 hour before dehydrating. Blot with paper towels.
5. Arrange in Dehydrator
Place meat pieces in a single layer on dehydrator racks, leaving space between for air flow. Meat should not be touching.
6. Set Temperature
Set the dehydrator to 130°F maximum. Temperature must stay below 140°F to avoid cooking the meat. Some units only go down to 145°F, so monitor closely.
7. Dry for 36-48 Hours
Dry the meat for 36-48 hours. Rotate pieces and blot with paper towels every 12 hours to remove surface moisture.
8. Check Doneness
The exterior should be dry to touch but not hardened. Interior should still be moist. Dryness depends on humidity and size of cuts.
9. Vacuum Seal
Once dried, vacuum seal the meat and refrigerate for 1-4 weeks to age. The sealed environment allows the aging process to continue.
10. Trim and Cook
After aging, trim off any dried crust or undesirable surface mold before cooking as desired. Enjoy your dry aged beef!
Dry Aging Duration
- 2-4 weeks is ideal for maximum tenderization and flavor development.
- At minimum, dry for 36-48 hours in the dehydrator followed by 1 week sealed.
- Up to 6 weeks aging can be done for very large cuts like whole prime ribs.
- Longer aging results in more moisture loss so meat yield is reduced.
Monitor aging beef closely. Excessive drying or growth of black, green or white mold means the meat should be discarded. When aged properly, the meat will develop a deeply beefy, nutty flavor.
Pros and Cons of Dry Aging in a Dehydrator
Pros:
-
Produces concentrated beef flavor and tender texture at home.
-
More feasible for small households than buying full primal cuts.
-
Dehydrator evenly dries the exterior of meat.
-
No specialized equipment required.
Cons:
-
Unable to precisely control temperature and humidity.
-
Increased risk of uneven drying or spoilage.
-
Takes 2-6 weeks, requiring patience and monitoring.
-
Must trim aged meat before cooking, reducing yield.
-
Can’t age very large cuts. Capacity limited by dehydrator size.
While dehydrators have some limitations, they can be used to successfully dry age beef at home with careful monitoring and proper technique. The concentrated flavor is worth the extra effort!
Tips for Success When Dry Aging Beef in a Dehydrator
Follow these tips to get the best results when dry aging beef in a dehydrator:
-
Invest in a dehydrator with a thermostat and fan or airflow settings. This allows better temperature control.
-
Use a thermometer to ensure the internal temperature does not exceed 140°F.
-
Trim all meat to uniform sizes so pieces dry evenly.
-
Blot meat every 12 hours and rotate racks to promote even drying.
-
Dry for the minimum 36 hours before vacuum sealing to age.
-
Keep extra trays and racks on hand to maximize capacity.
-
Do not overfill trays as air circulation is critical.
-
Sanitize the dehydrator before and after use to prevent contamination.
-
When in doubt, trim off any dried crust or odd colored mold growth.
-
Use a quality primal cut with ample marbling. Lean meat does not dry age well.
-
Record details like times, temperature and humidity to perfect the process.
How Does a Dehydrator Dry Age Beef Compared to Traditional Methods?
Dry aging beef in a tightly controlled environment is the gold standard, but using a dehydrator can produce decent results. Here is how it compares to traditional dry aging:
Flavor
-
Dry aging fridges produce very concentrated, complex flavor.
-
Dehydrators make the flavor more intense but some nuances may be lost.
Tenderness
-
Traditional methods break down connective tissue extremely well.
-
Dehydrators will tenderize meat but not to the same level.
Moisture Loss
-
Dry aging fridges keep optimal humidity so moisture loss is minimal.
-
Dehydrators pull more moisture from the meat exterior, so loss is higher.
Aging Duration
-
Commercial facilities can age beef for 60-120+ days.
-
Dehydrator aging is best kept to 2-6 weeks maximum.
Temperature Control
-
Dry aging fridges maintain optimal 34°-38°F temperature range precisely.
-
Dehydrators have more fluctuation in temperature which can allow bacteria growth.
Yield
-
Very little meat needs to be trimmed after proper dry aging.
-
Dehydrators may require removing more dried, discolored portions of meat, decreasing yield.
Food Safety
-
Dry aging fridges substantially reduce food safety risks.
-
Deviations in temperature and humidity can make dehydrator dry aging less safe. Proper monitoring is critical.
While traditional dry aging is still superior in many aspects, using a dehydrator can produce satisfying results at home. Taking the necessary precautions makes the risks manageable. With testing and fine-tuning of the process, it may even be possible to yield comparable outcomes.
Frequently Asked Questions
What cuts of beef are best for dry aging in a dehydrator?
The best cuts for dry aging in a dehydrator are well-marbled primal cuts like ribeye, strip loin, and tenderloin. Avoid pre-cut steaks. Chuck or brisket are also good options.
Can you age beef in a dehydrator and then sous vide it?
Yes, you can dehydrate age the beef and then sous vide it to break down connective tissue and cook it perfectly. The pre-aging helps tenderize while sous vide cooking keeps it moist and juicy.
How long does it take to dry age beef in a dehydrator?
Most meat cuts need 36-48 hours in the dehydrator followed by 1-4 weeks vacuum sealed for aging. Larger cuts may need up to 6 weeks total aging time.
What temperature should you set the dehydrator to dry age beef?
Ideal dehydrator temperature for dry aging beef is around 130°F. Do not exceed 140°F internal meat temperature. Monitor with a thermometer.
Is there a risk of bacteria when dry aging beef in a dehydrator?
Yes, improper temperature control can allow bacteria growth. Keep temperature below 140°F and age for the minimum time to limit risks. Discard meat that smells or looks spoiled.
The Takeaway
While dry aging beef traditionally requires precise temperature and humidity control in specialized environments, it is possible to forgo that professional equipment and still get decent dry aging results using a common household dehydrator. It takes careful monitoring and strict adherence to food safety, but with some trial and error, meat can develop enhanced flavor and tenderness. For the adventurous home cook or meat lover, dry aging beef in a dehydrator is an experiment worth trying!
What Kind Of Steak Can You Dry Age at Home?
This is pretty important. You SHOULD NOT age individually cut steaks . Technically, you CAN age steaks that have been cut into individual pieces, but it’s a huge waste of time and money, and you’d be crazy to do it. Your meat will shrink vastly in size as it loses water through the aging process. With all the trimming of the rind that needs to be done and the smaller size, you’ll only be left with a thin slice of steak.
What you SHOULD be dry aging are subprimals – or larger whole muscles. For example, a strip loin shell (bone in), or a 107/109 rib (basically a giant slab of bone in ribeye). It doesn’t matter whether it is grain or grass fed – that’s just a case of personal preference. You want to look for meat that is on the bone, not because it tastes better, but because you can cut the bone away during trimming and not lose any meat. If you keep reading, I’ll explain why you cut the bone away, rather than cook the meat on the bone.
The quality of the meat also matters. You should use Choice grade or higher meat that has at least some marbling, and you should avoid cuts that are too lean, like the Round. Lean or lower grade meat does not develop any significant intensification of flavor, because the marbling is slight. Since fat makes food taste good, not having any means you’re missing the base of flavor you need to build on.
If you want to try different cuts, like beef ribs, just remember that you WILL need to cut off any rind. For instance, dry aging might not work for a brisket because the flat might already be too thin to cut away and give up any more. CAB also found that dry-aged brisket didn’t take on any smoke flavor in their own tests. They came to the conclusion that drying briskets for BBQ wasn’t worth the time.
It may seem like a no-brainer, but since this is an attempt at a full guide, all dry aging should happen with meat that has not been wrapped or bagged, and the cuts should be put into the fridge “naked.” Leaving meat in a vacuum bag is wet aging. To learn more about the difference between Wet and Dry Aging, read this article.
Can you do it? Yes. Is it simple? Yes, and no. Is it something you can do easily without a dedicated setup? Hell no.
There’s lots of questions surrounding dry aging in the home setting, and I’m gonna answer all of them here for you. On a weekly basis, particularly leading up to the Holiday prime rib season, I was getting emails from folks who weren’t even exactly sure what dry aging was, asking if they should do it to their roasts. The potential threat of ruined meat and upset stomachs was both high and alarming, so instead of saying “no, don’t do it!”, I instead decided to write this guide. I enlisted the help of Diana Clark, a meat scientist at Certified Angus Beef®, to ensure that this guide was more than just a personal opinion on how it should be done. The do’s and don’ts within are all based on professional scientific recommendations. Also thank you to Texas Beef Council and Dr Davey Griffin from Texas A&M for extra assistance in answering the hard questions.
Dry aging is an expensive process, both in equipment required and meat investment cost. It’s not possible to do it right with a bag or plastic box, and you should be ready to cut away a lot of the finished product you worked so hard on. Now, if you’re still on board after reading all that, here’s what you need to know: